
QuickBooks lets you create custom invoices that have the look and feel you want. But the ways to personalize your invoices in QuickBooks aren’t exactly obvious.
This blog will teach you how to customize your invoices in QuickBooks, from adding a logo to changing invoice details. We’ll also go over some common issues to watch for.
Let’s get started!
What are custom QuickBooks invoice templates?
Custom QuickBooks invoice templates are personalized designs you can use for your invoices in QuickBooks. You can use QuickBooks’ pre-designed invoice templates or create your own.
These templates let you tailor invoice elements like:
- Layout.
- Logos.
- Fonts.
- Colors.
Some of the main benefits of learning how to customize invoice in QuickBooks include:
- Presenting professional and consistent documents.
- Staying consistent with your brand identity.
- Promoting clarity and readability for your customers.
- Ensuring all essential financial information is included.
Changing your invoice template layout in QuickBooks
The first thing to do when learning how to customize invoice in QuickBooks is change the template layout.
By clicking “Layout Designer”, you’ll find plenty of options to design and personalize your custom QuickBooks invoice template.
When the “Layout Designer” page opens, you’ll notice soft green boxes — these represent where a printed envelope would fit. This feature is essential if you’re mailing windowed envelopes, as it ensures a proper fit.
You can also rearrange other invoice components to create a unique layout.
Here are some examples of components you can shift around to tailor your invoices:
- Text boxes.
- Payment terms.
- Item descriptions.
- Images.
Next, let’s learn how to customize invoice in QuickBooks!
How to customize invoice in QuickBooks
Based on our observations, learning how to customize invoice in QuickBooks enhances your branding and makes documents clearer for your clients.
Here’s a step-by-step tutorial with written instructions below for reference:
Step 1: Launch QuickBooks and open your company file.
Step 2: Navigate to the “Customers” menu from the top menu bar and choose “Create Invoices.”
Step 3: Click on the “Formatting” tab at the top of the “Create Invoices” window.
Step 4: From the drop-down menu, select “Manage Templates.”
Step 5: Click on the template you want to modify and click “OK.”
Step 6: The “Basic Customization” window will appear after choosing a template. Here you can change the visual elements of your invoice.
Step 7: For advanced options, click “Additional Customization.” This lets you tailor the header, columns, footer, and more on your custom QuickBooks invoice template.
Step 8: Preview your customizations. If you’re satisfied, click “OK” to save the changes.
From now on, when you create an invoice, you can select your customized template from the template drop-down menu at the top of the invoice screen.
Common issues to watch out for
Now that you’ve learned how to customize invoice in QuickBooks, you’re ready to add some personal touches. That said, over time, we found that here are some common issues you should be wary of:
Alignment and spacing: Uneven spacing or alignment makes invoices look messy. Ensure that all elements in your invoice are properly aligned.
Inconsistent branding: Your invoice should reflect your brand. Be consistent with logos, colors, and fonts in all your documents.
Color choices: While it’s good to have colors that match your brand, using too many or overly bright colors can distract from the content. It’s best to stick to a simple color scheme.
Legal requirements: Depending on your location, you may have to include legally required information on your custom QuickBooks invoice templates. Be sure to check your local laws.
Printing issues: What looks good on a screen doesn’t always translate well to paper. Always do a print preview and, if possible, a test print.
Saving changes: Forgetting to save your changes is a common issue. After customizing, always click “OK” to save your custom QuickBooks invoice templates.
How to add logo to QuickBooks invoice
Our findings show that adding your company logo is one of the best ways to incorporate branding into your invoices.
Here are the steps to do it:
Step 1: Go to the “Customers” menu and click “Create Invoices.” Then navigate to the “Formatting” tab and select “Manage Templates.” Select the one you want to modify from the available templates.
Step 2: In the Basic Customization window, tick the checkbox labeled “Use logo.” A window will appear where you can upload your logo. Click “Select Logo” and browse your computer for the appropriate file.
Step 3: QuickBooks automatically resizes your logo to fit, but you can manually adjust its size and placement if needed.
Repositioning and resizing your logo
You can reposition and resize your logo by clicking and dragging it.
You can also use the sizing handles around the logo to adjust its dimensions. Make sure it aligns with the other elements of your invoice.
Can I add additional business information to accompany my logo?
We have found from using this product that you can accompany your logo with important business information.
In the “Basic Customization” window, there are options to include your company’s name, address, phone number, and more.
You can position these details around or below the logo as you like for a polished look.
How to change your company name on a QuickBooks invoice
Through our practical knowledge, if your company undergoes a name change, it’s crucial to update this information in your software as soon as possible.
To update your company name in QuickBooks:
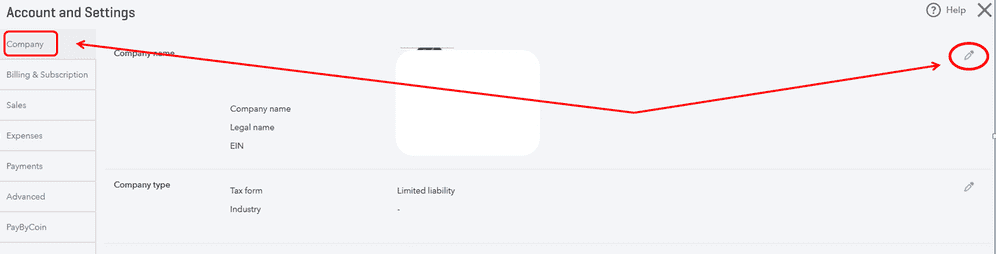
Step 1: In your settings (gear icon), choose “Account and settings.”
Step 2: Select “Company”, then “✎ Edit” in the “Company name” section.
Step 3: If your company’s legal name is the same as the company name you inputted, select the “Same as company name” checkbox. Otherwise, enter the legal name in the “Legal name” field.
Step 4: Click “Save” and “Done” to save your changes.
Enhance your custom QuickBooks invoice templates with Method
Method is the perfect solution for personalizing your invoices. The software boasts a powerful two-way sync with QuickBooks and key features like:
- Customer portals that let customers view and manage their invoices independently.
- Drag-and-drop customization to tailor your documents.
- Custom fields to add specific details to your invoices.
QuickBooks gets you started. See how Method helps you grow.
Image credit: Mikebita via Adobe Stock