


Intuit QuickBooks is a powerful tool for accounting, bookkeeping, and billing — but it can be rigid and confusing. That said, maintaining current information on your QuickBooks invoices is crucial for accurate record-keeping and business operations.
In this article, you’ll uncover a comprehensive list of steps to update your address information on QuickBooks invoices. Following these steps help businesses stay credible and compliant with legal requirements.
By the end, you’ll:
- Know how to access and modify your address settings in QuickBooks Online.
- Ensure that all your invoices reflect your current business address.
- Maintain consistency in your business documents.
- Enhance your professional image.
Let’s dive in!
Importance of updating your address on QuickBooks invoice
Before learning how to change address on QuickBooks invoice templates, it’s crucial to know why you might want to.
Updating your address on QuickBooks invoices can significantly enhance your business’ credibility and legal standing.
A current address ensures that your invoices are not only legally compliant but also maintains the professionalism of your business communications. It reflects attention to detail and helps in building trust and ensuring a positive experience for your customers and suppliers.
With the right name and address on your invoices, you avoid:
- Risk of miscommunication with customers and suppliers.
- Potential legal issues due to outdated business information.
- Lost payments for your products or services.
- Loss of credibility and professionalism in the case that outdated information is communicated.
How to change address on QuickBooks invoice
This section provides a step-by-step guide designed to assist QuickBooks users of all skill levels in updating their address information within the software. Note that for all QuickBooks versions, address changes must be accessed through the dashboard or settings menu.
Step 1: Logging into the QuickBooks account
- Open your web browser and navigate to the QuickBooks login page.
- Enter your user credentials in the designated fields.
- Click on the login button to access your account.
Step 2: Heading to the company settings
- Once logged in, locate the “Settings” icon in the upper right corner of the dashboard.
- Depending on your QuickBooks version, click on “Account and settings” or “Company Settings” from the drop-down menu.

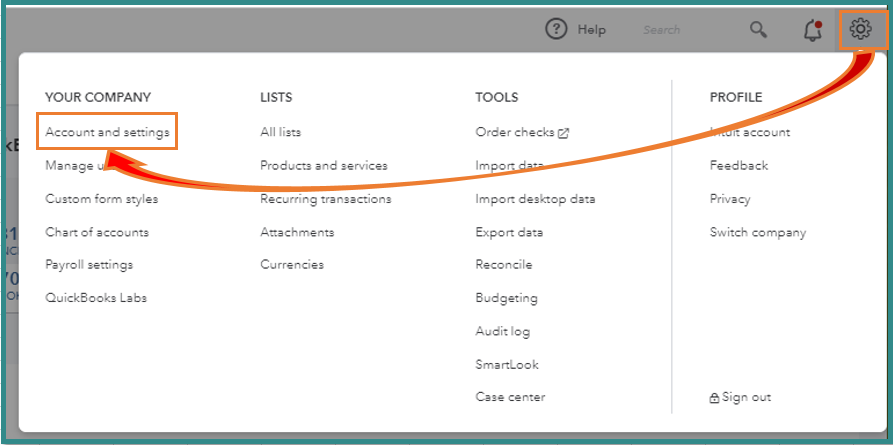
Image credit: QuickBooks
- Difficulty in locating the “Settings” menu can be common. You can use the in-product search results via the magnifying glass icon to help you navigate the platform.
- If you’re using QuickBooks Desktop or Self-Employed, you instead need to change your address through the “Invoices” menu, where you can select “Edit work info.”
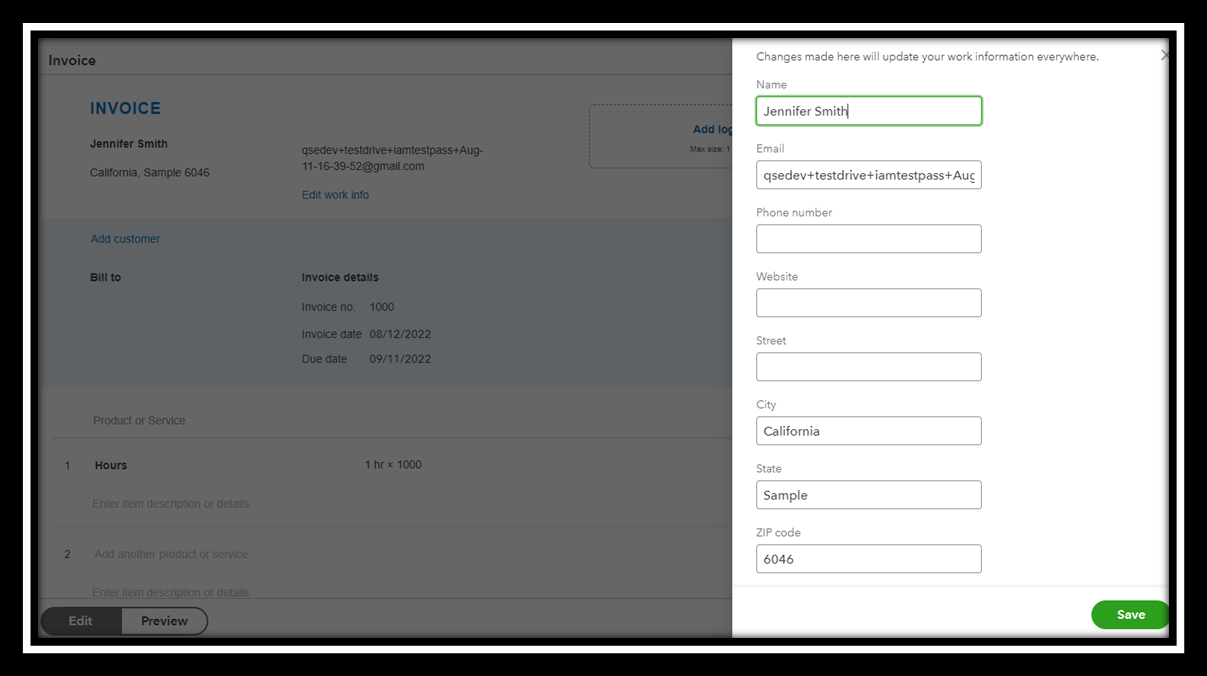


Image credit: QuickBooks
Double-checking the address for accuracy is crucial before proceeding to ensure all your communications reflect the correct information.
Step 4: Saving changes to the address
- After confirming the details, click the “Save” button to apply the changes.
- QuickBooks may notify you in a new window to confirm the update was successful.
Saving your changes is vital to prevent losing any updated information and ensure your new address is reflected on all future invoices.

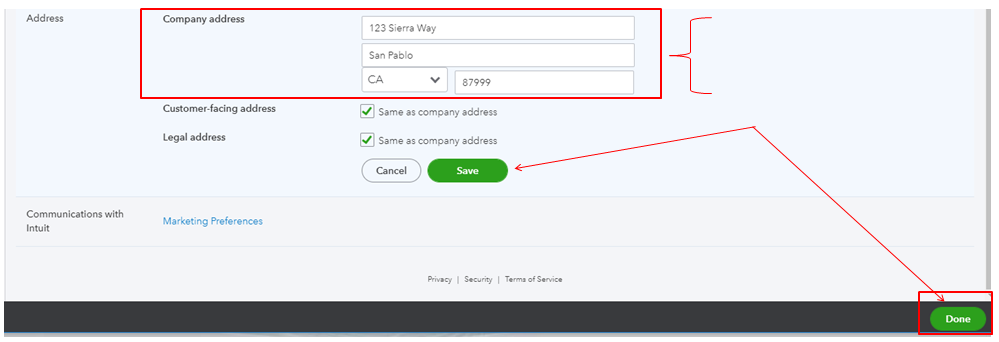
Image credit: QuickBooks
Changing address on QuickBooks invoice
This section will delve deeper into additional suggestions to validate that every QuickBooks invoice matches your updated address.
Make sure your address is consistent across all platforms
Maintaining a consistent address across all business platforms and documents is crucial. It ensures uniformity and professionalism in all business communications and legal documents. While QuickBooks may prompt for review to ensure all details are correct, manual checks never hurt.
Ensure the right address before you save changes
It’s always best to take a “measure twice, cut once” approach. Your invoice needs the new address details to be entered accurately in order for you to get paid. So, your address should be validated for correctness before saving.
Make sure you:
- Always verify the accuracy of the address with a secondary check.
- Compare the new address against official documents to confirm its correctness.
- Double-check the address on each invoice/transaction that goes through.
Update new address on all documents and invoices
QuickBooks might update related customer records automatically when you change your address, but you should still make sure all your existing documents are accurate.
- Navigate back to the “Sales” menu and select “Invoices.”
- For each existing invoice, select the “Edit” option.
- Update the address on each invoice individually.
- Save changes to ensure all invoices are updated.
Not able to change address? Here’s what to do
If you encounter difficulties in changing your address in QuickBooks, do not worry. There are several steps you can take to resolve this issue.
Checking all the permissions
Ensure you have administrative access to change address information. You can check user permissions under “Account Settings” to confirm your access level.
Going through the subscription plan
Different QuickBooks subscription plans may offer different levels of access to settings, account preferences, and information. Verify your subscription level to understand your capabilities and all available features within the system.
Reaching out to QuickBooks customer support
If you’re still stuck, you can get additional QuickBooks support:
- Visit the QuickBooks support website.
- Use the “Contact Us” option to get direct assistance.
- While you wait for a reply, check community forums, user comments, and tutorial videos for advice and solutions.
Key takeaways
Understanding how to update your address on QuickBooks is essential for maintaining business efficiency and credibility.
Remember that:
- Ensuring that the address is consistent across all platforms helps in preserving a professional image.
- Knowing what to do if you encounter problems can save time and avoid unnecessary stress.
- QuickBooks offers accessible support options to help you ensure all your information is accurate and up to date.
All in all, learning how to change address on QuickBooks invoice templates helps you drive informational accuracy and improve non-payment rates.
How to change address on QuickBooks invoice: Frequently asked questions (FAQs)
Can you change invoice details?
Yes, QuickBooks allows users to change details on invoices, including addresses, to ensure that all information remains up-to-date and accurate. With the right add-on, you can also customize the appearance of your invoices with templates that include your company branding and logo.
Can I edit an invoice after sending?
It is possible to edit an invoice after sending, provided that it has not been finalized or paid. QuickBooks offers flexibility to correct any mistakes before final processing.
How do I correct an incorrect invoice?
To correct an incorrect invoice in QuickBooks:
- Access the invoice you need to correct through the “Sales Forms” menu.
- Select the invoice and click “Edit.”
- Make the necessary corrections in the “Invoice Details” section.
- Save the changes to update the invoice accordingly.
See how Method keeps your invoices professional and accurate.