


Closing your books in QuickBooks might sound a little tedious (maybe even a little boring), but it’s one of the most important ways to protect your business.
When you close your books, you lock down your financial reports, keeping them safe and correct for the next big financial milestone.
And yes, this process keeps your accounts error-free, meaning when tax time rolls around, there won’t be a mad scramble to reconcile.
Let’s walk through how to close books in QuickBooks Online with some detailed steps, learn why it matters, and understand how to do it right.
What does it mean to close books in QuickBooks Online?
In QuickBooks Online, closing your books means finalizing your journal entries and locking in your company file for a specific period (usually a fiscal year).
Once you close your books, no one (even the company admin) can access and edit any past transactions without unlocking them first.
Why is this so important? Because once you close your books, all the information within your financial reports stays the same and doesn’t get adjusted or changed.
Put it this way: if someone were to get in and make even a small tweak to last year’s numbers, your taxes will get messed up and you’ll have to spend time balancing the books again.
Doesn’t sound like a good use of a Sunday afternoon, right? Well, that’s precisely the kind of problem closing the books can prevent.
When you should close your books in QuickBooks Online
At the bare minimum, you should aim to close your books annually to keep your records accurate. For the best results, close your books every month.
Monthly book closing means your bookkeeping stays up to date and ensures you’re more than prepared for tax season and even the dreaded audit if it comes your way. It also means that you’re being diligent and running accurate reports on your company’s financial health, making it easier to catch errors early.
Best of all, your accountants will absolutely thank you for it.
How to close your year-end books in QuickBooks Online
Now, let’s get into the step-by-step process of closing your books in QuickBooks Online. These detailed steps will make sure everything is locked down and accurate before the start of the new fiscal year.
Step 1: Confirm the first month of your financial year
Begin by confirming the first month of your financial year. You must confirm this because QuickBooks uses this month to adjust your company file.
- Go to the gear icon (settings) and then select “Accounts and Settings.”
- Under the Advanced tab, click the pencil icon next to “Accounting.”
- Choose the correct month from the drop-down menu labeled “First month of fiscal year.”
- Click “Save.”
- Click “Done.”


Image credit: QuickBooks
Step 2: Review your accounts
Before closing your books, you need to make sure all of your accounts are in order. This will include entering anything missing, like invoices, expenses, or payments.
- Check all journal entries and make sure no adjustments are needed.
- Review your expense accounts to make sure that everything is categorized correctly.
- Don’t forget to check for any balances that are outstanding in reports.
Step 3: Reconcile bank accounts, credit cards, and petty cash
Next, you will need to make sure that all your financial accounts are fully reconciled. This includes bank accounts, credit cards, and petty cash.
Use the reconciliation tool included with QuickBooks online to check that all transactions match up. Watch the video below to see how, or simply follow the steps underneath.
- Go to the account menu and select “Reconcile.”
- Use the calendar to select your closing date and review all transactions.
- Make sure your accounts are completely balanced before going any further.
Step 4: Close your books
Once you have followed the steps above and are confident your account is in good shape, you’re ready to officially close your books.
- Go to the gear icon (settings) and select “Account and Settings.”
- Under the “Advanced” tab, click the pencil icon next to “Close the books.”

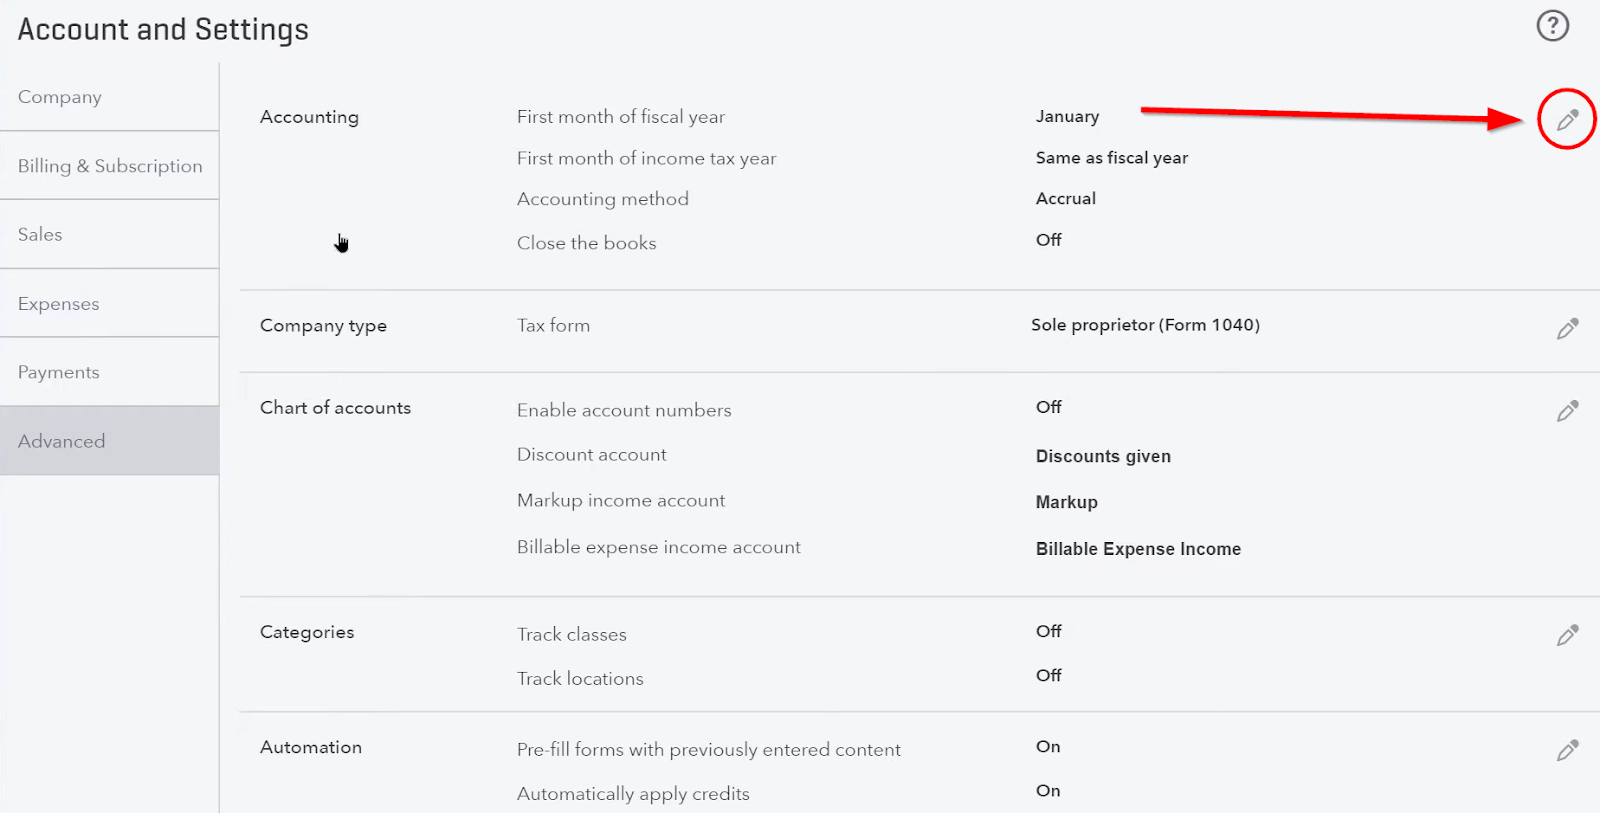
Image: QuickBooks
- Tick the “Close the books” checkbox.

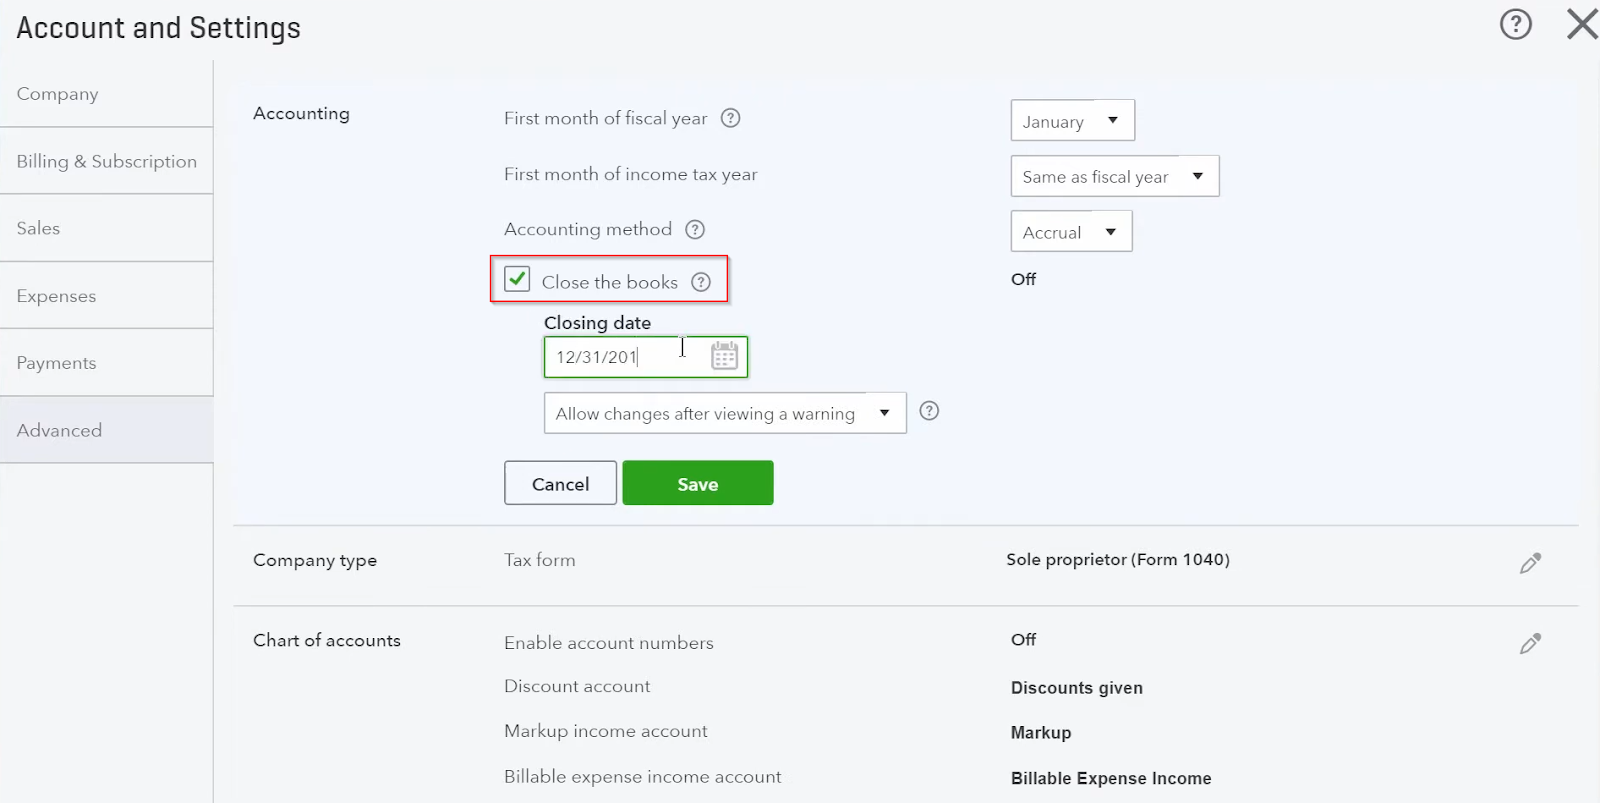
Image: QuickBooks
- Set a closing date password to prevent any unwanted and future changes by entering a new password in the “Password” and “Confirm Password” fields.

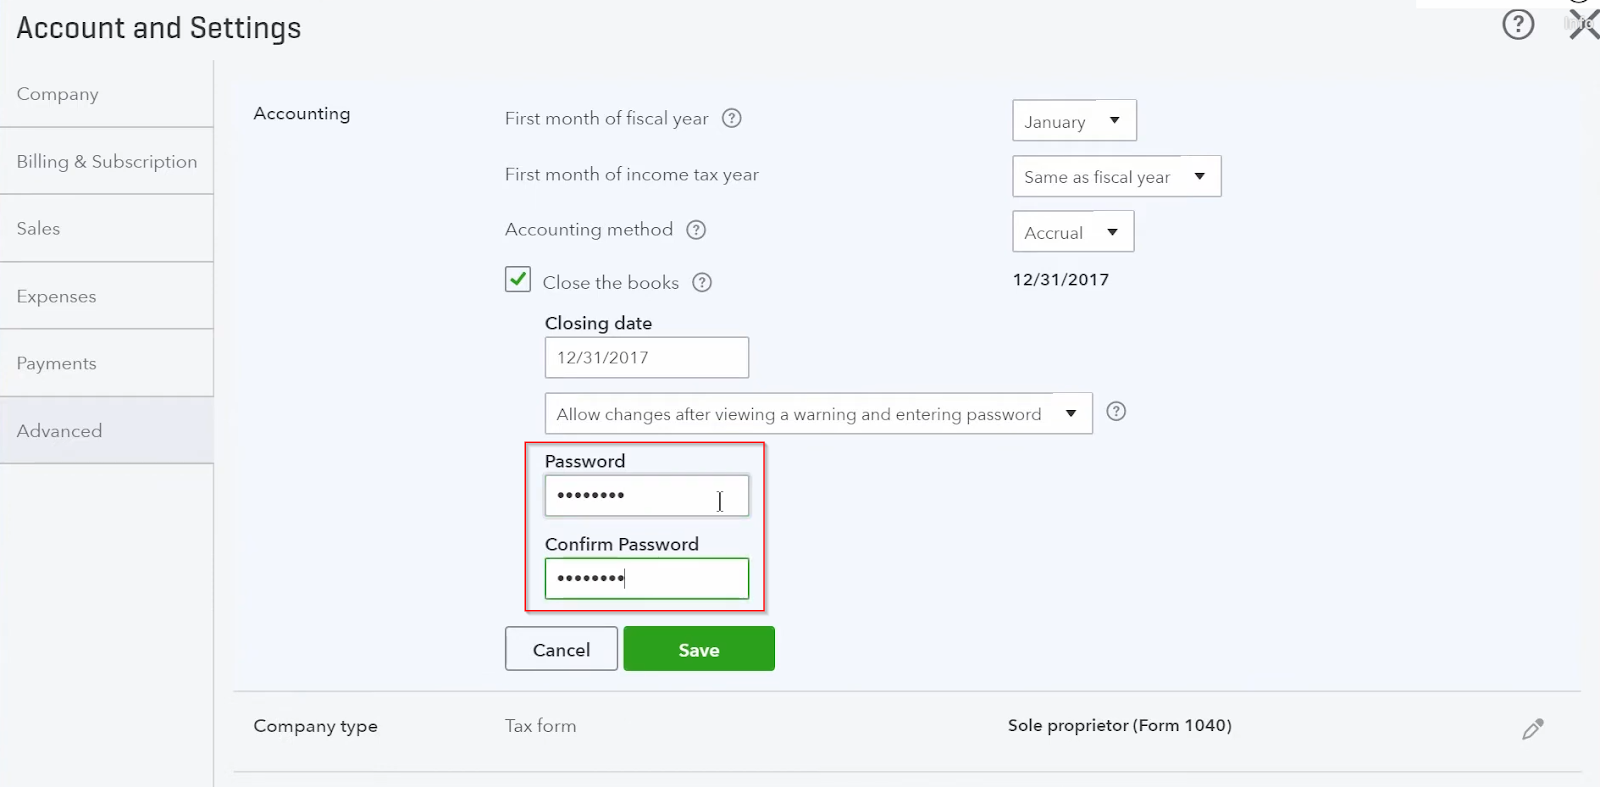
Image: QuickBooks
- Click “Save.”
Step 5: Review your closed books
The final step is to review your closed books and make sure everything is in order. At this point, you can run a “Profit and Loss Report” and compare it to your balance sheet to ensure that everything checks out.
- Go to the “Reports” menu and run a “Profit and Loss Report.”
- Make sure to choose the right accounting method: “Cash” or “Accrual.”
- Compare this with your balance sheet and carefully make sure everything matches.
- If you spot any error, you should bring it up with your accountant(s).

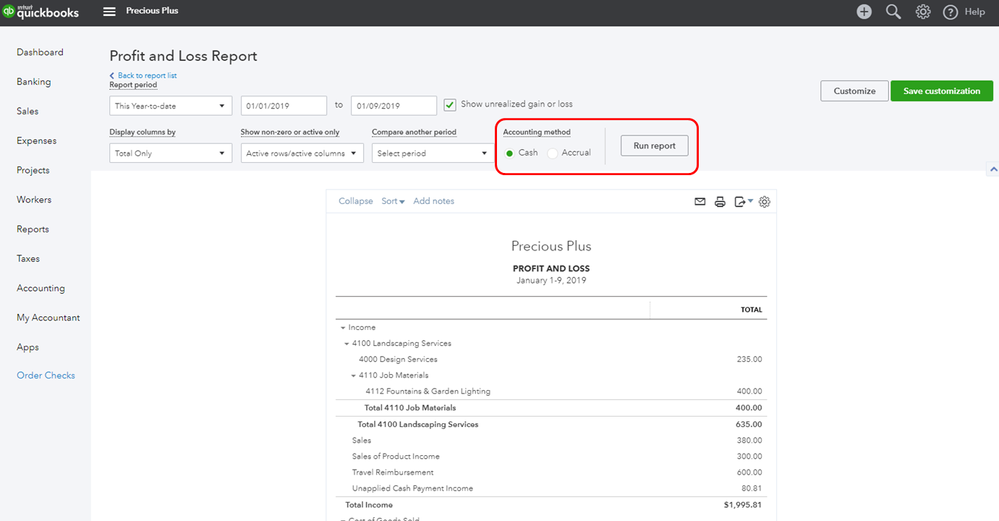
Image credit: QuickBooks
Year-end adjustments QuickBooks makes automatically
QuickBooks Online is quite helpful at year-end as it automates several adjustments, making your job a little bit easier.
It automatically transfers your net income to the “Retained Earnings” account on your balance sheet. This handy little adjustment means that your company file will reflect accurate data for the next fiscal year.
Just something to keep in mind: these adjustments happen after the closing date, so make sure all your numbers are correct before you close your books.
Year-end vs. month-end close: What’s the difference?
Other than the timeframes, there are a few key differences between a year-end close and a month-end close in QuickBooks Online.
With a year-end close, you review an entire year’s worth of data. You will be looking at everything from journal entries to expense accounts, and finalizing it all for tax reporting.
You also need to reconcile all accounts and run reports like P&L (Profit and Loss) and the balance sheet.
On the other hand, a month-end close focuses on regular reconciliation and making sure that all invoices are entered correctly. It’s sort of like a mini year-end close, but it happens every calendar month.
How to close your month-end books in QuickBooks Online
The month-end close process is quite similar to the year-end steps but much simpler. Follow these simple steps to keep your monthly statements and records straight:
- Review your accounts and enter any missing invoices or payments.
- Reconcile all your financial accounts using the “Account” menu.
- Run a Profit and Loss Report to check for anything that doesn’t match up.
- Set a closing date and close your books for the month.
Remember that doing monthly closes keeps your bookkeeping tight and financial reports accurate — your future self will be very thankful come year-end closing time.
How to edit your closed books in QuickBooks Online
Don’t worry if you need to make any changes after closing. Your books aren’t set in stone just yet, so it’s still an option. QuickBooks makes it easy — but only if you’re the company admin.
Here’s how:
- Go to the gear icon and select “Accounts and Settings.”
- Under the Advanced tab, click on the pencil icon next to “Close the books.”
- Make the required changes and then change the closing date password by entering a new password in the “Password” and “Confirm” fields.
Here are some of the specific changes and edits you can make after closing:
Edit the closing date
To change the date the books were closed, follow these steps:
- Go to the gear icon and select “Accounts and settings.”
- Click the pencil icon next to “Close the books.”
- Put a tick in the “Close the books” checkbox.
- Enter a new closing date and set a password if necessary.
Track any changes made after you close your books
QuickBooks also lets you monitor any changes made to your company file long after you have closed the books. This feature helps you keep data secure by tracking any edits and alerts you to the exact adjustments that were made.
Here’s how to set it up:
- Go to the gear icon and select “Audit log” under the Tools menu.
- Once in the audit log, you will see a detailed list of the changes that were made after closing the books, including who did it and when.
- Use the filters to narrow down specifics like dates, users, or transaction types to answer any question about edits made to your product data, accounts, and financial transactions.
- Review the list carefully, especially for changes made to journal entries or expense accounts.
Closing entries
In QuickBooks Online, you don’t typically need to manually create any closing entries. The system automatically transfers your net income from your income and expense accounts to a “Retained Earnings” account on your balance sheet.
This way, all your temporary accounts are automatically reset and ready for the brand-new fiscal year. Your company’s retained earnings are also updated by QuickBooks.
If you do need to make specific adjustments after this automatic process, like moving a balance from one account to another, you can create manual journal entries.
Wrap it up with confidence
Following these steps to close your books in QuickBooks Online will save you time, keep your accounts in order, and avoid any mad rushes come tax time.
QuickBooks makes it super easy for you to close the books and keep track of any changes your team makes, even after you click the close button.
If you’re worried about non-accountant team members making changes to your company file, Method CRM securely integrates with QuickBooks Online to give you and your accountants full visibility without ever having to touch your sensitive data. This means no more accidental changes or annoying reconciliations.
Close books QuickBooks Online FAQs
How do I lock closed periods in QuickBooks?
It’s easy! Click the gear icon, select “Accounts and settings,” and then, under Advanced, turn on the “Close the books” feature.
Set a closing date password and lock down your data.
How do I close the prior year’s books to send to the accountant?
QuickBooks Online makes this very easy and hassle-free. Before jumping in, make sure you have reviewed your reports, reconciled your accounts, and entered in any last-minute invoices or payments. Then, simply set a closing date password, select “Close the books” and click “Save.”
Send the company file to your accountant after closing, they’ll really appreciate the clean data.
What changes after year-end close?
Quickbooks will automatically move your net income to “Retained Earnings.” Your expense accounts get reset, and your company file will be all ready for the next fiscal year.
Should I share the closing password with my employees?
Short answer: no! Keep the closing date password under lock and key. You’re the admin, after all. You absolutely don’t want any of your employees accidentally messing with your financial reports — that’s the fastest way to create accounting chaos.
Want to maintain financial security while letting your team do more with your QuickBooks data? Try Method free.