


So, you’ve gone through and matched up your accounts in QuickBooks, but something just isn’t adding up. Perhaps there’s an odd transaction or a little hidden mistake somewhere. Whatever the reason might be, you’ve decided it’s time to undo the reconciliation process.
Before you get started, let’s make one thing clear: unreconciling in QuickBooks Online needs to be handled very carefully and accurately. Mess this up, and you could throw your whole account off balance — and trust us, that’s definitely one thing you don’t want.
Unreconciliation can sometimes be complicated. If done wrong, it often leads to issues with data integrity — not to mention inaccuracies in reports and a whole lot of confusion.
Sound like a painful process? Don’t worry. Our guide will show you how to do it properly and help avoid those issues down the line.
What preparations do you need to unreconcile in QuickBooks?
A little bit of preparation makes all the difference in ensuring that you don’t accidentally mess your books up. So, before you even consider the idea of unreconciling, there are a few important steps to take first.
Here’s what you need to do before starting:
- Back up your data.
- Review reconciled transactions.
- Check for errors or disparities.
Back up your data
First things first — make sure everything is backed up. QuickBooks has a handy built-in backup feature that you’ll definitely want to use for this. The last thing you need is to make some changes and not be able to undo them.
Once your data is safely backed up, you can rest easy knowing that if anything goes wrong, you can quickly restore your account to the state it was before you started.
Review reconciled transactions
Once your backup is safe and sound, go through your reconciled transactions with an extremely detailed approach.
You can access these reconciliation reports by going into the “Accounting” or “Banking” menu and checking out your bank register.
Pay close attention to the “R” column (that’s the reconciliation column) to ensure everything matches.
When you find something that doesn’t look right, this is where you can begin your troubleshooting.

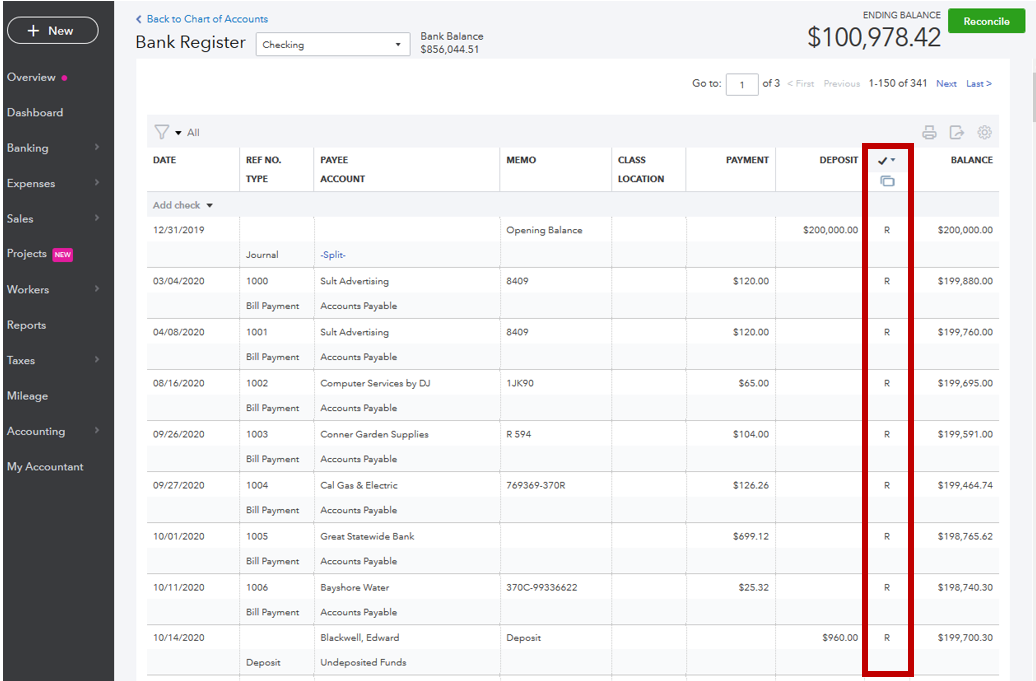
Image credit: QuickBooks
Check for errors or disparities
Now that you’ve reviewed those transactions thoroughly, it’s time to identify any discrepancies or errors lurking around.
Look for differences between what’s on your bank statements and what QuickBooks shows as transactions.
This is where the QuickBooks reconciliation report becomes incredibly useful—it will show exactly where things started to go awry, helping you pinpoint which specific transactions need fixing (so you’re not left guessing).
Steps to unreconcile in QuickBooks Online
The process of reversing reconciliations really depends on whether you’re handling just one transaction or many of them all at once.
Single transaction
Only one annoying transaction causing issues? Here’s how you can handle it quickly:
- Head over to the “Accounting” menu.
- Navigate to the “Chart of Accounts” and then select the bank account where this particular transaction is located.
- Click on “View Register.”
- Locate the transaction that’s giving you issues, click on the “R” in the checkmark column, and change its status from “R” (reconciled) to “C” (cleared) or “None.”
- Hit “Save,” and breathe a sigh of relief. You’re done.

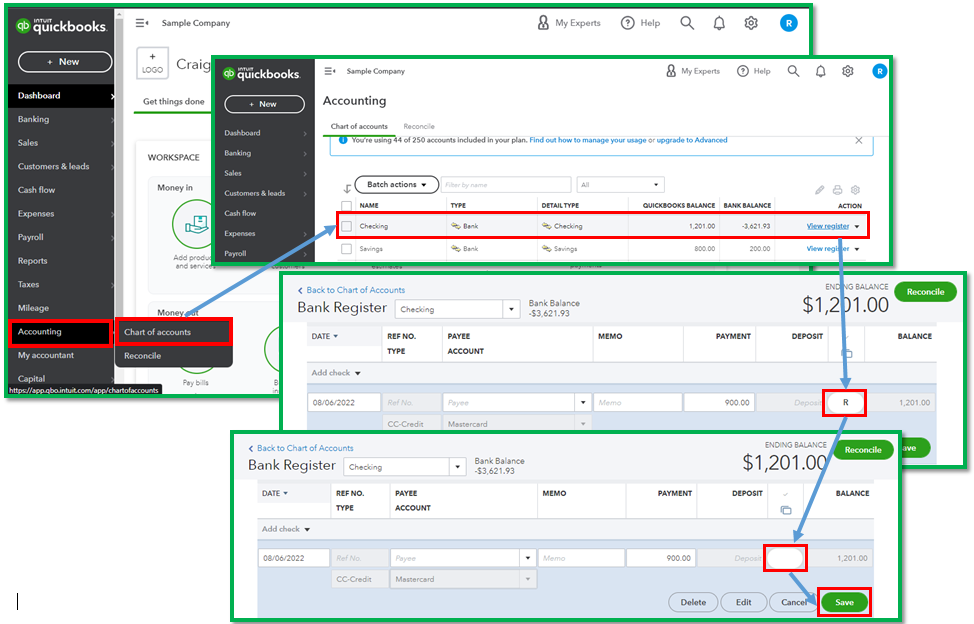
Image credit: QuickBooks
Troubleshooting tips
- If you’re having problems finding that specific transaction, double-check that you are indeed in the correct account.
- If it doesn’t let you unreconcile, adjusting your reconciliation dates might be necessary.
Multiple transactions in QuickBooks Online
If you need multiple transactions fixed, don’t worry — the process is quite similar:
- Go back to the “Chart of Accounts” and click “View Register” for the bank account you’re dealing with.
- Find each individual transaction that needs unreconciling.
- Change their “R” status for each one from “R” (Reconciled) to “C” (Cleared) or “None.”
Save each change as you go along (don’t wait until the end).
Just keep in mind that the more reconciliations you end up reversing, the bigger the discrepancies, so track everything you’re doing carefully.
Account-level unreconciliation
Sometimes, issues extend beyond just single transactions and require an entire account-level fix-up. Here’s how you can do this safely:
- Navigate over to “Accounting” and choose your bank account from within the “Chart of Accounts” section.
- Click “View Register” and set all relevant transactions from “R” (Reconciled) back down to “C” (Cleared).
- Then head over to the “Reconcile” page, inputting the correct ending balance before clicking
“Start Reconciling” again. - Make any necessary changes here and save them accordingly.
Be very careful when performing an unreconciliation at this level as it can drastically affect your entire financial picture. So, double and triple-check absolutely everything before moving forward.
How to bulk unreconcile in QuickBooks Online
If you’ve got a mountain of transactions needing correction, doing it one by one sounds like a nightmare. Luckily, QuickBooks has a bulk option:
- Head to the “Bank Register” and filter by reconciled transactions specifically.
- Select multiple entries at once, then change their reconciliation status collectively.
- Finally, save the changes and check again.

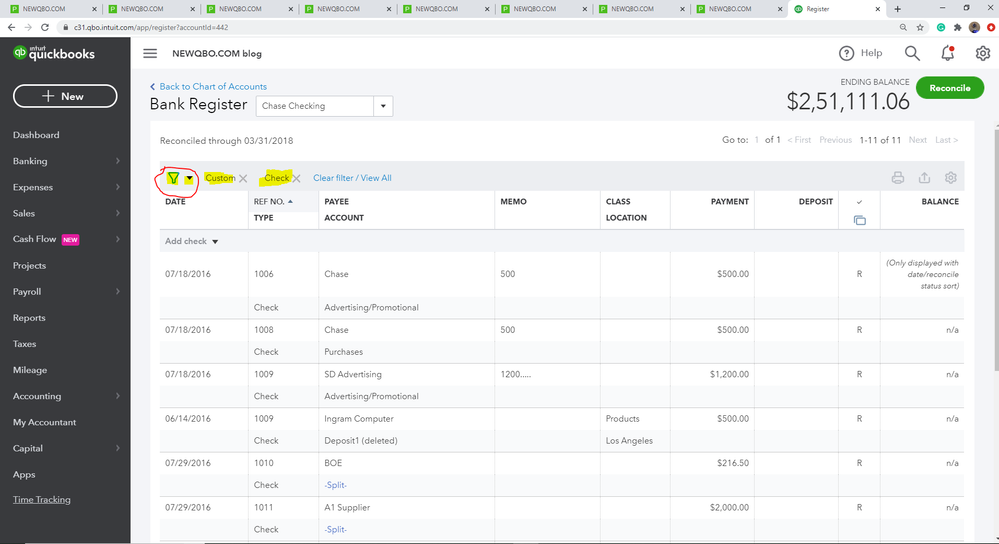
Image credit: QuickBooks
We advise you to proceed with caution here. Bulk unreconciliation could impact reports and statements across all your accounts significantly. So, only use this option sparingly and as a last resort.
How to unreconcile previous months in QuickBooks Online
If you find yourself needing to go back and fix something from previous months, it’s no problem:
- Go to “Reports” in the left-hand navigation menu.
- Type “Reconciliation Report” in the “Find report by name” search bar.
- Click “Reconciliation Reports.”
- In the “Account” menu, select the account for the report you want to view.
- From the “Report period” drop-down, choose the reconcile period (the previous month you need to fix).
- Select “View Report.”
- Find the transaction you need to fix, hit view, and adjust the status from “R” to “C” or “None.”
- Save the reconciliation now that you have the correct ending balance.


Image credit: QuickBooks
Keep in mind that when you change past months, the totals affect your balances from the current period, so go through to ensure these are now up to date, too.
Unreconcile in QuickBooks Desktop
With QuickBooks Desktop, you will find the operation a bit different than Online, but thankfully, the process for unreconciling is much the same:
- Go to the “Banking” section, then select “Reconcile.”
- Choose the account with the reconciled transaction.
- If you simply want to unreconcile the most recent transaction, click “Undo Last Reconciliation.”
- If you need to unreconcile specific transactions, go to the “Account Register” and then remove the “R” status.
Common issues and solutions
- Problem: Can’t find the unreconciled transaction.
Solution: Make sure the date filters are displaying the correct time frame.
- Problem: Reconciliation won’t save you after you make changes.
Solution: Check and adjust the reconciliation date or ending balance.
How to unreconcile credit card in QuickBooks Online
To unreconcile a credit card transaction in QuickBooks Online, you can follow the same basic steps as with a bank account:
- Go to “Chart of Accounts” and select your credit card account.
- Click “View Register” and locate the transaction.
- Change the “R” status to “C” or “None.”
- Save and close.
Keep in mind that credit card transactions can often make up part of monthly statements. Unreconciling one can affect your closing statements, so double-check everything before you finalize.
Can you unreconcile a reconciled monthly statement?
You can unreconcile a reconciled statement, but be careful. Unreconciling an entire monthly statement can throw your financials off in a huge and irreparable way. But if you absolutely must, here’s how:
- Open up the Reconciliation Report for the required month.
- Find the transactions and change their reconciliation status to “C” or “None.”
- Reconcile your accounts again (but with the correct balance).
Key takeaways: How to unreconcile in QuickBooks Online
Now that you know how to unreconcile in QuickBooks Online, keep these key points in mind:
- Before you start a single unreconciliation activity, back up your data
- Unreconciliation can be done on a single transaction, multiple transactions, and even an entire account — but tread carefully.
- Double-check all of your balances after unreconciliation to avoid any further mistakes.
- Always be very careful when making any changes to previous months or when doing bulk reconciliations.
Afraid of your team messing with your sensitive QuickBooks data? Integrate with Method CRM to give everyone complete visibility into your business performance without impacting your financial data. Method centralizes your lead and customer data to give your whole team the full picture — without the risk of needing to unreconcile the mistakes your non-accountants are bound to make.
Ready to give it a shot for free? Try Method for 14 days.
How to unreconcile in QuickBooks Online FAQs
Can you modify a reconciliation in QuickBooks?
Yes. Editing an existing reconciliation in QuickBooks is possible, but keep in mind this is not the same as an unreconciliation. Editing just allows you to adjust details like transaction notes and reconciliation reports. Unreconciliation, however, removes the state of “reconciled” and is actually a reverse of the reconciliation process.
Why can’t I reverse a reconciliation in QuickBooks Online?
The most common reason for being unable to reverse a reconciliation in QuickBooks Online is if the process is locked for financial reporting. The second most common reason is a lack of administrator permissions, which are required to reverse a reconciliation that has already been closed.
How many months can I undo reconciliations in QuickBooks?
There are no limits to how many months you can unreconcile in QuickBooks. However, a basic rule and caution to follow is that the further back you unreconcile, the more likely it is to affect your current financial reports, balance sheets, and tax filings.
For very old reconciliations, you should consult with an accountant to make sure that you don’t cause more problems and discrepancies.