Whether you’re paying vendors or receiving customer payments, a constant flow of credit card charges is unavoidable. What’s worse is keeping up with these payments on a daily basis.
The good news is that QuickBooks Online comes with a credit categorization feature. This tool:
- Organizes credit card transactions.
- Speeds up accounting processes.
- Enhances financial reporting.
- Keep accurate reports of your financial activities.
Keep reading to learn how to categorize credit card payments in QuickBooks, including some common errors and best practices.
How do you categorize credit card payments in QuickBooks?
Credit card payments are recorded as transactions in QuickBooks. If you’ve linked your banking information with your QuickBooks Online account, credit card payments are automatically recorded.
However, sometimes there can be errors that cause a transaction not to show. Or, you may have made a credit card payment on a different account that you need manually add.
Follow the steps below to find out how to categorize credit card payments in QuickBooks.
How to categorize a credit card payment in QuickBooks Online manually
Here’s how you can manually categorize credit card payments in QuickBooks Online using the “Pay down credit card” function:
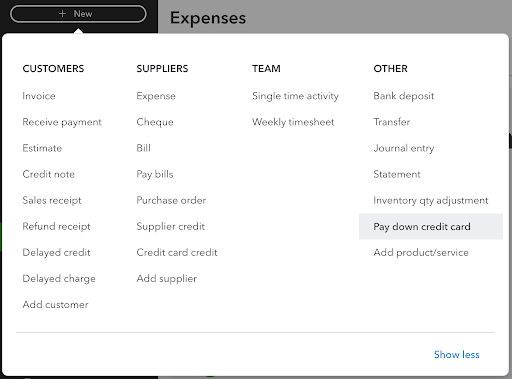
1. Navigate to “+ New” in the top left menu bar. Under the “Other” menu, select “Pay down credit card.”
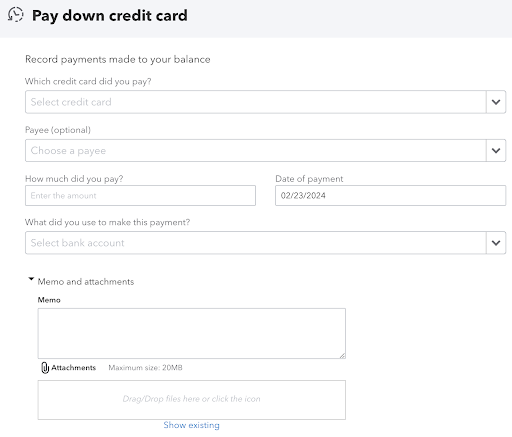
2. Choose the credit card you paid or add a new one if it’s not listed.
3. Write the name of your payee if you wish you keep it on record. However, this step is optional.
4. Enter your payment amount and the date the payment was made, then choose the bank account used to make the payment.
5. You have the option to add a memo and any attachments you want to keep on record.
6. When you’re finished, click “Save and Close” in the bottom right corner of the screen.
How to categorize credit card payments in QuickBooks: Top options
Understanding how to categorize credit card payments in QuickBooks also means learning about its different categorization options.
Categorize individual credit card transactions
When it comes to receiving payments via credit card, PayPal, or other payment methods, categorizing individual transactions is the norm. To achieve this, just follow the usual steps outlining how to categorize credit card payments in QuickBooks Online.
As you continue using QuickBooks, it learns to recognize and suggest categories for familiar credit card transactions. You can always adjust these if needed.
Also, keep an eye out for “Match” instead of “Add” on certain transactions. This feature helps avoid duplicates for:
- Pre-existing bills.
- Invoice payments.
- Bank deposits.
All you need to do is verify that the balance matches, then click “Match.”
Learning how to categorize credit card payments in QuickBooks boosts your efficiency and makes learning how to process credit card payments in QuickBooks Online easier.
Split transactions among categories
Sometimes, you may need to divide a credit card transaction across categories.
Imagine you’ve got a receipt for $200, which includes $120 for office supplies and $80 for travel expenses. You can easily split this in QuickBooks Online. Simply allocate $120 to the “Office Supplies” category and $80 to “Travel Expenses.” This way, your financial reports are as accurate as possible to reflect each type of expense.
Here’s how to split transactions among categories:
- Log into QuickBooks Online.
- Navigate to “Banking” in the left sidebar.
- Select the transaction you want to split under the “For Review” tab.
- Choose “Split” in the transaction details.
- Enter the accounts separately in the “Category” field.
- Press “Save and add.”
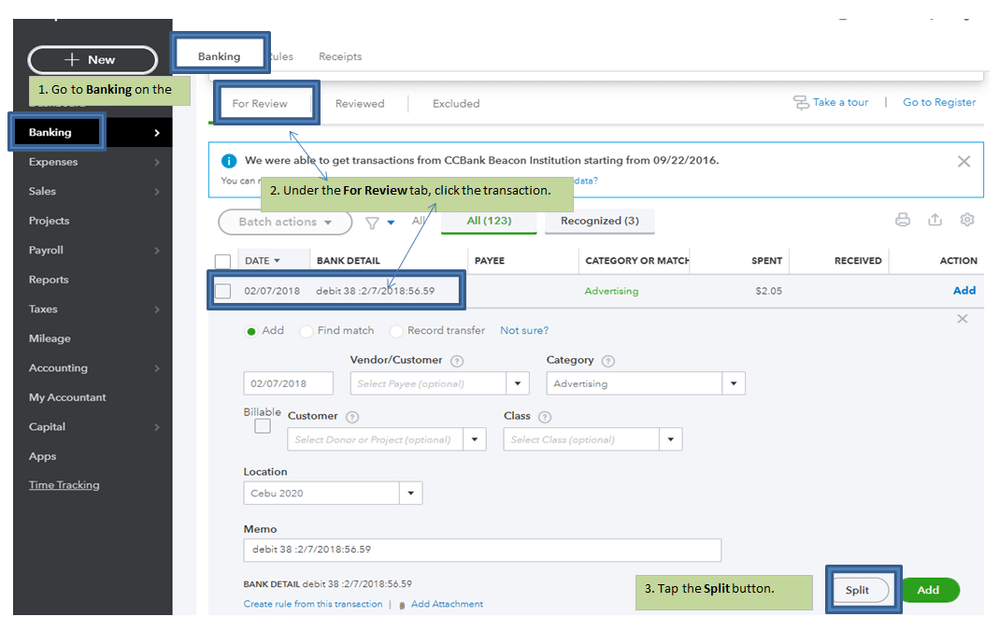
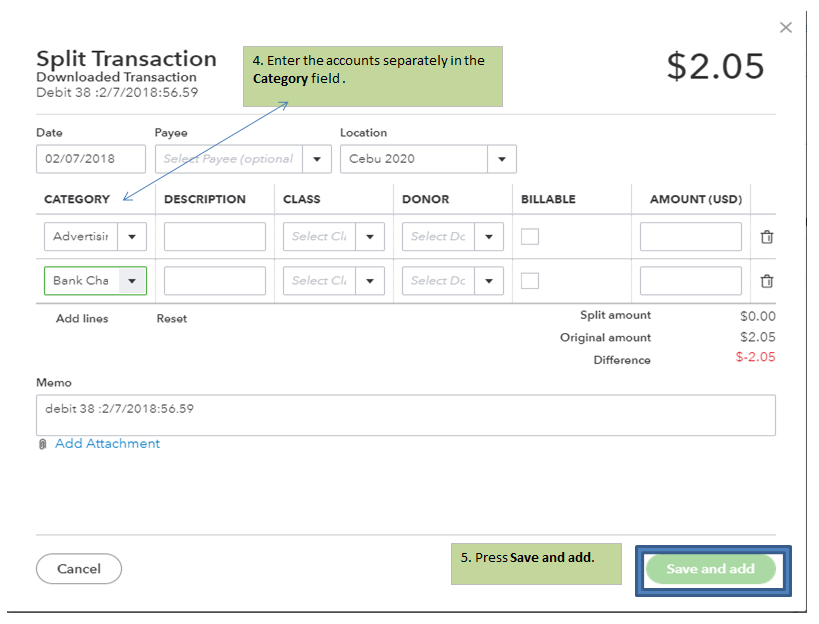
Image credit: Intuit
Common errors when categorizing payments into QuickBooks
Now that you know how to categorize credit card payments in QuickBooks, let’s identify some common errors and how to avoid them.
Not using the “Split” feature
Failing to use the “Split” feature on credit card statements can result in inaccurate tracking when a transaction spans multiple respective categories.
To fix this, get comfortable with the “Split” function and use it for multi-category transactions. Also, make sure you’ve assigned each transaction to the correct credit card account.
Incorrect account selection
When categorizing credit card payment details, selecting the wrong account leads to issues.
For example, choosing an expense account instead of a credit card liability account results in incorrect transactions and financial statements.
To avoid this, always double-check your account selections to make sure they match the transaction and credit card type, like payment vs. direct expense. Also, ensure that your bank and credit card details are correct to prevent inaccuracies.
Failing to update categories
Failing to regularly review and update your expense categories results in misclassifications.
To ensure accuracy when recording payments, schedule routine checks of your expense categories. This lets you make necessary adjustments as your business shifts over time.
Understanding these common errors is crucial in learning how to process a credit card payment in QuickBooks Online.
Best practices when categorizing credit card payments
As you learn how to categorize credit card payments in QuickBooks, adopting best practices eases your bookkeeping burdens.
Here are some best practices to keep in mind:
- Regularly reconcile: Regularly match your credit card transactions with bank statements for financial accuracy.
- Set up banking rules: Use QuickBooks’ banking rules to automatically categorize bank transactions. This saves you valuable time and reduces manual errors.
- Separate personal and business expenses: Carefully categorize transactions, especially if the same credit card is used for personal and business expenses. This maintains an accurate and comprehensive overview of your financial health for informed decision-making.
- Train your team: Equip your team with the skills to handle transaction details in QuickBooks efficiently.
- Review reports regularly: Use QuickBooks reports to check for any categorization errors.
These best practices are also useful when learning how to process a credit card payment in QuickBooks Online.
How to easily record and categorize credit card payments in QuickBooks Online
To perform credit card payment categorization quick and easy in QuickBooks Online, follow these steps:
- Log into QuickBooks Online to access your account and manage your credit card purchases and payments.
- Go to the “Banking” tab in the left-hand menu and select “Banking” to open your linked accounts, including bank feeds.
- Select your credit card account from your list of accounts. Choose the account where your payment was made.
- Find the transaction you need to categorize by locating the “For Review” tab and then choosing the transaction you need.
- Open the transaction, then choose a category:
- Category: Using the “Category” dropdown menu, select one that best describes the nature of the transaction. It could be a category such as Accounts Payable, Office Supplies, or Travel Expenses.
- Memo: Optionally, you can add a memo or specific bank details to clarify the precise purpose of your payment.
- Split Transactions: If the payment covers multiple categories, you can select “Split” to allocate amounts. For example, $100 for office supplies and $50 for travel expenses.
- Finally, click “Add” to review and confirm the transaction categorization. This will save it to your QuickBooks credit card payment records.
Following these steps is a straightforward process for categorizing credit card payments in QuickBooks, making sure your financial records are accurate and up-to-date.
Alternative methods to categorize a credit card payment in QuickBooks
Create a check
Did you make a credit card payment via check? You’ll need to record this transaction accurately in QuickBooks Online to maintain your financial records. Follow these steps to categorize checking:
- Log into your QuickBooks Online and access your account.
- Find the “+ New” button to initiate new banking transactions.
- In “Business View,” you need to select “Pay down credit card.”
- Enter in and specify the amount and date of the payment.
- Select the bank account from which the payment was made.
- As the payment was made using a check, here you will now select “I made a payment with a check” and then enter the check number into the corresponding field.
- (Optional) You can also add a note or attachment to the transaction during this process.
- Once you have correctly entered all the details, click “Save and close” to record and categorize the check payment.
Reconcile your credit card transactions and make a payment
Keeping your accounts reconciled in QuickBooks online means you’ll have more accurate and up-to-date records across your credit cards and expense transactions.
To get a more visual step-by-step guide on reconciling accounts in QuickBooks Online and Desktop, take a look at our video tutorial:
Here’s how to reconcile credit card transactions in QuickBooks Online:
- At the top right corner of your screen, select the gear icon. Under the Tools menu, choose “Reconcile” from the dropdown.
- In the Account dropdown menu, select the bank account or credit card you want to reconcile.
- Using the ending balance and date from your credit card statement, fill in the Ending balance and Ending date fields.
- Click “Start Reconciling”.
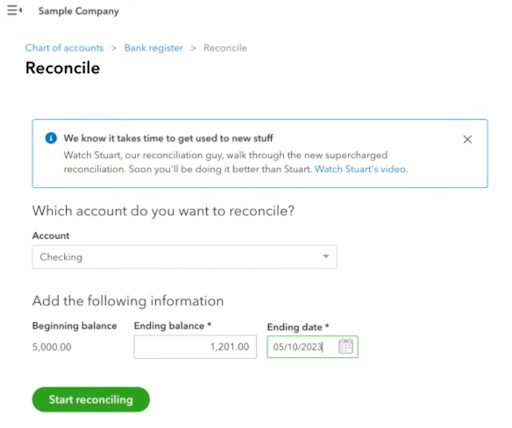
- QuickBooks will now show you a list of transactions for the selected account. You can compare each transaction in QuickBooks Online with those on your credit card statement.
- If a transaction matches the statement, you can click the checkbox to the right to mark it.
- If a transaction doesn’t match up, leave it unchecked.
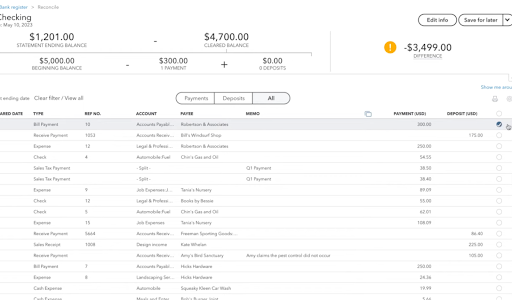
- Now, check for discrepancies. QuickBooks will indicate any differences between your records and the statement. If you find a difference, review the transactions to identify and resolve it.
- Once all the transactions are matched and discrepancies have been addressed, you can click “Finish now” to complete the reconciliation.
To record a payment for your reconciled credit card:
- Click “+ New” and then select “Pay down credit card” under the “Vendors” section.
- Choose the credit card account you have just reconciled and enter the “Payment Amount” and “Date.”
- Now, you can select the Bank account used for the payment.
- If the payment was made by check, enter the check number in the field. Or, for electronic payments, you can enter the EFT number.
- Optionally, you can add a memo or attachment if you need to.
- Click “Save and Close,” and you will have recorded the payment.
Use banking download
If both your credit card and the bank account you use for payments are connected (through bank feeds), you can easily record the payment by simply transferring it:
Step 1: Transfer the Payment
- Go to the “Expenses” tab from the menu.
- Choose the account from which you’ll transfer the payment.
- Find the transaction, and select the “Pay down credit card” option.
- Open the Transfer account dropdown, then choose the account to which you want to send the transaction.
- Click “Confirm” to complete the transfer.
Alternatively, you can record the payment as a transfer:
- Go to Expenses in the menu.
- Select the account you’ll be transferring from.
- Find the transaction, and choose “Record as transfer.”
- In the “Transfer account” dropdown, pick the destination account.
- Finally, you can click “Confirm” to save the transfer.
Step 2: Match the Transaction
After transferring, you can match the transaction with the new account:
- Go to the “Recognized” tab and locate the transaction.
- In the “Action” column, you should select “Match” to confirm it with the new account.
How QuickBooks users make more sales in less time with Method
Method is the #1 CRM for QuickBooks users. It makes credit card payments in QuickBooks even easier, along with offering several additional benefits.
Method’s two-way, real-time sync with your accounting software reduces manual data entry and keeps your business finances current and up to date. This leads to fewer errors, which frees up more time for activities that add value to your business. It also promotes accurate financial decisions through data-driven insights.
What’s more is that Method’s automation capabilities speed up and simplify your payment process for a better bottom line.
Conclusion: How to categorize credit card payments in QuickBooks
Using QuickBooks’ reconciliation tool to balance your accounts is the best way to keep an accurate recording of your financial records.
By reconciling your accounts, you’ll simplify your financial management and discover valuable insights into your business’ revenue.
How to record credit card payments in QuickBooks FAQs
Is a credit card payment an expense in QuickBooks?
Yes, a credit card payment is typically recorded as a transfer rather than a direct expense when using QuickBooks online. While the charges made on the card are categorized as expenses, the payment itself does reduce the card balance.
How do I enter credit card charges in QuickBooks Online?
To enter credit card charges in QuickBooks Online, you can follow these steps:
- Select “+ New” then choose “Expense.”
- Under the “Payment account” select your credit card account.
- Enter the date, payee, and the amount for the charge.
- In the category field, choose an appropriate expense category from the dropdown menu.
- Add any notes, then click “Save and close.”
What kind of expenditure is credit card payment?
A credit card payment is treated as a liability payment in QuickBooks, as it reduces your credit card balance.
Note that QuickBooks doesn’t count credit card balance payments as a direct business expense, but rather as the repayment of borrowed funds.
Is it OK to exclude credit card payments in QuickBooks?
No, excluding payments to credit cards, including partial payments, is not recommended in QuickBooks. Doing so leads to inaccuracies in your financial records and reports.
Recording all transactions, including credit card statements, ensures a complete and accurate financial overview.
See how Method simplifies your credit card payments.
Image credit: Liza Summer via Pexels


