How to make an invoice

You’ve made a sale and you need to send your customer an invoice. After all, you want to get paid, don’t you?
Besides being a key step for collecting payments, invoices are also an important document for accounting purposes. You – or whoever is managing your books – will need invoices to help keep track of the money coming into your business.
In this guide we’ll show you how to make an invoice. It’s a pretty simple document, but making just one isn’t the issue.
Rather, invoices start becoming a hassle when you need to deal with dozens of them at a time. That’s why you’ll need a more efficient way of creating and sending invoices, one that preferably doesn’t require you to keep copying and manually filling a Google Docs sheet!
Pro tip: Skip the guide with our free invoice generator
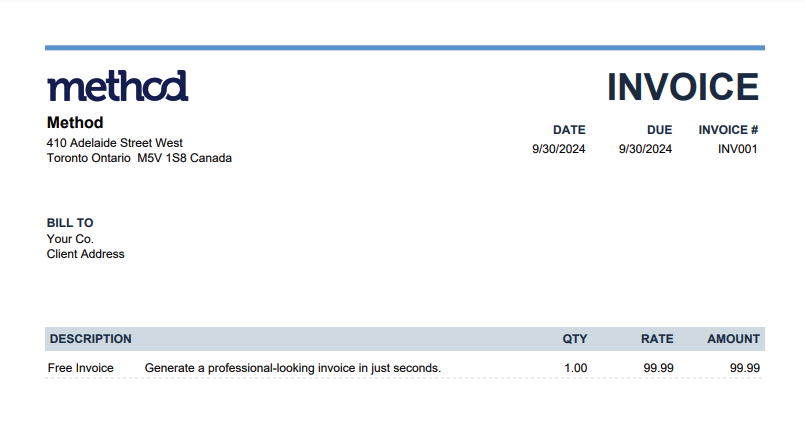
That’s why our first recommendation to you is to use our free online invoice generator!
No need to manually copy a Google Doc or Microsoft Excel invoice template each time you need one. All you need to do is fill in each of the field, and then just click a button – that’s it!
In an instant you’ll get a professional invoice as a PDF file that you can send to your customer.
Guide: How to make an invoice

The key to a strong invoice is to make it easy for your customer to understand exactly what they bought and how they can pay you as fast as possible. How you make an invoice doesn’t matter for as long as you include the following in the document.
1. Create a header
First, create a professional-looking header. This should include your business name, logo, main address, and contact details.
Depending on where you’re operating or the region your customer is located, you may need to include a business tax ID (such as a GST number, ABN number, or VAT ID).
2. Include your customer’s information
Next, add your customer’s company name (or contact name), their mailing address, and their contact information (such as phone number, email addresses, etc.)
3. Add administrative or office-only info
Here, you should have the word “invoice” printed at the top. You should also include an invoice number so that it’s easy for you or your admin person/bookkeeper to track.
The invoice number can include a combination of letters and/or numbers. It’s up to you on how you want to arrange or style your invoice number, but make sure it fits how you and your team like to work.
So, for example you might have a two letter prefix for each product or service you offer, such as “DE” for delivery or “RW” for raw materials and so on.
4. Insert the dates
Next, add the dates for when you issued the invoice and the due date for when you expect the customer to pay the invoice.
5. Describe the goods or services you provided
List all of the services provided and/or goods sold to the customer during the invoice period. You should include each item/service, the quantity or rate per unit (like time spent), and details about what each product/service involved.
It’s always a good idea to include as much detail as possible. It’s transparent to customers and can encourage them to pay you sooner.
For example, if shipping raw materials, then include the specific materials provided, the quantity, and the price per unit.
6. Include the total money owed with applicable taxes
Clearly show the total amount due along with any applicable taxes and/or discounts. This part should give the customer a look at the full cost of the products or services you’ve provided during the invoicing period.
7. Include any additional notes or information
Next, use the ‘comments’ or ‘message’ section to specify other details that aren’t listed in the invoice, such as:
- Accepted payment methods (like credit cards, checks, PayPal, Stripe, and others).
- Notes about delivery or fulfillment, such as estimated delivery dates, the shipping carrier, and tracking numbers.
- Currencies accepted by your business.
- Notes about discounts or additional fees. You should also include details about custom or special payment terms. For example, you may have a customer that requested breaking a payment into smaller pieces.
- Information about late payment penalties.
- Notes about terms and conditions in relation to the sale. For example, for a recurring purchase, you might have provided a discount for the first three months. You’d want to ensure that the customer is aware that the price could go up after the three month period.
8. Add your branding
Finally, customize your invoice by including your business logo. This will leave a bigger impression on your customers compared to a generic template from Google Docs or Microsoft Excel.
Build on your invoices with payment and customer management
Sending an invoice is only the first step. Even today, late payments, lost invoices, and admin issues are a problem for as many as 73% of small and medium-sized businesses (SMB).
That’s why it’s a good idea to get ahead of these problems by using a software solution to quickly create and send invoices (including recurring invoices), storing them all online and connected to the customer so you never lose an invoice again! You can allow your customers to pay you directly online, so that you can collect payments faster and more reliably.
Not only will you get paid (and avoid those unwanted and awkward conversations with your customers), but you’ll also get all that boring and time-consuming admin work under control.
A QuickBooks-ready customer relationship management (CRM) suite will even sync your invoice creation, sales orders, purchase order, and other data with your QuickBooks data automatically, keeping everything up to date.
Image credit: simonmcconico via Getty Images Signature


