Applying vendor credits properly won’t just help your business save a little money but also help you keep your financial records up to scratch. That means keeping your healthy bookkeeping alive, which is a must for any company.
QuickBooks Online has the very useful ability to manage vendor credits within the system, letting small and medium-sized businesses deal with the entire process in one place.
Keep reading to learn how to apply vendor credits in QuickBooks Online with ease.
What is a vendor credit in QuickBooks?
Vendor credits represent amounts owed to you by a vendor, like bill credits or refund checks, that can later be applied to future bills or services. Where do they come from? Perhaps you’ve been overcharged or there was a mistake on the vendor’s end—this means they’ll need to refund you in some way.
If you’ve ever been a customer at any store, you’ll know that refunds aren’t always given. Sometimes, you’re offered store credit that you can use on a future purchase. Vendor credits in QuickBooks work the same way, where the amount owed is tracked and applied towards future bills and updated in your records.
Step-by-step guide to apply vendor credits in QuickBooks Online
Need to apply vendor credits in QuickBooks? The platform makes it easy for you to record them and either apply them to a bill now or later on. The process can be done in a few simple steps, which we’ll demonstrate below.
Recording the vendor credit
Vendor credits should always be recorded accurately. So, check, double-check, and triple-check your entry before you move on, as these credits will reduce your accounts payable and keep your financial statements sound. You don’t want to misrecord only to run ro issues when auditing or filing taxes, particularly with large amounts.
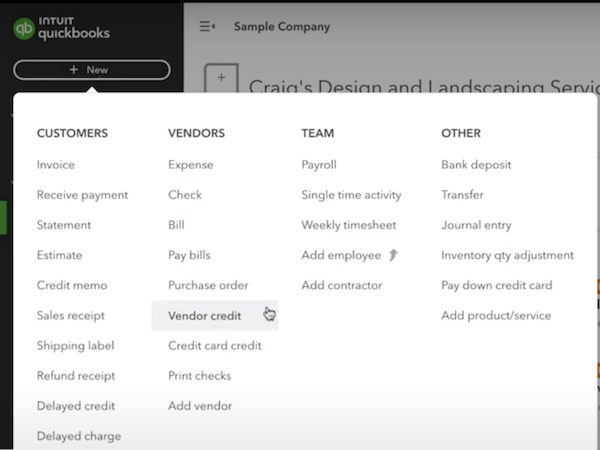
1. Navigate to the “+ New” button
Once you’ve logged into your QuickBooks Online account and have navigated to the dashboard, click the “+ New” button in the left-hand sidebar.

Image credit: 406 Bookkeeping Services
2. Select “Vendor Credit”
From the menu, select the “Vendor credit” option.
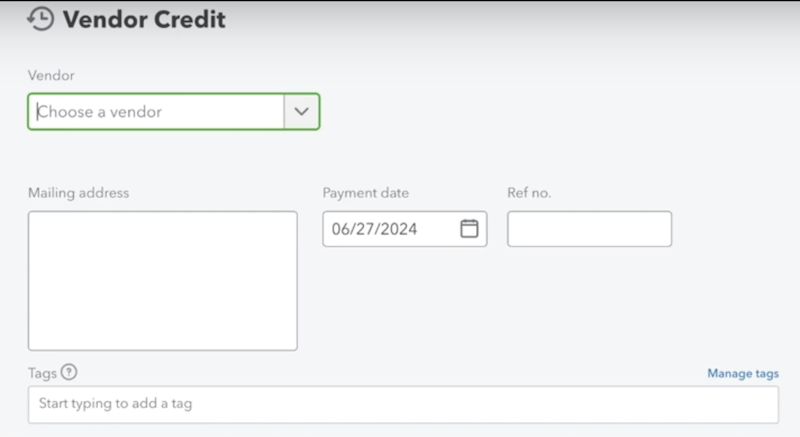
3. Enter relevant details
Here is where you’ll enter all the details about the vendor and the vendor credit. This includes:
- The vendor name (drop-down menu).
- The date the credit was issued.
- The exact amount.
- Mailing address if applicable.
- Reference number.
- Tags.
- A description of the purpose for the credit.

Image credit: 406 Bookkeeping Services
4. Save the vendor credit
Once everything is filled in, be sure to click “Save and close” to confirm. You should see a pop-up at the top of your screen confirming your vendor credit saved successfully.
Applying the vendor credit to a bill
While you might not have gotten a refund to your original payment method, vendor credits are made to be used so that you can reduce the amount payable from that vendor. When you use those credits for bills, you match your records to your expenses more accurately. Ready to apply those credits to a bill you just received? Follow these instructions.
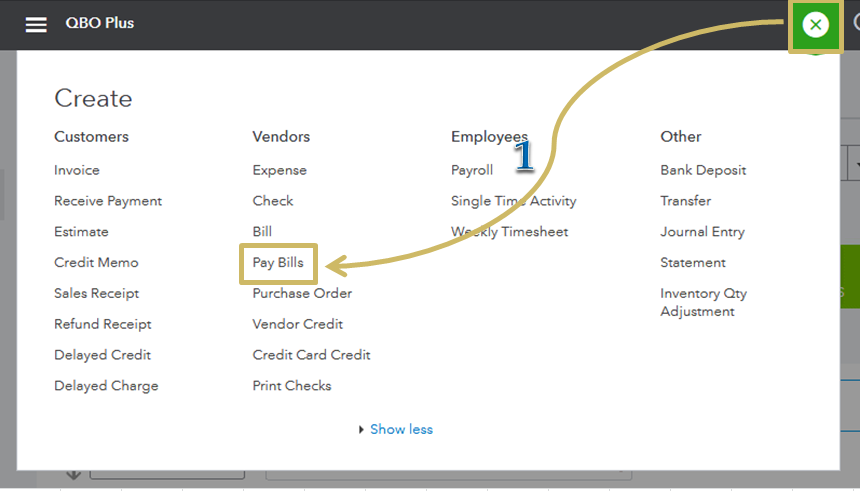
1. Click on “Pay Bills”
Your first course of action is to find the bill to which the vendor credit needs to be applied. To do so, click on “+ New” from the dashboard and select “Pay bills.” From there, you’ll find a list of bills that you can choose from.

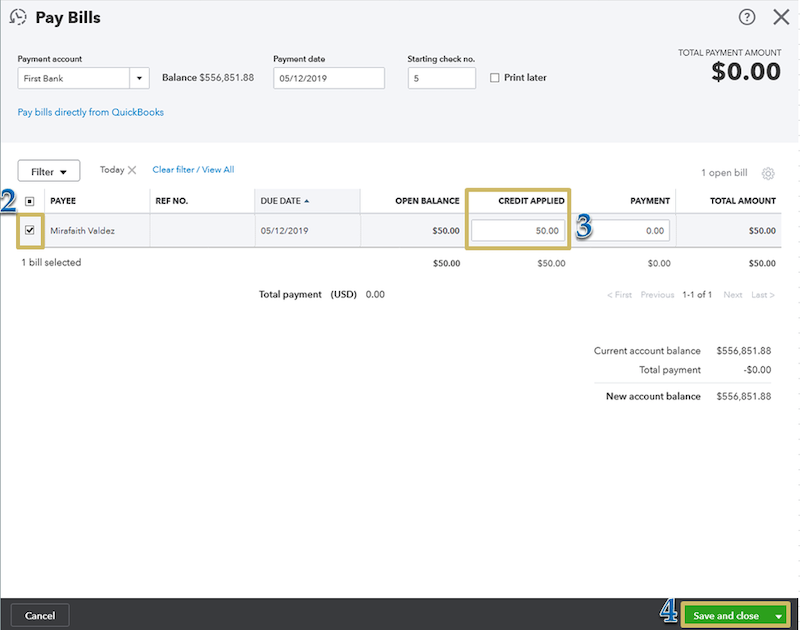
2. Select the applicable credit in the “Credits” section
Find and choose the correct vendor from the list
Under the “Credit Applied” field, you’ll automatically see that available credit associated with that specific vendor. That makes it much easier to apply these credits towards future bills without the manual effort.

Image credit: QuickBooks
3. Confirm the credit amount and apply it to the bill
After completing the rest of the fields like you would when you pay a regular bill, ensure that the credit is present within that bill before you pay. Then hit “Save and close” to set the credit in place.
Applying the vendor credit to a future bill
If you don’t want to apply your vendor credit to your most recent bill, it’s also possible to wait to apply it to a future bill. Simply unmark the vendor credit on your bill, and it won’t be applied. You might want to do this to avoid using it on partially paid bills or for strategic reasons when you’re expecting a larger bill coming up. It can be smarter to hold off and apply that credit in moments when you’ll need it most.
Tips for efficiently managing vendor credits
The better you manage your vendor credits, the more you can improve your cash flow and financial management. But the reality is that business finances can get tricky, which is why you should take advantage of these tips to ease the burden.
Reconciling vendor statements regularly
Make sure to consistently review your vendor statements to see if they’re accurate and align with your financial records. Reviewing them at regular intervals will ensure you don’t miss anything too far in the future when it’s too late and you have many instances of misreported expenses. With accurate books in the long run, you won’t have to scour through months or even years of statements to find those missing credits.
Setting up reminders
Automated alerts are built into QuickBooks for good reason — to keep you on track and so that you don’t forget about credits that are about to expire. Business owners often have to juggle a variety of tasks, inside and outside of finances, so giving yourself a reminder will help you stay ahead of any upcoming payments.
Utilizing QuickBooks Online reports
As a financial management software, QuickBooks Online presents a variety of useful reporting features. The types of reports included will vary depending on your subscription but work on any operating system, with the highest-tier Plus plan giving you access to all of them.
There are a couple of vendor-related reports, including the:
- Vendor Balance Detail.
- Vendor Balance Summary.
- Expenses by Vendor Summary.
- Purchases by Vendor Detail.
- Transaction List by Vendor.
- Vendor Contact List.
These lists will give you a rundown of outstanding balances, including those vendor credits you have yet to use and what’s been applied. In addition, they won’t just show you those details, but give you insights to understand and manage your overall spending with each vendor.
Creating a standardized process
Since managing your expenses relies on consistency and accuracy, creating a standardized process for handling vendor credits is a must for achieving this. With clear steps that can be repeated every time vendor credits need to be handled, anyone on your team can record and apply credits properly without the risk of costly mistakes.
What happens if I apply too much vendor credit to a bill?
Having a standardized system can’t be emphasized enough, especially when it comes to overapplying vendor credits. While you might forget to apply credits once in a while, overapplying is much more damaging to your bookkeeping. If you happen to forget, you’ll end up with a credit balance on your account, which can cause some confusion later on. The solution is to make sure everyone is on the same page. Contact the vendor to ask if those credits are reflected on their end and ensure they don’t change anything administratively.
Key takeaways
As long as you have a proper system in place that can be easily followed by all relevant parties on your team, handling vendor credits in QuickBooks is easy as pie. From this article, you’ve learned:
- That a vendor credit is a monetary credit that can be used for future bills and purchases.
- How to record and how to apply vendor credits to QuickBooks bills.
- That you should reconcile your vendor statements, use QuickBooks’ online reports, and create a standardized process for vendor credit management.
If you’re ready to save time on all the QuickBooks manual data entry, consider integrating with tools like Method. As the #1 CRM for QuickBooks users, Method simplifies your workflow by instantly syncing customer data, invoices, and payment details between QuickBooks and your CRM system. This integration:
- Eliminates the need for double data entry.
- Gives your customers self-service tools for convenience.
- Reduces human errors through user permissions, making your accountants happier.
- Ensures that your financial information is always automatically up to date.
Check out the video below to see more about what Method does for your business.
Ready to try Method for yourself for 14 days? Start your free trial today.
How to apply vendor credits in QuickBooks FAQs
Can I apply a vendor credit to multiple bills?
QuickBooks Online lets you apply a single vendor credit to multiple bills, which is particularly helpful if you’ve got more than one outstanding invoice from that vendor. If the credit amount is more than the amount on a single bill, for example, you might want to be able to distribute that credit and use it up entirely.
Can I apply a vendor credit to an invoice?
Vendor credits can’t be applied to invoices. Why? Because of the direction of payment. Invoices are sales documents that you issue to your customers, while bills are charges owed to vendors. Similarly, they cannot be applied to payroll.
Do vendor credits expire?
Vendor credits don’t have expiration dates in QuickBooks Online, but there might be a timeframe set by the vendor. You might have to apply credits onto a bill within 90 days, for example, which means you should stay well on top of those reminders and reviews to avoid losing out.


