For many, receiving a refund is a positive thing. However, the process of tracking and organizing multiple vendor refunds can quickly become a source of frustration.
Even in the warmest relationships, refunds happen. Maybe a shipment arrived late, or there were too many pencils and not enough pens—regardless, you get your money back from vendors from time to time. Once that refund arrives in your account, QuickBooks Online will be ready for action.
This guide has all the steps outlining how to record a vendor refund in QuickBooks Online. Let’s get started!
What are vendor refunds in QuickBooks Online?
QuickBooks Online views a vendor refund as any event where a vendor returns money back to your business.
A refund returned by a vendor may occur due to various reasons. Maybe they charged you excessively, provided reimbursement for an unwanted item, or repaid a credit that remained unused on your end.
Unlike refunds for customers—where funds flow out from your account—in the case of vendor refunds, the cash flow comes from them and into your account.
Recording these in QuickBooks is key to keeping your bank accounts, vendor balances, and financial statements accurate—otherwise, you can see how things could get messy.
Steps to record vendor refunds in QuickBooks Online
There are three main steps to recording vendor refunds in QuickBooks Online. Each one makes sure your financial data stays neat and accurate, so managing the cash flow becomes easier, and you avoid having to perform an unreconciliation.
Step 1: Record the refund as a vendor credit
When a vendor refunds you, the first thing you’ll need to do is record it in QuickBooks as a vendor credit. QuickBooks will use this to track the amount owed to you by the vendor.
It’s especially important if this refund is going to be applied to any bills in the future.
Purpose of recording a vendor credit:
- It ensures the refund is properly tracked, so nothing gets missed.
- It keeps a clear record for reconciling your accounts later on.
- It creates an audit trail just in case you need it come tax time.
Navigate to vendor credit
- Log in to QuickBooks Online.
- From the + New button on the left-hand menu, select “Vendor Credit”.
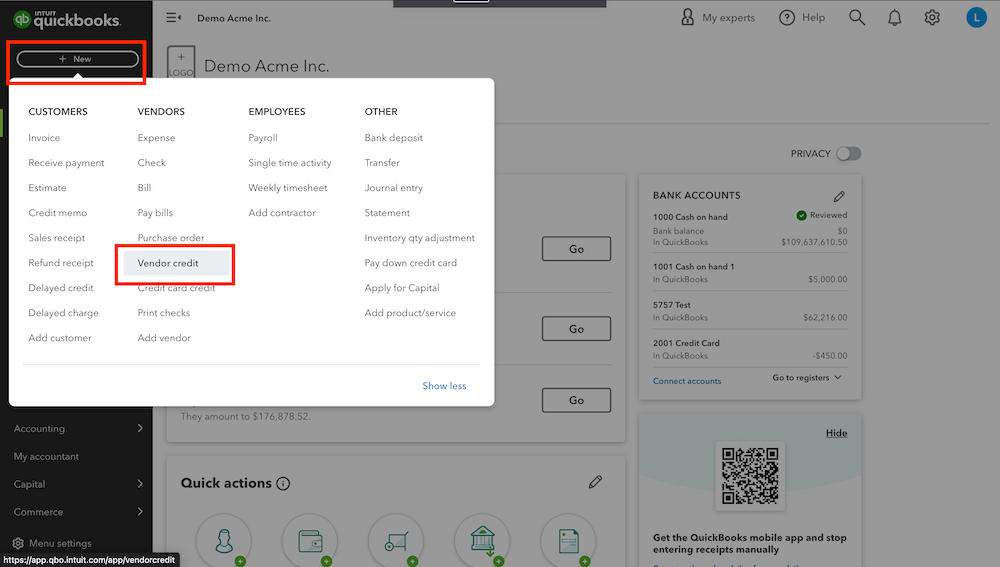
Image credit: LiveFlow
Enter vendor credit details
- Here, you’ll see fields to enter the vendor credit details. Here’s a breakdown:
- Vendor name: Pick the vendor that is providing the refund.
- Date: Enter the date of the refund.
- Category: Choose the expense account or category related to the refund.
- Amount: Add the refund amount here.
- Memo (optional): Write a quick note about why you got the refund as a reminder.
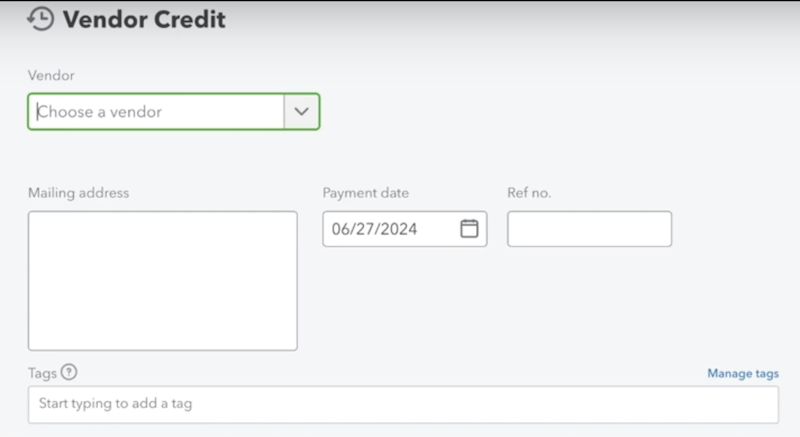
Image credit: 406 Bookkeeping Services
Save the vendor credit
- Click “Save and Close” to finish. Or, if you have more vendor credits to log, click “Save and New” to keep going.
Step 2: Record the refund deposit
It doesn’t matter how the money was returned to your business (check, direct deposit, cash, or even a tangible item)—you need to record it strictly as a deposit in your bank account.
Recording the deposit is important because it:
- Accurately shows the cash flowing into your account.
- Ensures there are no mismatches in your bank reconciliation.
- Helps QuickBooks recognize the deposit as an incoming transaction.
Navigate to “Bank Deposit”
- Log in to QuickBooks Online.
- From the + New button on the left-hand menu, select “Bank Deposit”.
Enter deposit details
- The Bank Deposit screen will open, where you can enter the following details:
- Bank account: Pick the account where the refund was deposited.
- Date: Enter the date the refund was deposited into your bank.
- Received from: Select the vendor who gave you the refund.
- Payment method: Choose how the refund was received (check, cash, etc.).
- Account: Select the right account for the refund, typically the expense account tied to the original purchase.
- Amount: Add the refund amount.
- Memo (optional): If you want, include a short description for later reference.
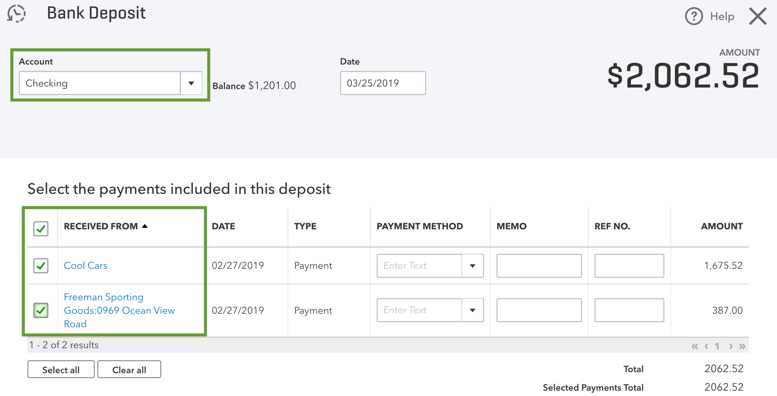
Image credit: Intuit QuickBooks
Save the deposit
- Save the deposit by clicking “Save and Close,” or select “Save and New” if you have some more deposits to add.
Step 3: Link the vendor credit to the deposit
Now, you’ll need to link the vendor credit you recorded in Step 1 to the deposit you recorded in Step 2. This lets QuickBooks connect the dots and accurately reflect the refund in both your Accounts Payable and any subsequent financial reporting.
Linking the credit matters because it:
- Prevents any duplicate transactions from showing up in your financial statements.
- Keeps your Accounts Payable and bank balance in sync.
- Makes reconciling accounts and handling audits way less complicated.
Navigate to “Pay Bills”
- Log in to QuickBooks Online.
- Select “Expenses” From the left-hand menu and then click “Pay Bills”.
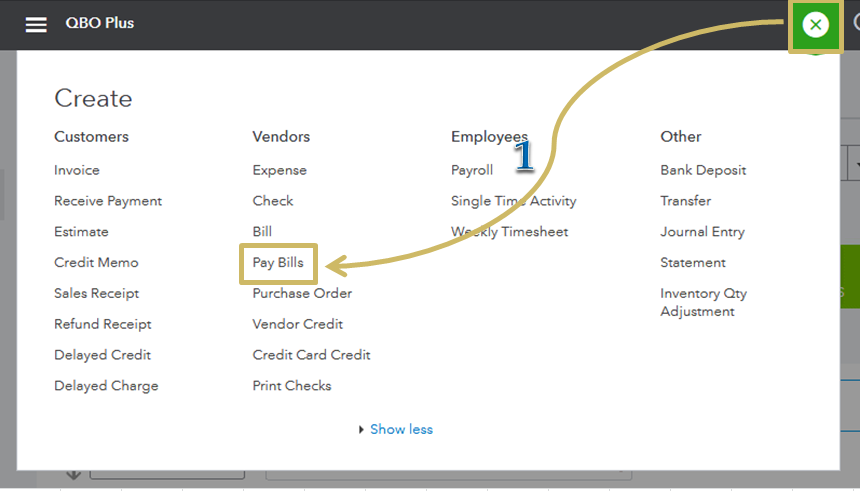
Image credit: QuickBooks
Apply the vendor credit
- Find the vendor associated with the credit.
- Check the box next to the matching bill or deposit.
- Under the “Credit Applied” field, you’ll automatically see that available credit associated with that specific vendor.
- Double-check that the credit amount matches the deposit amount.
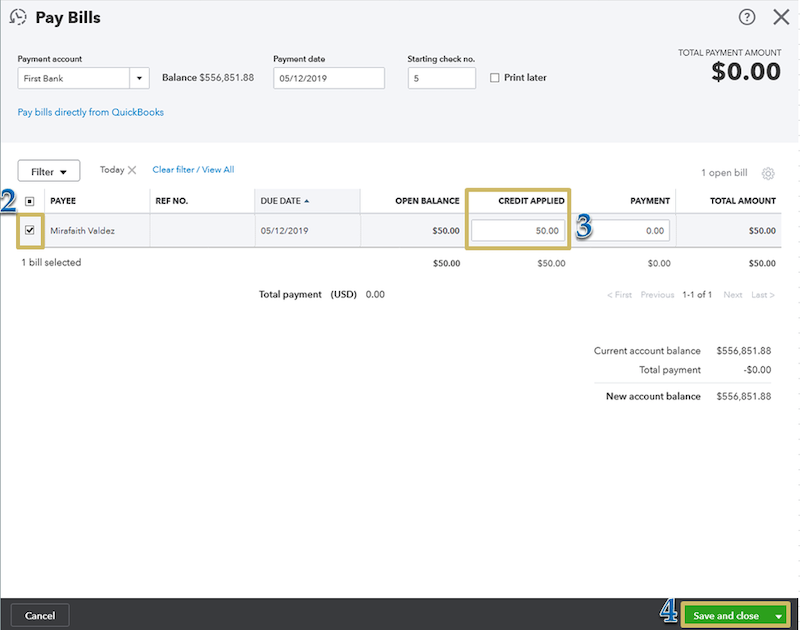
Image credit: QuickBooks
Save the payment
- When everything looks right, click “Save and Close” to finalize the payment. If you have more credits to apply, click “Save and New” to keep going.
Can you track vendor refunds separately in QuickBooks Online?
Yes, QuickBooks Online allows you to track vendor refunds completely separately. You can do this by using the Vendor Credit and Bank Deposit features, where you can create two distinct records. These will show up in your vendor reports, transaction logs, and balance sheet.
Keeping these refunds separate makes reconciliation far easier and provides a clear audit trail for tracking refunds from vendors.
What if I made a mistake while recording a vendor refund?
Everyone makes mistakes, but luckily, fixing them in QuickBooks Online is simple and easy. Here’s what you can do:
- Open the “Expenses” tab from the left-hand menu.
- Find the refund entry containing the mistake.
- Click on the transaction to open it up.
- Edit the incorrect details, like the vendor name, amount, or category.
- Click “Save and Close” to update the transaction entry.
If the mistake is big, such as selecting the wrong vendor entirely, it’s usually better to delete the entry and start over from scratch. That way, you avoid any confused looks from your accounting team down the road.
Key takeaways
- Recording vendor refunds properly is important. You need to do this to keep your bank account, accounts payable, and financial reports reliable and accurate.
- Stick to the simple three-step process. Record the vendor credit, log the refund deposit, and link the credit to the deposit for a full reconciliation of your accounts.
- QuickBooks Online makes it quite straightforward to handle your vendor refunds with handy tools like Pay Bills, Bank Deposit, and Vendor Credit.
- Always remember to link vendor credits to deposits to avoid any duplicate entries in your financial reports.
- Make use of the notes and memos features to create meaningful descriptions when recording any refunds.
Managing vendor refunds doesn’t have to be a headache. Neither does keeping your finances organized alongside your vendors, leads, and customers. Method CRM syncs directly with QuickBooks Online to centralize contact info and automate the nitty-gritty like payment tracking. The result? Spot-on financial records without the grunt work.
With Method, you get a crystal-clear view of your transactions—attach docs, customize workflows, and keep everything running like clockwork. It’s all about saving time, cutting out errors, and keeping a solid audit trail. To learn more about what Method makes possible, check out the video below:
Or, if you’re ready to see for yourself, start your 14-day free trial of Method.
How to record a vendor refund in QuickBooks Online FAQs
Can I record a partial refund from a vendor?
Yes, QuickBooks Online lets you handle partial refunds just as easily as a full one.
Just enter the partial refund amount when creating the Vendor Credit. Later, when you link the credit to a deposit, QuickBooks automatically matches the correct amount for you.
Can I attach documentation to the vendor refund transaction in QuickBooks Online?
Any receipts, invoices, or documents related to the vendor refund can and should be attached to the QuickBooks transaction for reference. You can easily do this while entering the Vendor Credit or Bank Deposit.
Look for the Attachments section and add your files there. This way, there will be plenty of reference material for anyone reviewing the transaction.
Can I record a refund from a vendor that I haven’t paid yet?
Absolutely. If you haven’t paid the bill yet but still received a refund, skip the Vendor Credit step and create a Bank Deposit for the refunded amount. QuickBooks records this as an incoming deposit in your bank account.
Is there a way to make tracking refunds easier?
If tracking refunds feels like a lot to juggle, you might want to try Method CRM. It integrates perfectly with QuickBooks to centralize vendor info and simplify payment tracking, making your accounting workflow a whole lot smoother.


