Any type of accounting done for a business requires strict organization and proactivity. While it’s a tedious task, keeping your books in order helps you stay on track for smarter decision-making and seamless tax prep at the end of the year.
With your expenses tracked, you’ll get a real-time look into your financial health at all times, and QuickBooks simplifies the process. Keep reading to learn how to categorize expenses in QuickBooks Online.
Step 1: Set up expense categories
Setting up expense categories in QuickBooks is the first step toward maintaining well-organized financial records. Follow these steps to create categories tailored to your business needs.
Navigate to the Chart of Accounts
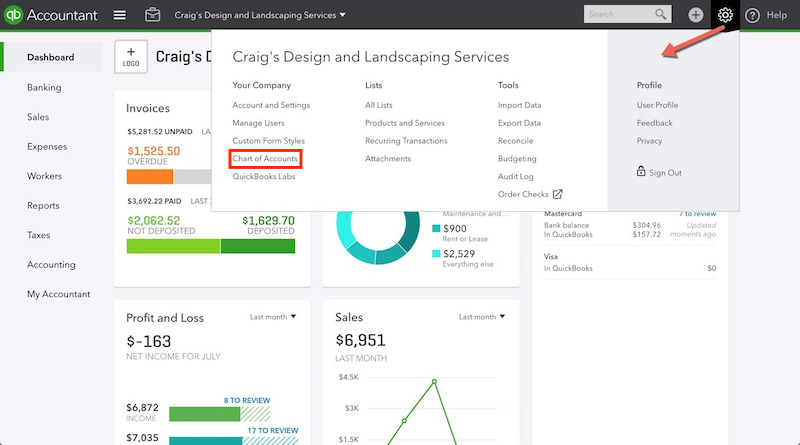
The Chart of Accounts is the backbone of your expense categorization, and is essentially the framework of your entire accounting system. To access it in QuickBooks Online:
- Log in to QuickBooks Online.
- Select “Settings” (or the gear icon) from the top-right menu.
- Click “Chart of Accounts” under the “Your Company” section.
- Review the existing list of accounts to avoid duplicates.

Image credit: QBOchat
Add new expense categories
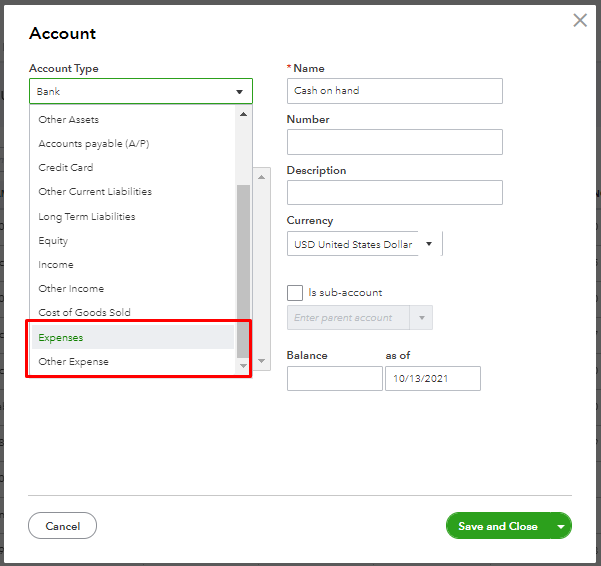
If your business needs unique expense categories, make sure you’re in the Accountant view, then:
- Click “New” at the top of the Chart of Accounts page.
- Select “Expense” as the account type.
- Enter a descriptive name (e.g., “Marketing” or “Office Supplies”).
- Add details like an account number and description for internal tracking.
- Save your new category.

Image credit: Intuit QuickBooks
Create sub-categories
Sub-categories provide more granularity for specific expenditures using the “sub-account” dropdown menu. For instance:
- Under the “Marketing” category, create sub-categories like “Social Media Ads” or “Print Campaigns.”
- This helps when analyzing expenses at a granular level while keeping the broader category intact.
Merge similar categories
To simplify reporting, merge redundant categories:
- Go to the Chart of Accounts.
- Select the category you want to merge, then click “Edit.”
- Choose the primary category you’d like to consolidate under, and confirm the merge.
Edit and delete categories
To edit or delete a category:
- Open the Chart of Accounts.
- Select the category and click “Edit” or “Delete.”
- Follow the on-screen prompts to complete your changes.
Step 2: Categorize expenses in QuickBooks
QuickBooks makes expense categorization straightforward, whether you’re recording transactions manually or syncing with your bank.
Record expenses manually
To record expenses manually:
- Navigate to the “Expenses” tab on the left-hand menu.
- Click “New Expense.”
- Fill out the vendor, payment account, and expense details.
- Select the appropriate category from the dropdown menu.
- Save the transaction.
Import and categorize bank transactions
For transactions from your bank:
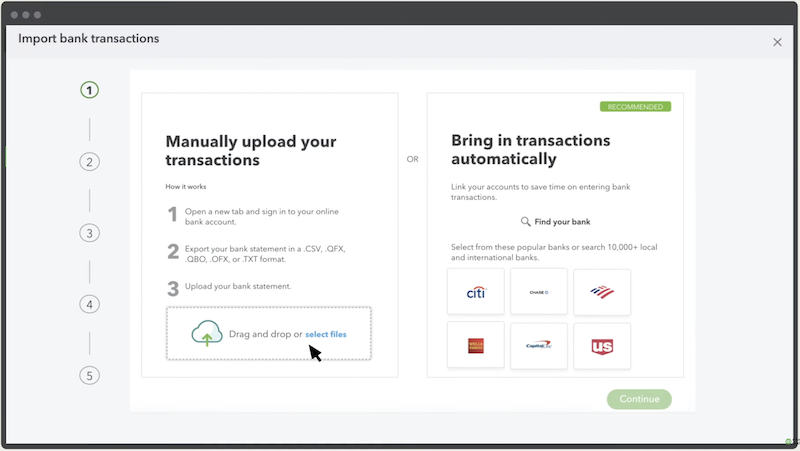
- In the “Transactions” tab, click “Bank transactions” to import them into QuickBooks.
- The system will automatically suggest categories based on transaction details. Review these suggestions and adjust as needed to ensure accuracy.

Image credit: Intuit QuickBooks
Match transactions with existing records
QuickBooks also helps match transactions to existing invoices or payments:
- After importing bank transactions, check out the “For Review” tab.
- Match transactions by clicking “Find Match” and selecting the corresponding record.
- Confirm matches to keep your accounts reconciled.
Best practices for expense categorization
Consistent and accurate categorization makes bookkeeping simpler and more effective. Follow these tips to keep your finances in check:
Consistency in categorization
Create clear categorization rules and ensure your team follows them. For example, always categorize travel-related expenses under “Travel” rather than creating multiple overlapping categories.
Regularly review and update categories
Your expense tracking needs will evolve with your business. Set aside time every quarter to review and update categories, ensuring they align with your current operations.
Use detailed descriptions and notes
Add notes or descriptions to each transaction. For instance, a note like “Client lunch with ABC Corp” under “Meals & Entertainment” helps during audits and reviews.
What should I do if I miscategorize an expense?
If an expense is categorized incorrectly, correcting it in QuickBooks is simple:
- Locate the transaction in the “Expenses” or “Banking” tab.
- Click the transaction to open it.
- Edit the category field, selecting the correct category.
- Save the changes to update your records.
Importance of accurate expense categorization in QuickBooks
Accurate expense categorization gives your business the financial visibility it needs to run smoothly, plan strategically, and stay tax-compliant. It’s a simple procedure that provides several benefits that can make a lasting difference in your business’s financial health.
Clarity in financial reporting
Clear and organized expense categories make generating and analyzing financial reports, such as profit and loss (P&L) statements, easier. Without proper categorization, reports may be cluttered with vague or badly categorized entries, making it difficult to spot trends or areas for improvement.
Categorization also gives stakeholders—like investors or lenders—a transparent view of your company’s financial health.
Better decision-making
Data-driven decisions are only as good as the data behind them. Proper expense categorization helps keep your financial data reliable, current, and easy to interpret. When you can see how much is spent in specific areas, you can make better choices relating to resource allocation, hiring, and growth initiatives.
Tax compliance
By categorizing expenses correctly, you can quickly identify which expenditures are tax-deductible and which are not. For example, certain expenses like office supplies, marketing costs, and travel expenses may be deductible, but only if they’re properly categorized. If you lump everything under “Miscellaneous,” you could miss out on valuable deductions.
Key takeaways
- Accurate categorization helps with transparent financial reporting, informed decision-making, and tax compliance.
- Setting up expense categories in QuickBooks is straightforward—use the Chart of Accounts to organize your expenses effectively.
- Regular reviews and consistent practices keep your records accurate and valuable.
Tired of wasting hours sorting through messy expense records? Integrate with Method CRM to keep your QuickBooks categories clean and your financial data accurate. Method CRM instantly syncs with QuickBooks, giving your entire team complete visibility into expense tracking—without the risk of miscategorized entries or duplicate transactions. Watch the video below to learn more.
Ready to stay audit-ready and always in control? Try Method free — no credit card required.
How to categorize expenses in QuickBooks FAQs
Can I create custom expense categories in QuickBooks?
Yes. You can create custom categories to help categorize each transaction to your business’s specific needs.
Can I merge similar expense categories in QuickBooks?
Yes, it’s possible to merge categories. Simply edit one category and merge it with another to avoid duplication and simplify reporting.
How often should I review and update my expense categories?
Review your expense categories at least once per quarter. This ensures your bookkeeping reflects any changes in your business operations or expenditures.


