As a QuickBooks Desktop user, keeping your financial records accurate and current is much easier when you import accountant changes. It helps keep everything synced up and your accounting team happy, whether you’re:
- Fixing mistakes.
- Making tax adjustments.
- Updating reconciliations from past entries.
In this article, you’ll learn how to import accountant changes in QuickBooks Desktop to keep everything accurate and up to date. By the end, you’ll be prepared to handle these imports like a pro.
What are accountant changes in QuickBooks?
Accountant changes are basically those tweaks, adjustments, or fixes your accountant makes to your books. For QuickBooks Online, these changes are made by an “Accountant User” and do not require an import, as everything is hosted in the cloud.
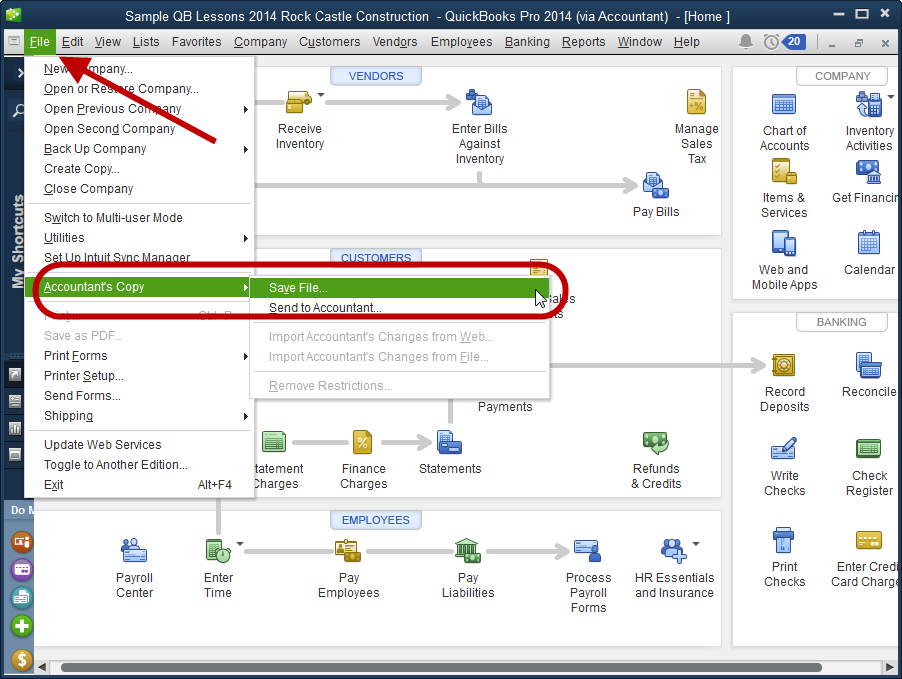
For Desktop, accountant changes typically require the “Accountant’s Copy” feature, which lets accountants make changes to your company file while you continue working on their own copy.

Image credit: QBK Accounting
Of course, with two copies, there will be discrepancies. So, once your accountant completes their adjustments, you can import them to reflect the changes on your main QuickBooks file.
These edits usually come right after they have reviewed your financial records and noticed a few things that weren’t quite correct. They might include:
- Reconciliations: Making sure your bank statements line up perfectly with your QuickBooks records.
- Tax adjustments: Fixing anything that would impact your tax filings, like moving expenses into the right categories.
- Journal entries: Adjusting older transactions to fix mistakes or account for things like accruals.
- Category changes: Reclassifying expenses or payments into the right buckets and categories for more accurate reporting.
These changes are key to keeping your financial records accurate, staying on the right side of the IRS, and ensuring that all your financial reports accurately reflect what’s happening financially in your business.
5 steps to import accountant changes in QuickBooks Desktop
Importing accountant changes into QuickBooks Desktop is a straightforward enough process, but taking the time to do it carefully means your records will stay as accurate and audit-ready as your accountant intended. Here’s a step-by-step guide to handle it:
Step 1: Prepare for import
Before you start, you’ll need to prepare your company file. A little preparation goes a long way, and in the case of QuickBooks, it will save you a lot of issues down the road.
Key preparation steps:
- Coordinate with your accountant: Make sure you’re on the same page about any changes being made and whether a second glance is required before the import.
- Back up your company file: Don’t skip this step. If something goes wrong during the import, backing up your company file will be a lifeline when restoring the data.
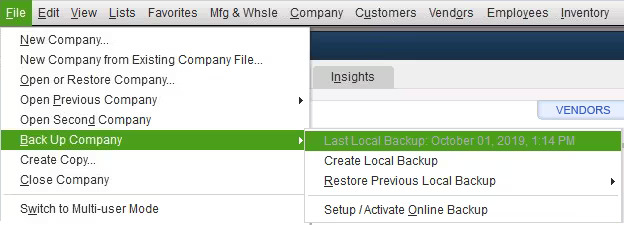
Here’s how to back up your company file in QuickBooks Desktop:
- Open QuickBooks Desktop.
- Go to the “File” menu.
- Select “Back Up Company” and then click “Create Local Backup”.
- Pick where you want to save the backup on your computer.
- Click “Save” to complete the backup.

Image credit: Intuit QuickBooks
Once the backup is saved, you can move on to the next step.
Tip: It’s good practice to store the backup in several places. One instance on your computer is fine, but it’s smart to leverage additional media storage like a flash drive, as well as using your Network Attached Storage (NAS) or a cloud-based file storage tool. Ask your IT team for help if needed.
Step 2: Access the company file
Now is the time to pull up your company file so you can start the import. This ensures you’re working with the correct file.
Here’s how to access your company file:
- Go to the “File” menu at the top-left corner of the screen.
- Select “Open or Restore Company” from the menu.
- Find and open the file you want to work on. Double-check it to make sure you have selected the right one.
Step 3: Start the import process
Now, it’s time to import the changes your accountant made and sync them with your QuickBooks Desktop records.
To initiate the import process:
- Click on the “File” menu at the top-left of the screen.
- From the dropdown, select “Utilities”.
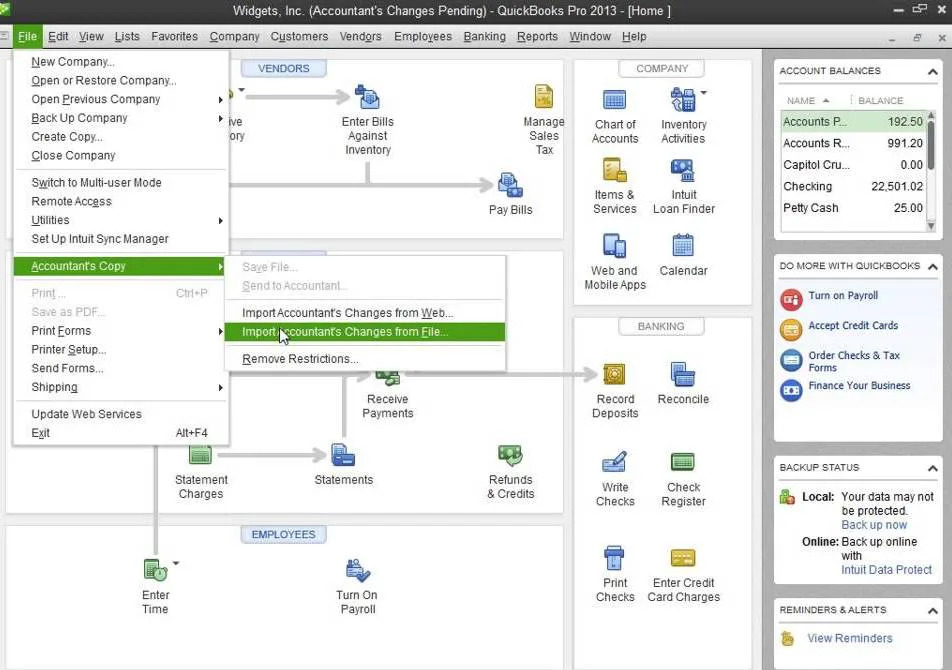
- Click “Import” and then choose “Accountant Changes.”
- You’ll be prompted to locate the .QBY file (the file your account will have sent with their changes).

Image credit: WizExpert
How to choose and import the accountant changes:
- Find the .QBY file on your computer (the one your account sent you).
- Select the file and follow the instructions on the screen to start the import.
- QuickBooks Desktop will check the file to make sure it’s compatible with your company file, and if everything checks out, the import will start.
This part might take a few minutes, depending on the size of the file, and how many changes your accountant made. Be patient while it’s being imported, as it’s common for the progress to stall from time to time.
Step 4: Review and accept changes
Once the import finishes, QuickBooks Desktop will show you a list of your accountant’s changes. This is your final chance to review everything and make sure you’re happy before it gets added to your records.
To review and accept accountant changes:
- Check the summary: You’ll see a breakdown of the changes, such as adjustments to journal entries, reclassifications, or reconciliations.
- Go through each change: If something doesn’t add up or looks off, don’t hesitate to contact your accountant to discuss it.
- Approve or reject changes: After reviewing, decide whether or not to accept or reject each adjustment.
Taking a moment to review each and every change now will save you from dealing with adjustments and mistake-fixing later.
Step 5: Stay connected with your accountant
Your accountant plays a key role in keeping your finances in top shape, so it’s a good idea to maintain communication during the import process.
Here’s how to stay connected:
- Ask questions: If something isn’t clear, don’t hesitate to contact your accountant before approving any changes.
- Use QuickBook Notes: The Notes feature in QuickBooks Desktop lets you flag anything quickly that you want to discuss or clarify with your accountant.
- Set a regular review schedule: If you’re importing changes every month or quarter, schedule a quick Zoom call or meeting ahead of time to go over everything together.
Once you’re on the same page as your accountant, accept the changes and integrate them into your QuickBooks file. Keeping communication open helps you address issues quickly, understand why adjustments were made, and, most importantly, ensure that all financial records stay accurate and compliant.
Tips for seamless collaboration when importing accountant changes
Working more closely with your accountant makes the process of importing changes into QuickBooks much less stressful. Here are a few ways to keep collaborating and stay in your accountant’s good books:
Establish clear communication
Decide together upfront how and when changes will happen. Will you review everything before it’s imported? Or will you take a look at it afterward? Setting clear expectations will save you both a lot of time and frustration.
Agree on a timeline
Setting schedules for when changes are to be made and imported into QuickBooks is the best way to avoid last-minute surprises and keep your day-to-day bookkeeping on track.
Use the “Notes” feature in QuickBooks
Both QuickBooks Online and Desktop have a Notes feature. Use it to leave comments and provide useful context for your accountant. These can be about specific transactions or areas that need a little extra attention. It’s one of the best ways to keep on the same page.
Regularly reconcile your accounts
Regular reconciliation in QuickBooks is one of the easier ways to keep records clean and make your accountant happy by reducing the adjustments that they need to make.
Here’s a quick step-by-step, but for a more detailed guide, we have a more in-depth article here.
- Log in to QuickBooks and select “Reconcile” from the “Accounting” or “Tools” menu.
- Pick the bank or credit card account you need to reconcile from the downtown menu.
- Enter your statement details by inputting the ending balance and statement from your most recent bank or credit card statement.
- If the balances don’t align, don’t panic. Fix any discrepancies by checking for errors like duplicate transactions, missing entries, or an accidental typo. Adjust these as needed to fix them.
- Once the difference is $0, click on “Finish Now” to complete the process.
- Schedule this process to occur monthly or quarterly, depending on your schedule and cash flow.
Why should you import accountant changes in QuickBooks?
While it may feel like another annoying admin tasks, importing changes made by your accountant is essential for your business, and here’s why:
- Accurate financial records: When you import changes, your books are always updated with the latest adjustments, cutting down on any errors that can throw your books.
- Audit readiness: If you’re ever faced with the unpleasant experience of an IRS audit, having accurate records with a clear audit trail will save you a lot of stress.
- Compliance: Financial compliance is an accountant’s bread and butter. So when they make adjustments, and you import them into your QuickBooks, it means you can be confident everything financially is above board and in good standing.
- Informed decision-making: Clean, up-to-date financial data gives you a much clearer picture of your business, helping you make smarter decisions for the future.
Key takeaways
- Keep your financial data accurate and clean: Importing accountant changes means your records are current and ready for any surprises (like an audit).
- Always back up your company file: Before importing changes, create a backup to protect your data in case anything goes wrong. Store multiple copies.
- Communicate with your accountant: Clear communication and schedule imports to avoid any confusion.
- Reconcile accounts regularly: Stay on top of reconciliation. It will minimize the need for constant adjustments and save time for both you and your accountant.
Ready to simplify your imports?
Looking for an easier way to manage your financial data? Try Method. It connects to your QuickBooks to help you track transactions and interactions, automate workflows, and generate customized reports without the repetition and hassle. Plus, your whole team can stay in the loop without making accidental changes or having direct access to your sensitive financial information.
The best part? Method gives you remote access to your QuickBooks Desktop data, meaning you can access information and make changes anytime, anywhere. No more being bound to the desktop computer at your office! To learn more about Method, check out the video below.
Extend the power of QuickBooks with your 14-day free trial of Method. No credit card required.
How to import accountant changes in QuickBooks FAQs
Can I undo accountant changes after importing them in QuickBooks?
Yes, but the only way to undo changes after an import is by restoring the backup of your company file. That’s why creating a backup before importing changes is absolutely essential.
Do I need to close my QuickBooks file while my accountant works on it?
No, it’s not necessary to close your file. Your accountant can work on a copy of the company file instead. Once they are finished making adjustments, they will send their copy in the form of a .QBY file, which you then import. This can all be done without ever closing QuickBooks.
How often should I import accountant changes in QuickBooks?
It depends on your business and your cash flow. For smaller businesses, quarterly imports are generally enough. But if you’re dealing with a lot of transactions or running a medium-sized business, monthly imports are ideal.


