As your business expands, you may encounter duplicate vendor profiles. These discrepancies quickly become challenging to manage, adding unnecessary complexity to your records.
Merging vendors in QuickBooks organizes your records and helps prevent confusion during invoicing, reporting, and tax filing.
In this article, you’ll learn how to merge vendors in QuickBooks to ensure your vendor list remains clean and up to date. Let’s get started.
What is merging vendors in QuickBooks?
Merging vendors in QuickBooks is the process of combining two or more vendor profiles into a single entry. This is necessary when you have duplicate vendor records, often caused by slight variations in how you enter information (like different spellings of a company name or separate entries for the same business under different contact details). Over time, these duplicates clutter your system, making it harder to track transactions, pay bills, and generate accurate reports.
Merging vendors consolidates all transactions and payments for a specific vendor into a single profile. This:
- Helps eliminate confusion.
- Ensures your financial data remains clean and accurate.
- Simplifies your accounts payable management.
Steps for how to merge vendors in QuickBooks
Now that we understand what merging vendors means, let’s walk through the steps to:
- Identify duplicate vendor profiles.
- Verify their details.
- Consolidate them into a unified profile.
QuickBooks Online
QuickBooks Online simplifies vendor management by helping you track payments, bills, and purchases. You can easily add, edit, and organize vendor details.
Identifying duplicate vendors
To search for and identify duplicate vendors in QuickBooks Online:
- Open your QuickBooks Online account and navigate to the dashboard.
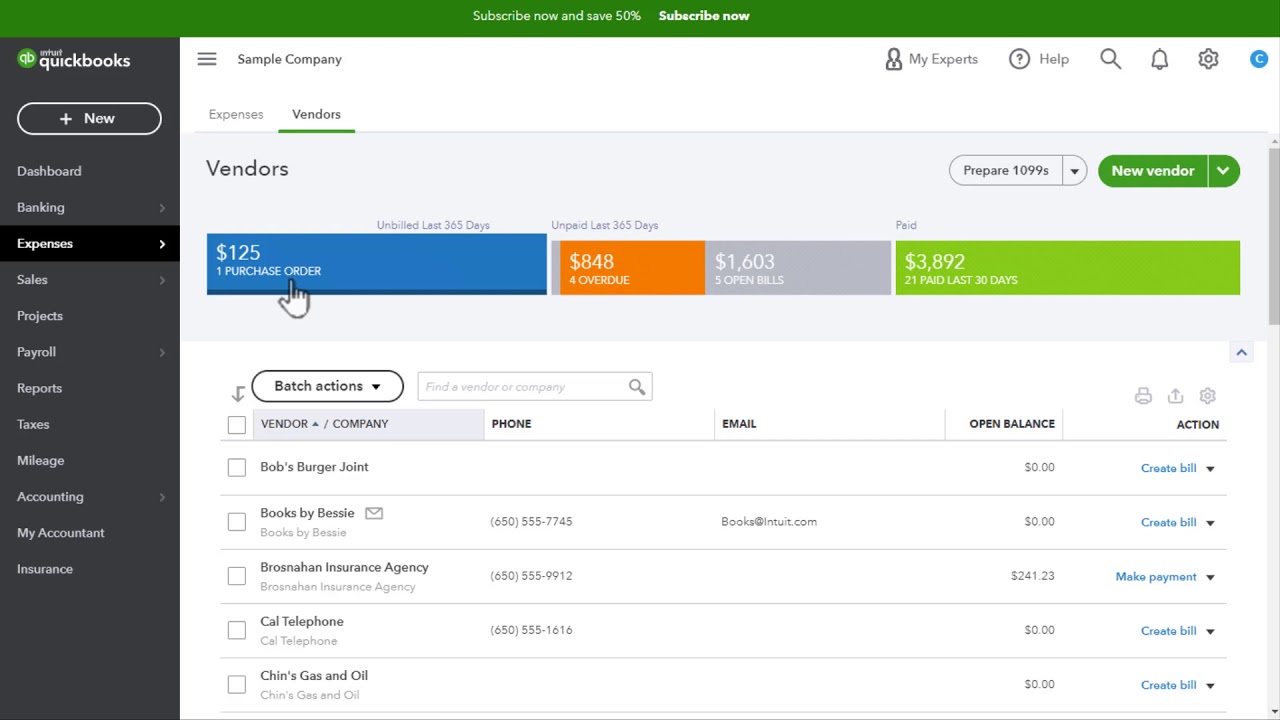
- From the left-hand menu, click “Expenses” and select “Vendors” to access your vendor list.
- Use the search bar at the top of the vendor list to type in the vendor name you suspect may have duplicates.
- Scan through the list for vendors with similar but not identical names. These may include slight spelling differences, abbreviations, or extra spaces.
- Click on each vendor’s name to open their profile. Compare contact information, addresses, and transaction history to confirm if they are duplicates.

Image credit: Rex Jacobsen
Merging duplicate vendors
After identifying duplicate vendors, the next step is to merge them. Here’s how to go about that:
- Decide which vendor profile you want to keep as the main entry.
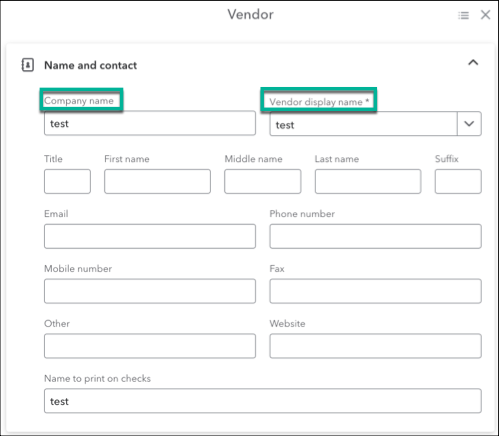
- Open the duplicate vendor profile and click on “Edit.”
- Change the display name of the duplicate vendor to exactly match the name of the primary vendor.

Image credit: Intuit QuickBooks
- Click “Save” to update the vendor. QuickBooks Online will automatically merge the two vendor profiles, transferring all transactions from the duplicate vendor to the primary vendor.
- Return to the vendor list to ensure the duplicate entry has been removed and all transactions are correctly consolidated under the primary vendor profile.
Note: QuickBooks Online only lets you merge up to four vendors at a time.
Updating transactions and information
Although the vendors have been merged, your job isn’t quite done yet. You still need to verify that all transactions and information were merged as well. To do that:
- Check the transaction history of the primary vendor to ensure that all payments, bills, and credits from the duplicate vendor have been transferred correctly.
- If the duplicate vendor had any open balances or unpaid bills, ensure they are now reflected under the primary vendor’s account. You may need to adjust any discrepancies manually.
- If the duplicate vendor had different payment methods or bank account details, update the primary vendor’s profile with this information, if necessary.
- Ensure that any linked transactions, such as invoices or purchase orders, are now correctly associated with the primary vendor. If any are still linked to the duplicate, update them to reflect the primary vendor.
- Review your accounts payable and related reports to ensure everything is accurate and balanced. This will help catch any missing or incorrect transactions.
- Ensure that the primary vendor profile contains all relevant details and combines the data from both vendors, including:
- Contact information.
- Tax ID.
- Payment terms.
- Finally, run updated reports, such as the Vendor Balance Detail report, to confirm that everything is correctly merged and that all data is accurate.
QuickBooks Desktop
QuickBooks Desktop offers similar vendor management features as QuickBooks Online, letting you create and organize vendor profiles, record bills, make payments, and generate reports. To merge vendors on QuickBooks Desktop:
Open the Vendor Center
- Launch your QuickBooks Desktop application.
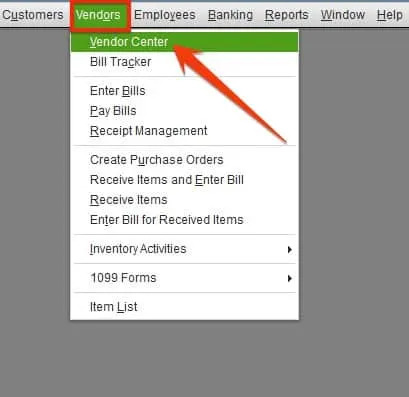
- On the top menu bar, click on the “Vendors” tab.
- From the drop-down menu, select “Vendor Center.”
- The Vendor Center will open, displaying a list of all your vendors, where you can add, edit, or manage vendor information.

Image credit: PNATC
Identify duplicate vendors
- In the Vendor Center, use the search bar at the top to search for vendor names you suspect might have duplicates.
- Look for vendors with similar names, slight spelling differences, or variations in contact details.
- Click on each vendor’s name to open their profile and compare details such as addresses, contact information, and transaction history to confirm duplicates.
- Check if the vendors have overlapping transactions or bills, which could indicate they are duplicates.
- Once identified, make a list of the vendors you believe are duplicates.
Note: If you’re using the Accountant or Enterprise version of QuickBooks Desktop, note that there is a specific “Merge Vendors” button once you’ve identified duplicates.
For Accountant:
- Go to “Accountant.”
- Select “Client Data Review.”
- Click “Merge Vendors.”
For Enterprise:
- Go to the “Company” tab.
- Select “Accounting Tools.”
- Click “Merge Vendors.”
Edit the vendor to be merged
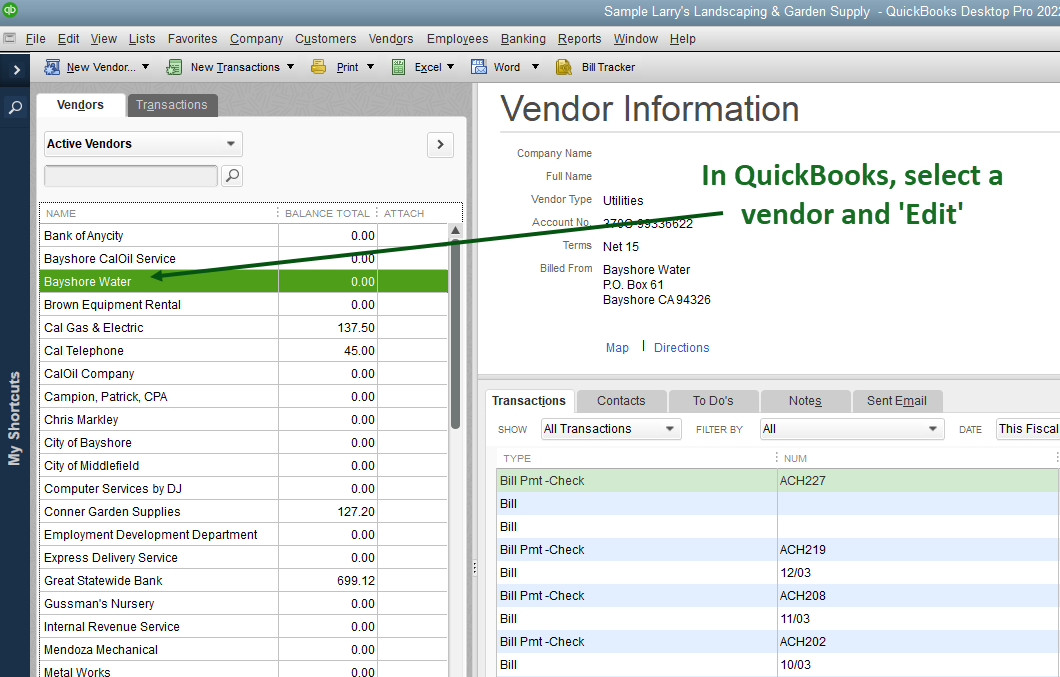
- Click on the vendor name you want to edit (typically the duplicate vendor that you want to merge into the primary one).
- In the vendor’s profile, click the “Edit” button in the bottom right corner.
- This will open the edit window where you can see the vendor’s details.

Image credit: Treasury Software
Modify vendor name
- In the edit window, go to the “Vendor Name” field and update the name to exactly match the primary vendor’s name. This ensures both profiles align correctly for merging.
- After updating the name, click “OK” or “Save & Close” to save your changes.
- Double-check that the vendor name now matches the primary vendor’s name and is ready for merging.
Confirm changes
- If necessary, make any last-minute changes to the vendor details, ensuring they match the primary vendor’s profile.
- Once satisfied with the details, click “OK” or “Save & Close” to finalize the edits.
- Review the updated vendor profile to verify that QuickBooks applied all changes correctly and that the details are consistent with those of the primary vendor account.
- If there are other duplicate vendors, repeat the steps to edit and confirm their details before merging.
Verify vendor list
Having completed your modifications, it’s time to ensure everything adds up. To verify the updated vendor list:
- Click on the “Vendors” menu at the top, then select “Vendor Center.”
- In the Vendor Center, scroll through your list of vendors to check that you’ve correctly updated all details for each vendor.
- Use the search bar to locate specific vendors you’ve edited or merged. Ensure their names, addresses, and other details are accurate and consistent.
- Look for any remaining duplicates or inconsistencies in vendor names or information. If you find any, address them by editing or merging as needed.
- Click on individual vendor profiles to confirm that their transaction history (bills, payments, refunds, etc.) properly matches to the primary vendor.
- Generate reports such as the “Vendor Contact List” or “Vendor Balance Detail” to ensure that all information is accurate and that no entries are missing or duplicated.
- Double-check the balances for each vendor to ensure there are no discrepancies after merging.
- Once everything appears accurate, save any changes and ensure your vendor list is up to date and ready for use.
Essential considerations when merging vendors in QuickBooks
When merging vendors in QuickBooks, you need to pay careful attention to ensure you combine the right profiles and accurately transfer all relevant data. Here are some essential considerations to help you avoid errors and ensure a smooth vendor merge process.
Back up your data
Always create a backup of your QuickBooks company file before making any changes, including merging vendors. Doing this:
- Protects against mistakes, allowing you to revert to the original data if there are errors during the merging process.
- Preserves data integrity, ensuring all transactions and vendor details remain intact, even if they are unintentionally altered or lost.
- Avoids permanent changes, protecting your financial records from becoming compromised if your team makes any mistake.
Review transactions
Before you merge vendors in QuickBooks, carefully review all transactions associated with them. This helps ensure that you don’t lose or incorrectly transfer any important financial data. Reviewing transactions helps you:
- Ensure you’ve correctly transferred all transactions to the primary vendor profile.
- Account for open bills or payments associated with the duplicate vendor.
- Prevent lost or duplicated transactions during the merge process.
- Ensure that you’ve linked all associated transactions, such as purchase orders or credit memos, to the correct vendor profile.
- Confirm that reports like accounts payable or vendor balance details remain accurate post-merge.
Custom fields
When merging vendors in QuickBooks, consider how to handle custom fields. Custom fields are unique data fields that businesses use to track specific vendor information, such as contract numbers or special payment terms.
Since QuickBooks merges vendor profiles based on the name and primary details, custom fields from the duplicate vendor profile may not automatically transfer to the primary vendor profile. So it’s a good practice to manually transfer any vital information stored in custom fields to the primary vendor’s profile before merging.
This ensures that you don’t lose any critical details unique to the duplicate vendor. After merging, review the primary vendor profile to verify that QuickBooks has correctly carried over all custom field data.
Why do you need to merge vendors in QuickBooks?
Merging vendors in QuickBooks has a couple key perks. It helps keep your data accurate and makes handling vendors easier. When you combine duplicate vendor profiles, you cut out confusion in your records and ensure that all your transactions and payments connect to one vendor account.
You’ll notice fewer mistakes, such as missed payments or double bills. This also helps you better see what each vendor is doing. Plus, with less clutter in your vendor list, managing your accounts payable becomes a breeze. You’ll find that creating reports is simpler and more dependable. In the end, this saves time and makes your financial management smoother.
Key takeaways
- Merging vendors consists of combining two or more vendor profiles into a single entry.
- The vendor merging process in QuickBooks Desktop differs slightly from that of QuickBooks Online.
- Always back up your QuickBooks company profile before initiating a merge process.
- Confirm consolidation of transactions and information after merging vendors.
Want to extend the limits of QuickBooks? You can simplify vendor management and so much more with Method.
Designed for QuickBooks users, it syncs your leads, customers, and vendors in real time—no duplicates, no errors, no headaches. And that’s just the tip of the iceberg.
Watch the video below to learn more about what Method makes possible for your business.
Ready to give it a shot? Try Method free for 14 days—no credit card required.
How to merge vendors in QuickBooks FAQs
Can I undo a vendor merge in QuickBooks?
Unfortunately, once you complete a vendor merge in QuickBooks Online, you cannot undo it. This is why it’s crucial to carefully review all vendor details and transactions before merging. That said, in some versions of QuickBooks Desktop, there is a limited window of time during which you can use the “Undo” feature to reverse a merge.
Can I merge vendors with different currencies?
QuickBooks does not allow you to merge vendors that have different currencies assigned to them. QuickBooks links each vendor to a specific currency, and requires that both vendors involved in the merge share the same currency. If you attempt to merge vendors with different currencies, you’ll receive an error message and won’t be able to complete the process. To resolve this, you would need to manually adjust the currency settings or re-enter vendor information to ensure consistency before merging.
Can I merge a vendor with a customer in QuickBooks?
No, QuickBooks does not allow you to merge a vendor with a customer. QuickBooks treats vendors and customers as separate entities within the system, each with its own set of features and transactions. Merging them could cause confusion in your records, as vendors typically deal with accounts payable, while customers are linked to accounts receivable.


