New leads are the lifeblood of any business — but who has the time to manually enter lead data?
Method’s web to lead app is a great solution for anyone who wants to spend less time capturing sales info and more time closing sales. With the app, you can embed a public form on your website to capture new leads 24 hours a day. When a potential customer fills out the form, Method automatically logs their information in your CRM and sends an email to your sales team.
We’re pleased to announce that we’ve recently released several updates to the web to lead app to improve our users’ lead management experience.
What Has Changed in the Web to Lead App?
New form preferences
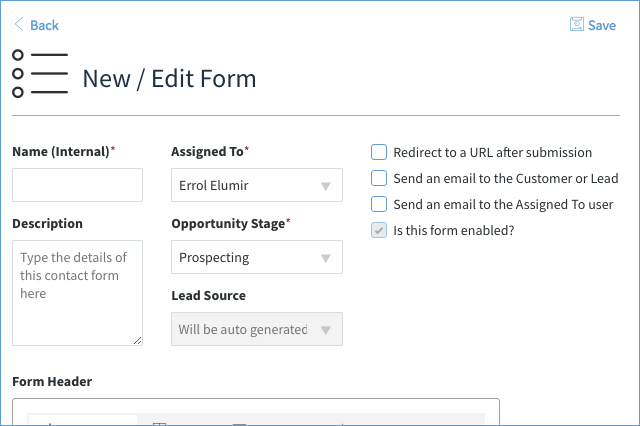
When you create or edit a web to lead form, you will see several new preference options. These preferences give you greater control over how your form behaves and how the data submitted through the form is tracked in Method.

Here are some of the new preferences available:
Opportunity Stage: Set the default stage for opportunities created from the submitted web to lead form. Previously, this was always set to Prospecting.
Lead Source: Set the default source for leads created from the submitted web to lead form. Previously, this was always set to Web.
Redirect to a URL after submission: When checked, leads will be redirected a certain URL after the form is submitted. When unchecked, a thank you message will be displayed. Previously, a thank you message was always displayed.
Send an email to the Customer or Lead / Send an email to the Assigned To user: When checked, an email will be sent to the lead and/or the assigned Method user after the form is submitted. Previously, you could not opt out of sending these emails.
Create multiple forms with unique URLs and preferences
Previously, the web to lead app was only set up to manage one web to lead form. Now, you can create multiple forms within the app. Let’s take a closer look at how this works.
Can each form show different data fields?
By default, each form will show the same standard data fields (name, phone, email, etc.). For advanced users who wish to add or remove certain fields from one of their forms, this can be done by creating a copy of the “Customer Form” screen and customizing that copy.
In the future, all users will be able to manage which fields are shown on which forms directly within the web to lead app — stay tuned!
What are the benefits of creating multiple forms?
Previously, your single web to lead form captured lead information and it was assigned to one Method user with one lead source. But what if you wanted to distinguish between different lead sources, or assign some leads to different users?
With the updated web to lead app, you can create multiple web to lead forms, each with its own URL and unique preferences like those described above. This gives you greater control over how you track and manage your leads within Method.
When could you use multiple forms?
Here’s an example: imagine you’re running lead generation campaigns on Twitter and Facebook. Naturally, you want to track which leads come in through each platform. You also want to divide the workload amongst your sales reps, so Alanna handles the Twitter leads and Errol handles the Facebook leads.
Now it’s easy to set this up! Simply create two forms and set your Lead Source and Assigned To preferences as desired. Each page will have a unique URL that you can share on the designated social platform. When someone clicks one of these links and submits the form, Method will automatically label and assign the new lead appropriately.

View form response metrics
When you open your web to lead app, you will see a list of all of your forms. This list displays new metrics for each form, including number of views, number of responses, and response rate. These metrics can help you assess how each of your forms is performing.

If you have any questions about the updated web to lead app, check out our help center or contact our team!


