When you start managing your business with QuickBooks, you’ll encounter a term called Opening Balance Equity (OBE). If you’re new to accounting software or just launching your business, you might wonder what OBE is and why it’s important.
Getting this right ensures your books are accurate from the get-go. If your records are off, it could cause significant problems down the line. You want your balance sheet to show what’s really going on with your finances.
In this article, we’ll answer the question, “what is Opening Balance Equity in QuickBooks?” By the end, you’ll know why it matters and how to use it correctly. Let’s dive in!
What is opening balance equity (OBE) in QuickBooks?
In QuickBooks, OBE stands for “Opening Balance Equity.” It’s an account that tracks the starting balances of your business’ assets, liabilities, and equity, making it essential during your initial account setup.
Here’s a simple explanation: OBE acts as a temporary placeholder for your money. When you set up QuickBooks and enter starting balances for accounts like bank accounts, credit cards, or loans, there needs to be a way to balance your books. That’s where Opening Balance Equity comes into play—it helps ensure everything aligns as you begin tracking your finances.
Think of Opening Balance Equity (OBE) as a temporary holding account for your starting balances. When setting up QuickBooks, you’ll input your company’s initial balances for accounts like cash, loans payable, and accounts receivable. OBE ensures these numbers are balanced, providing a clear and accurate snapshot of your business’ financial position.
Here’s how it works: When you set up your company file in QuickBooks, the system automatically creates an Opening Balance Equity (OBE) account. As you enter your opening balances, QuickBooks records these amounts in the OBE account to maintain the accounting equation:
Assets = Liabilities + Equity.
Once your setup is complete, QuickBooks automatically clears the OBE account by transferring its balance to your company’s retained earnings or equity accounts. This ensures the OBE account no longer appears on future financial statements, providing a clear and accurate view of your business’ financial health.
How OBE is created in QuickBooks
QuickBooks automatically generates an OBE account to temporarily balance the difference between your business’ assets and liabilities. The process begins when you create a company file, configure your settings, and choose an accounting method.
As you enter opening balances for your assets, liabilities, and equity accounts, the OBE account offsets these amounts. Once the setup is complete, QuickBooks transfers the OBE balance to retained earnings or equity accounts, ensuring your financial records are accurate and ready for use.
Entering starting balances for accounts
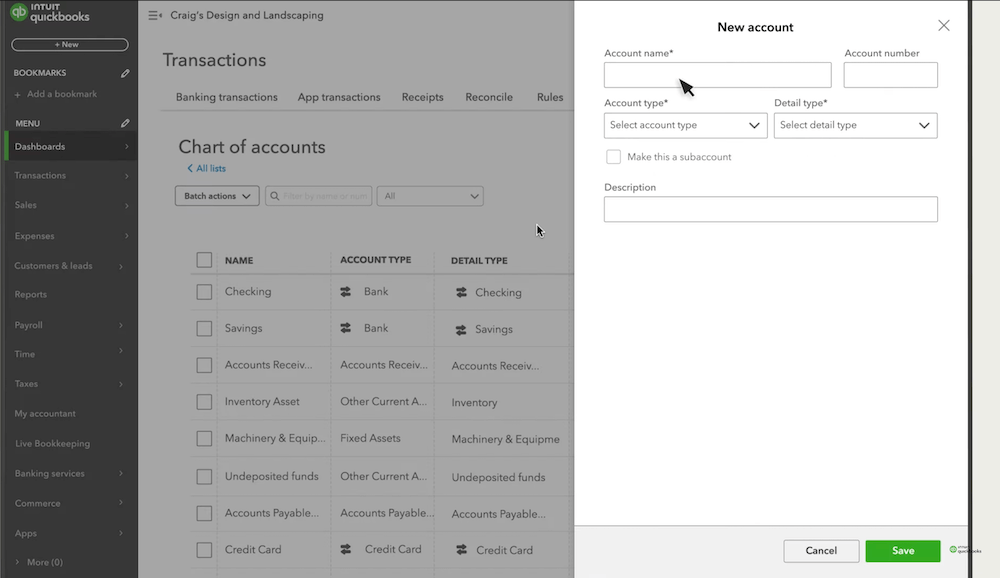
Take the following steps to enter initial balances:
- Open QuickBooks and access your company file.
- Go to “Lists” > “Chart of Accounts”.
- Right-click and select “Account” > “New”.
- Enter an account name.
- Choose an account type.
- Select detail type.
- Check the “Make this a subaccount” box if the new account is a subaccount. Then, select its parent account.
- Input opening balance.
- Specify the balance date in the “As of” field.
- Click “Save”.

Image credit: Intuit QuickBooks
Keep in mind that the steps above apply only to bank, asset, credit card, liability, or equity accounts. Asset accounts include cash, accounts receivable, and inventory. For cash, use your bank statement balance as the opening balance. For accounts receivable, input any outstanding invoices. And for inventory, record the value of your initial stock.
Liabilities cover loans payable (outstanding loan balances), accounts payable (unpaid bills), and credit cards (credit card balances). Equity accounts include common stock, representing the initial investment, and retained earnings, which reflect prior earnings.
Connecting bank accounts
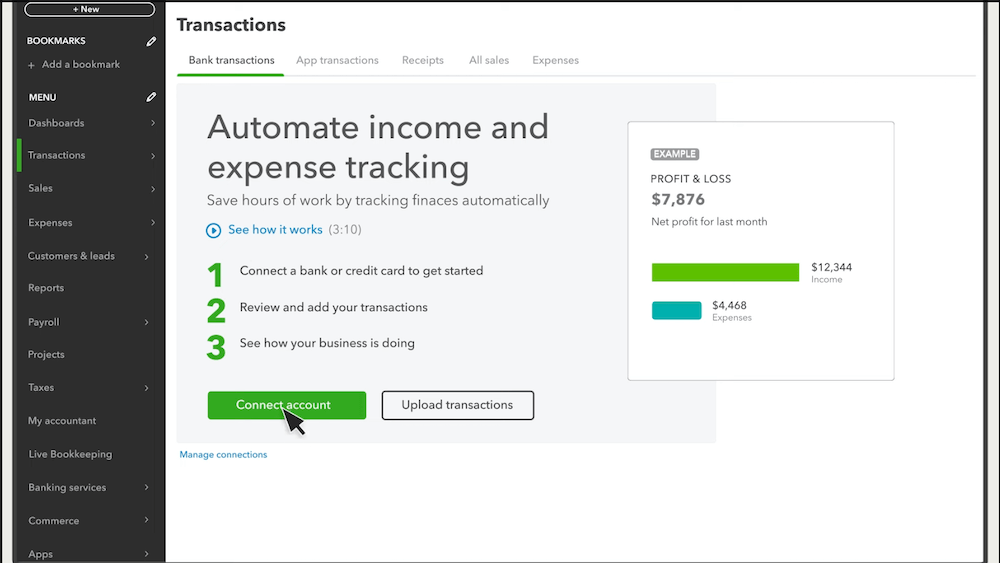
To connect bank accounts to QuickBooks:
- Open QuickBooks and go to the left-hand menu.
- Click on the “Bookkeeping” tab, select “Transactions,” and choose “Bank Transactions.”
- Click on “Connect account.” You can select “Link account” if you’ve already connected an account.

Image credit: Intuit QuickBooks
- Search for your bank from the list or enter its name in the search bar if it’s not listed. Once found, click “Let’s Go.”
- Read the terms and conditions and click “Agree.”
- You’ll be prompted to log in with your online banking credentials. Enter your username and password.
- Follow any additional prompts from your bank for security verification.
- Select the specific account(s) you want to connect (like checking or savings) and click “Finish.”
- Specify the date range for the transactions you wish to import, typically up to two years.
- Click “Connect,” and QuickBooks will begin importing your transactions, which may take a few minutes.
- Once connected, navigate back to the “Banking” section. You’ll see all your transactions listed under each account.
- Take time to categorize and review these transactions for accuracy.
When you import historical transactions, QuickBooks automatically sets an opening balance for your bank account. Any discrepancies between your initial asset and liability entries may lead to adjustments in the Opening Balance Equity (OBE) account.
If your recorded bank balance doesn’t align with other entries, QuickBooks uses OBE as a temporary placeholder to balance the difference. It’s important to monitor this account and address discrepancies promptly. Leaving unadjusted amounts in the OBE can distort your financial statements, making it harder to accurately assess your business’ financial health.
Adding inventory quantities
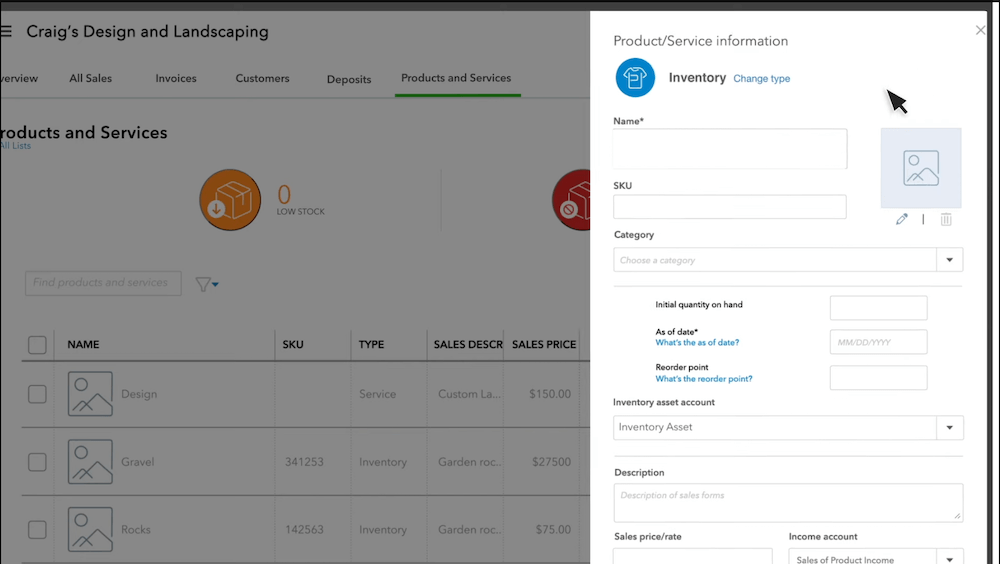
To add initial inventory quantities in QuickBooks:
- Log into QuickBooks and navigate to the “Settings” gear icon.
- Under “Account and Settings,” go to the “Sales” tab and enable the options for “Show Product/Service column on sales forms” and “Track quantity and price/rate” to activate inventory tracking.
- Click the “Products and Services” link under the “Lists” heading. This will take you to where you can manage your inventory items.
- Click the “New” button or “Add an item” button. Select “Inventory” from the dropdown menu to add a new item.
- In the “New Item” window, fill out the necessary details such as:
- Name: A unique identifier for your inventory item.
- SKU: A unique code used to track the item in inventory.
- Category: The classification of the item for organization and reporting.
- Initial quantity on hand: Enter the quantity you have as of your start date.
- Sales price/rate: The price at which you will sell the item.
- As of date: Set this to when you want to start tracking inventory.
- Reorder point: The minimum quantity at which you want to be alerted to reorder the item.
- Inventory asset account: The account used to track the value of your inventory assets.
- Description: A brief description of the item.
- Sales price/rate: The price at which you will sell the item (may need to be filled again if required).
- Income account: The account that records income from sales of this item.

Image credit: Intuit QuickBooks
- Once all details are entered, click “Save and Close” to add the item to your inventory list.
- If you need to adjust quantities after entering them, return to the “Products and Services” page, select your item, and make any necessary adjustments.
When you input initial inventory quantities, QuickBooks temporarily balances these entries using the Opening Balance Equity (OBE) account. If discrepancies exist between your recorded inventory assets and liabilities, QuickBooks adjusts OBE as a placeholder until you correctly allocate the amounts to their appropriate accounts.
How to use OBE in QuickBooks manually
Effectively managing Opening Balance Equity (OBE) is crucial for maintaining accurate financial statements. Neglecting it can lead to confusion and an unclear picture of your business’ financial health.
By properly handling OBE, you’ can’ll ensure your records stay balanced and gain a clearer understanding of your business’s performance.
Entering opening balances
To enter opening balances in QuickBooks:
- Navigate to “Lists” > “Chart of Accounts”.
- Choose an account requiring an opening balance.
- Right-click and select “Edit Account”.
- Input balance in the “Opening Balance” field.
- Specify the balance date in the “As of” field.
- Click “Save” to record the opening balance.
When you enter your opening balances, QuickBooks automatically creates a journal entry that debits or credits the Opening Balance Equity (OBE) account. This adjusts the OBE by the corresponding opening balance amount, either increasing or decreasing it to ensure your accounts remain balanced.
Reconciling opening balances
To reconcile opening balances with bank statements and other financial records:
- Start by collecting bank statements, invoices, receipts, and ledger accounts.
- Ensure accuracy of opening balances in QuickBooks.
- Determine the reconciliation period.
- Compare QuickBooks records with bank statements.
- Confirm deposits, withdrawals, and transfers.
- Note differences between QuickBooks and bank statements.
- Enter adjustments for discrepancies.
- Ensure bank fees, service charges, transaction fees, and interest are captured in QuickBooks.
- Review other financial records:
- Accounts Receivable: Verify outstanding invoices and payments.
- Accounts Payable: Confirm unpaid bills and payments.
- Loans Payable: Reconcile loan balances and payments.
- Inventory: Verify initial inventory quantities and values.
- Verify OBE balance in QuickBooks.
Clearing the opening balance equity (OBE) account
Once you’ve verified and reconciled all opening balances, follow these steps to clear the Opening Balance Equity (OBE) account:
- Access the Chart of Accounts:
- In QuickBooks Desktop: Navigate to the “Lists” menu and select “Chart of Accounts.”
- In QuickBooks Online: Click the “Settings” gear icon and go to “Chart of Accounts.”
- Locate the OBE Account:
- Find the “Opening Balance Equity” account in the list. Its balance should match the total of the opening balances entered during the setup process.
- Check for Pending Transactions:
- Ensure there are no open transactions or pending adjustments that need to be posted to the OBE account before proceeding.
- Create a Journal Entry:
- In QuickBooks Desktop: Go to “Company > Make Journal Entries.”
- In QuickBooks Online: Click “Create > Journal Entry.”
- Move the OBE Balance:
- Set up a journal entry to transfer the OBE balance into the appropriate equity account (e.g., Retained Earnings or Owner’s Equity).
- Enter the OBE balance as a debit or credit, ensuring the total matches the balance of the OBE account.
- Verify the Equity Account:
- Double-check that the journal entry credits the correct equity account (e.g., Retained Earnings or Owner’s Equity).
- Set the Entry Date:
- Ensure the journal entry date aligns with the end of the accounting period or the date the opening balances were reconciled.
- Post the Journal Entry:
- Review the journal entry for accuracy. Once confirmed, post the entry to finalize the clearing of the OBE account.
- Check the OBE Account Balance
- Return to the Chart of Accounts to verify that the OBE account now shows a $0 balance.
- Review Financial Reports
- Run a Balance Sheet report to confirm that the equity account (e.g., Retained Earnings or Owner’s Equity) reflects the correct balance.
- Check the Trial Balance and other related reports to ensure no unusual balances remain in the OBE account.
By completing these steps, you’ll successfully clear the OBE account, ensuring accurate and clean financial records.
Ongoing use
After setting up and clearing your Opening Balance Equity (OBE) account, it’s crucial to monitor it regularly. Once the balance is transferred to the appropriate equity accounts, the OBE account should remain at zero.
Make it a habit to check the OBE account in your Chart of Accounts, especially after huge transactions or when updating opening balances. If a balance reappears, it’s a signal that something wasn’t cleared properly and needs to be addressed.
Best practices for long-term management:
- Enter Opening Balances Accurately: Ensure new accounts or fiscal periods have correct opening balances to avoid discrepancies.
- Stick to OBE Best Practices: Follow QuickBooks guidelines for entering and reconciling numbers, matching them with bank statements or other financial records.
- Run Regular Reports: Use tools like the Balance Sheet and Trial Balance to confirm your accounts are balanced and free of unexpected OBE entries.
- Investigate Issues Promptly: If errors are found, resolve them immediately to prevent OBE from showing inaccurate balances.
By staying vigilant and following these practices, you can maintain accurate financial records and avoid complications with your Opening Balance Equity account.
Best practices for managing opening balance equity
Adopting best practices when handling OBE ensures everything adds up correctly so you can trust the numbers you see. Here are some practices to help you manage your OBE effectively:
Review transactions regularly
Checking transactions regularly is key for keeping your Opening Balance Equity (OBE) accurate in QuickBooks. Frequent reviews help spot discrepancies, prevent OBE imbalances, and confirm journal entries. This way, you can make informed financial choices and reduce risks from mistakes and non-compliance.
Establish daily, weekly, or monthly reviews to verify transactions, reconcile accounts, identify and investigate discrepancies, and monitor resolutions. Regular reviews ensure that your financial records remain accurate and up to date.
Reconcile accounts
Good account reconciliation can ensure the accuracy of Opening Balance Equity (OBE). You should reconcile your accounts regularly, at least once a month, to spot any mistakes or differences. Look over all transactions, balances, and journal entries. If you find any issues, sort them out quickly.
QuickBooks’ reconciliation tool and automation can make the process easier. Always record any corrections or changes you make, and stay organized with your documents, such as bank statements and other records.
Consult an accountant
Managing Opening Balance Equity (OBE) requires a skilled hand for accurate and reliable financial reporting. Professional accounting can help you easily navigate the tricky rules and spot mistakes early on.
Accountants guide you through setting up and managing OBE. Their support helps you avoid big errors and keeps your finances sound. They ensure you comply with GAAP/FASB regulations, keeping your business safe.
Is the OBE account used for regular transactions?
No, the Opening Balance Equity (OBE) account is not meant for everyday transactions. It’s a temporary account created during the initial setup of QuickBooks or any accounting system. Its purpose is to balance your books when entering opening balances for accounts like bank accounts and liabilities.
Once these balances are correctly entered, the OBE balance should be transferred to appropriate equity accounts, such as Retained Earnings or Owner’s Equity. Avoid using the OBE account for regular transactions, like daily sales or expenses, as this can lead to inaccuracies in your financial reports. Keeping the OBE account clear ensures your financial statements remain accurate and reliable.
Key takeaways
Opening Balance Equity is a key tool for setting up your business in QuickBooks.
Keep these points in mind:
- Opening Balance Equity (OBE) is a temporary account that balances your numbers when you first begin tracking financial records.
- The account is created automatically when you input your opening balances.
- Double-check and verify your opening balances as they determine the OBE.
- Once you finish the setup, clear the OBE balance and transfer it to an equity account.
- After clearing out, your OBE balance must be zero.
- Monitor the OBE regularly to ensure the balance stays at zero.
- QuickBooks’ reconciliation tool and automation will make the process much easier.
- The services of a professional accountant can make the entire process less tricky.
Want to keep your team away from your sensitive QuickBooks data while still giving them the information they need to succeed?
Try Method free for 14 days—no credit card required.
What is OBE in QuickBooks FAQs
Should the OBE account have a debit or credit balance?
The ideal Opening Balance Equity (OBE) account balance is zero. Since this account is only used during setup, it shouldn’t hold any funds once the process is complete. A debit or credit balance indicates unaccounted expenses or income, which can create inaccuracies. To zero out the OBE account, transfer the balance to Retained Earnings, Owner’s Equity, or the appropriate equity accounts. This ensures your financial reports remain accurate and dependable.
Can I have multiple opening balance equity accounts in QuickBooks?
QuickBooks lets you have just one Opening Balance Equity (OBE) account for each company file. Trying to set up more than one can cause errors and problems. The software is built this way to help with setup and keep your balances in order. Having multiple OBE accounts can create confusion and mess up your financial reports. QuickBooks suggests using subaccounts or different equity accounts to track specific balances while keeping your OBE account accurate and simple.
Can I transfer the balance from the OBE account to another account?
Yes, you can move the balance from the Opening Balance Equity (OBE) account to another. Usually, this means you’ll transfer it to an equity account like Retained Earnings or Owner’s Equity.
After you enter and check all the opening balances, make a journal entry to shift the OBE balance to the right equity account. This keeps your books balanced since the OBE account is meant to be temporary and should end up with a zero balance once everything is set.


