Two business people shaking hands over an office desk.

How to pay vendors in QuickBooks Online

Learn how to pay vendors in QuickBooks Online. This guide shows you how to handle payments and your different payment options.

How to pay vendors in QuickBooks Online Read More »

You rely on your vendors to provide your business with essential goods and services. So, you need to make sure they get paid on time to maintain strong business relationships with them.

Learning how to pay vendors in QuickBooks Online accomplishes this quickly and easily. From understanding how the software handles payments to exploring different payment options, keep reading to learn how to manage your payables effectively.

Grow your business without leaving QuickBooks Online.

How does QuickBooks Online handle vendor payments?

Before going over how to pay vendors in QuickBooks Online, let’s discuss why you’d want to.

You can manage and track payments through your QuickBooks Online account using QuickBooks Bill Pay. It’s an online payment portal that lets you send checks and automated clearing house (ACH) payments, which are bank transfers that place direct deposits in your vendor’s bank account.

The best part is that your vendors don’t have to set up anything on their own end. With this convenient solution, you can pay your vendors directly through QuickBooks Desktop or Online, and have your accounts payable and accounts receivable updated automatically. 

Payment options and fees associated with payments

The basic version of QuickBooks Bill Pay does not include an additional subscription fee. However, you are limited to five ACH payments per month.

The QuickBooks Bill Pay Premium plan costs $15 a month and includes 40 ACH payments in a month.

Finally, the Elite plan costs $90 a month and includes an unlimited number of ACH payments. You should choose your plan around the number of vendors you do business with.

In addition to these subscription fees, each ACH payment costs $0.50 per transaction for the Basic and Premium plans, and $1.50 per transaction for checks for every plan.

Let’s take a closer look at how to pay vendors in QuickBooks Online using Bill Pay.

How to pay a vendor in QuickBooks Online

How to pay a bill

You can enter and pay bills entirely in QuickBooks Online. It only requires a few simple steps:

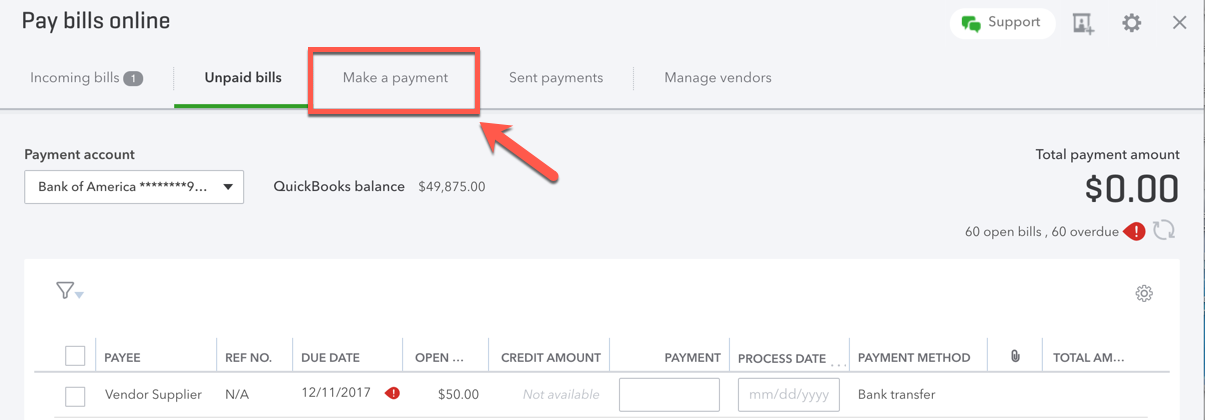
  1. Navigate to “Bill pay online widget” from your QuickBooks dashboard.
  2. Click the “Make a payment” tab.
  1. Enter the payment information for your vendor.
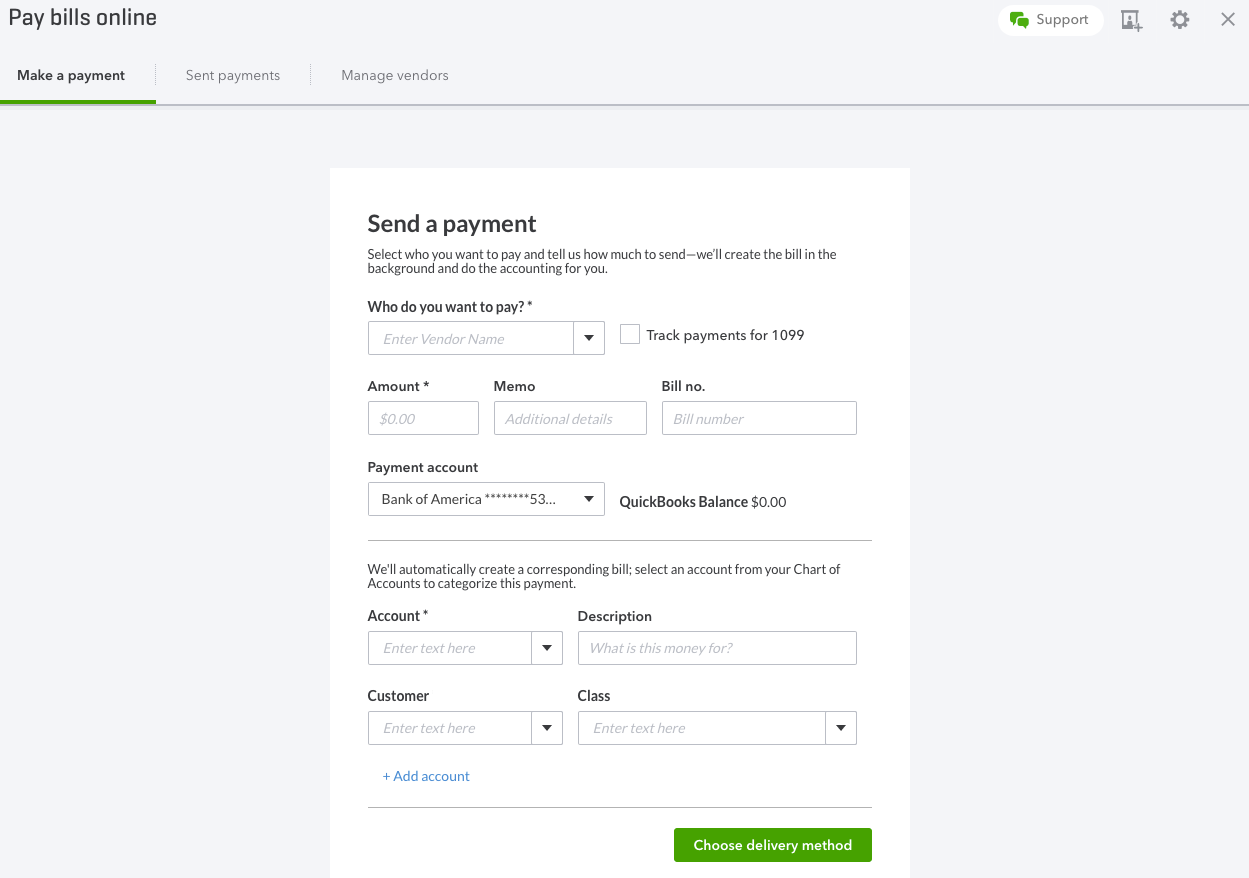
Image credit: QuickBooks

  1. At the bottom, click “Choose delivery method.”
  2. Click “Bank transfer” or “Check.” If you haven’t already set up your vendor for a bank transfer, you’ll also need to enter the bank account details. If you are paying by check, you will need to select a process date and edit the vendor information if necessary.
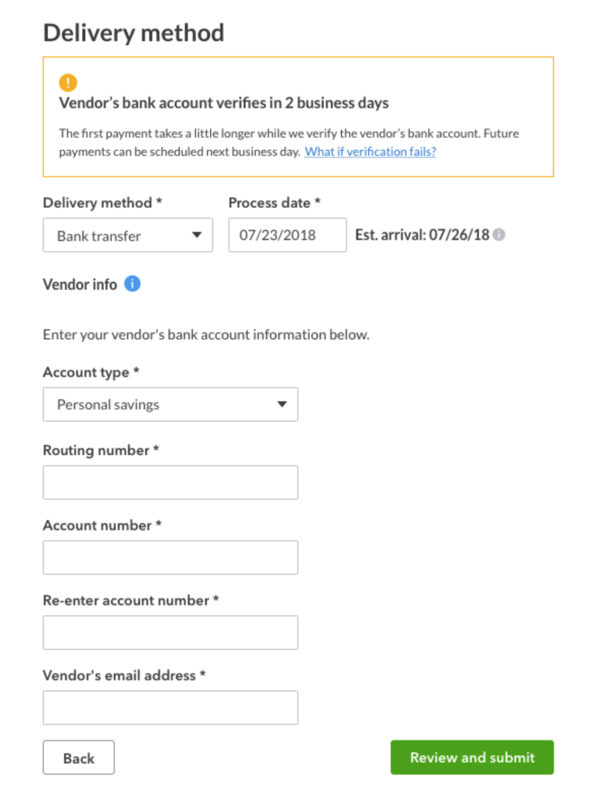
Image credit: QuickBooks

  1. Click “Review and submit” and then “Submit payment” to finish.

How to enter bills and bill payments

Follow these detailed steps to create an unpaid bill from your vendor and then complete the payment:

  1. From the menu on the left side of the screen, select “Get paid & pay” and then “Bills.” Depending on your version of QuickBooks, the interface might instead show “Expenses” and then “Bills.”
  2. At the top right of the screen, click “Add bill” and choose from the options in the drop-down menu.
  3. For a new bill, you can upload an invoice from your computer by choosing “Upload from computer,” and QuickBooks will automatically fill in the information it scans from the document. You can edit this information as necessary.
  4. Alternatively, you can select “Create bill” to enter this information manually.
  5. Once your vendor information has been entered, click “Save and close” at the bottom right corner of the screen.

This is the first step to knowing how to pay vendors in QuickBooks Online.

How to record partial payments towards bills

If you want to pay parts of your invoice with different payment methods, or you want to set up payment installments, then partial payments make sense for you.

To record a partial payment towards an invoice, simply follow the same steps as above and enter the payment amount you wish to make towards the bill. 

Then, schedule the payment for your preferred date. Here’s how to pay vendors in QuickBooks Online using scheduled payments:

  1. Select “Expenses,” then “Bills.”
  2. Click “Schedule Payment” on the related bill.
  3. Select “Edit,” then enter the partial amount.

You can repeat these simple steps as many times as you need for each portion of the bill — with whatever method of payment you want.

How to view bills and bill payments in QuickBooks Online

Now that you know how to pay vendors in QuickBooks Online, you’ll need to know how to access those payment details and adjust any incorrect or outdated information.

You can view all of your bills by following these simple steps:

  1. Select “Get paid & pay” or “Expenses,” depending on your version of QuickBooks.
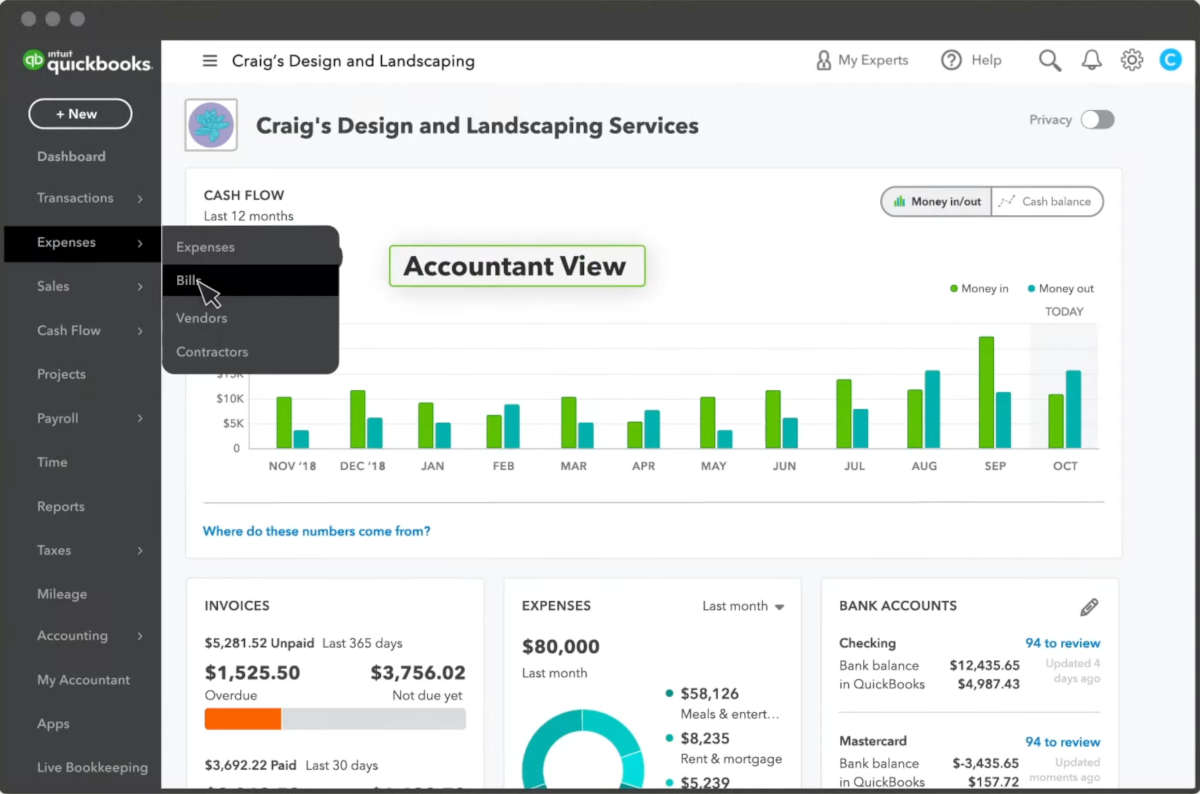
Image credit: QuickBooks

  1. Select “Bills.”
  2. You’ll see three tabs labeled “For review,” “Unpaid,” and “Paid.” Select one of the tabs to view the bills in that category and select further actions for it.

Image credit: QuickBooks

How to view and edit vendor’s payment information

You can update vendor information at any time. To view and edit a vendor:

  1. From the main menu on the left side of the screen, select “Get paid & pay” and then “Vendors.” Depending on your version of QuickBooks, it might instead show up as “Expenses” and then “Vendors.”
  2. Find the vendor you want to edit in your vendor list and select them.
  3. Make any adjustments to the vendor’s information and save your changes.

Method CRM lets you run your business, your way.

How to find your unpaid bills in QuickBooks Online

Bills that you haven’t yet paid are listed separately in your QuickBooks Online account. To check payment details for those unpaid bills:

  1. Select “Get paid & pay” or “Expenses,” depending on your version of QuickBooks. 
  2. Select “Bills.”
  3. Click the tab labeled “Unpaid.”

How to pay vendors via ACH in QuickBooks Online

You can pay your vendors from the same place where you view your unpaid bills.

  1. Select “Get paid & pay” or “Expenses” depending on your version of QuickBooks. Then select “Bills.”
  2. Click the “Unpaid” tab near the top of the screen to view the bills that have not yet been paid.
  3. To the right of the unpaid bill you want to pay, click “Schedule payment.”
  4. Choose the bank account you want to withdraw from on the right side of the screen. If you haven’t yet set up your bank account details, you can do that from this page.
  5. Enter the payment method, payment amount, withdrawal date, and vendor information into the form. When you’re finished, click “Next.”
  6. You will have a chance to review your payment info. If you’re ready to make the payment, click “Schedule payment” to finalize it.
  7. Match your payment from the bank by selecting “Transactions” from the main menu on the left. Select “Confirm,” and you’re done!

ACH transactions and checks are your two options for making an electronic payment. QuickBooks Bill Pay won’t accept credit cards. If you’re interested in making credit card payments on your bills, then your vendor needs to set up their own payment system.

Benefits of QuickBooks ACH vendor payments

Being able to pay outstanding bills with ACH payments means you can complete your financial transactions in the same place that you view the rest of your business expenses. This helps you organize your workflows and keep your records up to date.

Knowing how to pay vendors in QuickBooks Online keeps your business on top, as it’s fast, convenient, and secure.

How to pay vendors in QuickBooks Online FAQs

Can I edit or cancel an online payment after sending it?

Yes, it’s possible to edit or cancel your online payment after you send it as long as you do it before 12:00 a.m. on the withdrawal date. You can find this date in the automated confirmation sent to your email address when you scheduled the bill payment.


After this time, the bill will be processed by the bank and you won’t be able to change it.

To cancel or edit a payment after scheduling it:

  1. Select “Get paid & pay” or “Expenses,” depending on your version of QuickBooks. Then select “Bills.”
  2. Click “Show Bill Pay payments.”
  3. Find the bill you want to edit or cancel from the list and click “View details.”
  4. Click “Cancel this payment.”

How can I view the status of a payment I have sent?

The payment status of your full payment history is viewable at any time from the “Bill Pay payments” page. On this page, choose between the following tabs:

  1. The “Bills” tab to view all paid and unpaid bills.
  2. The “Unpaid” tab to view only unpaid bills.
  3. The “Paid” tab to view only paid bills.

Wrap up: How to pay vendor bills in QuickBooks Online

QuickBooks Bill Pay is a safe, secure, and efficient way to pay vendors. Understanding how to pay vendors in QuickBooks Online lets you keep your financial records in the same place, so you don’t need to juggle multiple logins to track your finances.

If you’re looking for a better way to collect payment from customers, including adding e-signature capture to your own invoices, consider extending the power of your QuickBooks account using Method.

This software platform integrates seamlessly with your QuickBooks account to give you powerful customer relationship tools and two-way, instant information sync. Gain more options for online payment gateways using Method.

See for yourself how Method can improve your business with a free demo!

Image credit: Andrea Piacquadio via Pexels

senior man smiling and working on a laptop in an office.

How to allow partial payment on invoices in QuickBooks

Learn to allow partial payments on invoices in QuickBooks with ease. Our simple guide shows you how.

How to allow partial payment on invoices in QuickBooks Read More »

When it comes to financial management, times can get tough. The good news is that QuickBooks recognizes this and offers a straightforward solution: partial payments on invoices. 

Picture a scenario where customers can make payments in chunks to ease their financial burden. That’s what happens when you allow partial payment on invoices in QuickBooks. 

In this blog, you’ll dive into the QuickBooks partial payment invoice functionality and get insights into its benefits and practical applications. By the end, you’ll know the best approach to manage your invoices and maintain financial stability.

Let’s get started!

Sick of missing invoices and other data in QuickBooks?

Managing partial payments in QuickBooks: A quick start guide

When you manage customer payments in QuickBooks, it’s often helpful to allow payments in smaller, “partial” portions rather than in full upfront. QuickBooks makes this possible with its partial payments feature and progress invoicing, which lets you break down payments to keep cash flow steady.

You can effectively manage partial payments in QuickBooks Online by following these key steps:

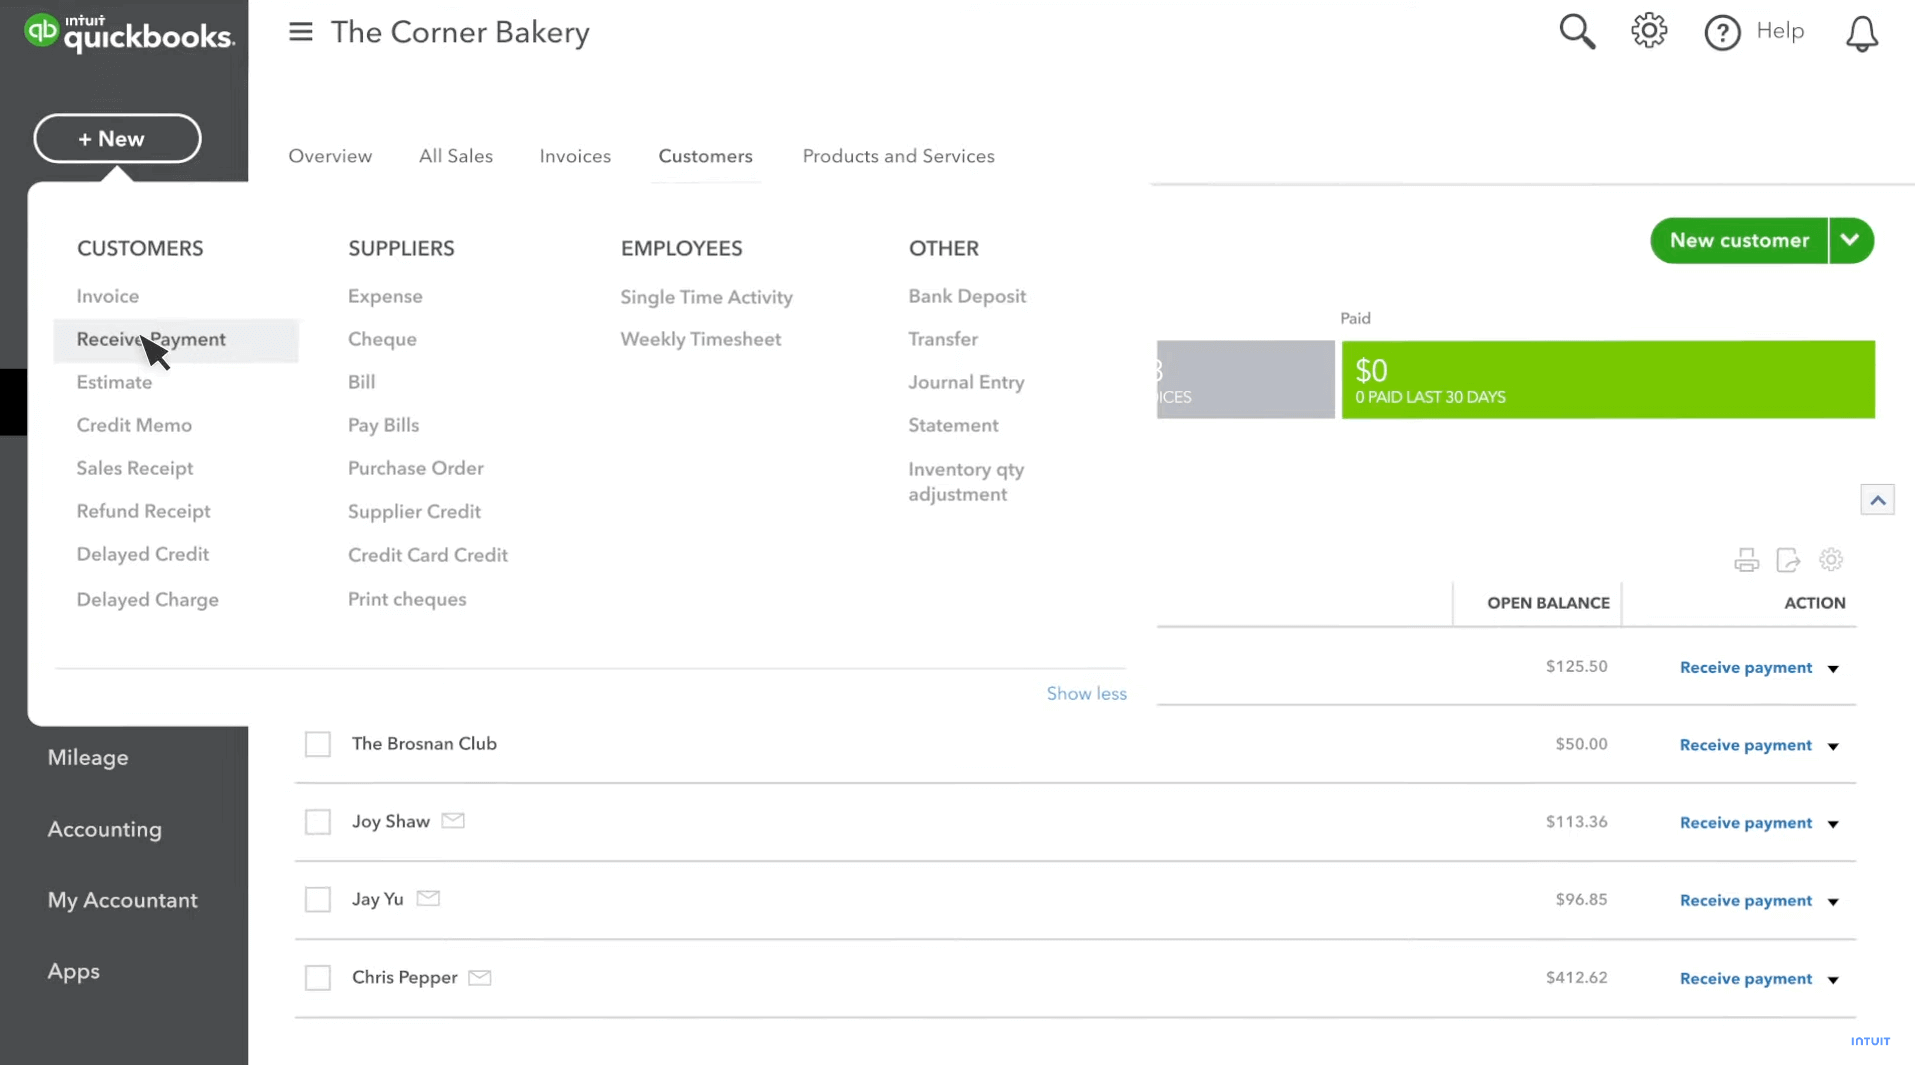
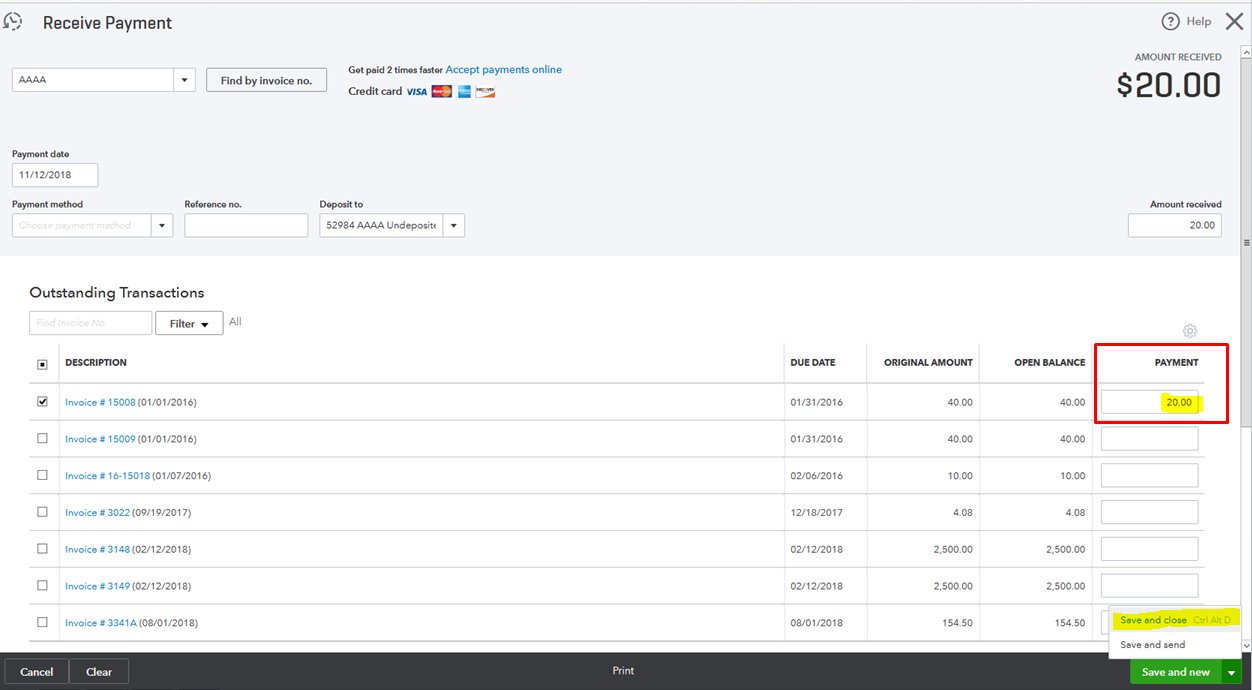
1. Recording a partial payment

  1. Log into your QuickBooks Online account.
  2. Click the “+” icon and select “Receive Payment”  
  3. In the “Customer” dropdown, select the customer’s name to display their open invoices.
  4. In the “Outstanding Transactions” section, check the box next to the relevant invoice.
  5. Now, in the “Payment” column, you enter the partial payment amount received.
  6. Choose the appropriate “Payment Method” (e.g., credit cards, bank transfer).
  7. You can now select the “Deposit to” account where the payment will be recorded.
  8. Finally, you click “Save and Close” to record the payment.
  9. You can click the pencil icon to adjust any additional payment details if required.
A screenshot showing the "Receive Payment" screen in QuickBooks Online.

Image credit: Intuit

2. Sending a payment reminder

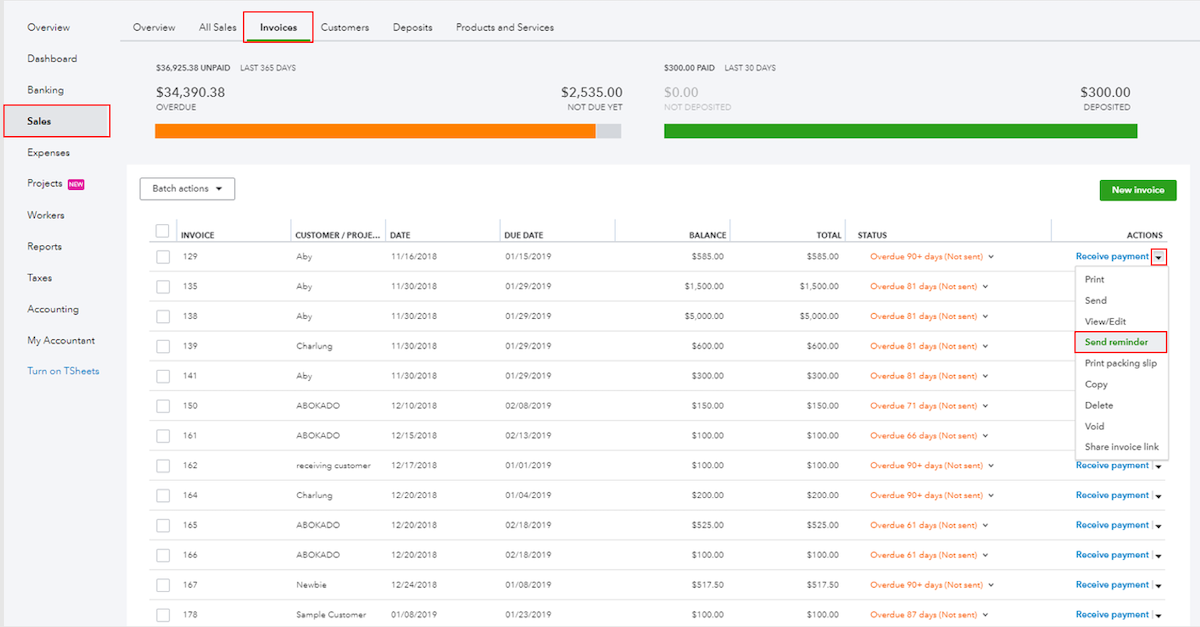
  1. First, you should navigate to the “Sales” tab in the left-hand menu.
  2. Then, click on “Customers”.
  3. Select the customer to which you need to send the reminder from the list.
  4. Click the dropdown arrow in the “Action” column next to the invoice.
  5. Now you can choose to “Send Reminder”.
  6. Review your email content, and click “Send” to dispatch the reminder to your customer.
A screenshot showing how to send invoice payment reminders in QuickBooks Online.

Image credit: Intuit

Push QuickBooks Online further than ever with Method.

Understanding partial payments in QuickBooks

In order to understand how to allow partial payment on invoices, QuickBooks users need to have a good understanding of what a partial payment is.

A partial payment is a transaction that lets your customers pay their total invoice amount in fractions. This option is important to have in scenarios where a full immediate payment for an invoice is challenging for your client. Businesses in various industries allow partial payment on invoices in QuickBooks, offering a sensible solution to managing finances and tracking progress on outstanding balances.

Businesses in various industries allow partial payment on invoices in QuickBooks, as it offers a sensible solution to managing finances. 

For example, in the events industry, cash flow can be variable, with income tied to specific events. Making partial payments helps you balance your expenses against the fluctuating income and avoid cash flow issues.

Benefits of allowing partial payments

The partial payment functionality in QuickBooks is a valuable feature that strengthens customer relationships with payment flexibility. 

When you allow customers to pay with an initial payment or a custom payment schedule, it reduces the upfront financial pressure. It’s a popular payment option and encourages more regular payments.

Offering partial invoices also has several key financial advantages:

Increase sales

When you give your customers the choice to make installment payments, provide estimates that fit their budget, or pay a partial payment upfront, you make your products and services more accessible. 

This approach often leads to larger purchases and increased sales receipts as your customers will feel more comfortable making purchases without requiring immediate, full invoice payment. 

Drive customer loyalty

Having the option to allow partial invoices for affordable price options strengthens the loyalty of your customers. A flexible payment method builds trust, and positions your business as one that prioritizes the needs of your customers first.

Loyal customers are likely to return and also make future purchases, providing a more steady and reliable stream of revenue to your business. 

Attract new customers

Partial payment options allow your business to attract new customers who may not have even considered your products and services due to a tight budget. 

When you advertise flexible payment schedules, you’re opening the door for customers who much prefer (or rely on) installment payment plans.

Common setbacks with partial payments

While partial payments do offer some flexibility, there are some potential drawbacks you need to be aware of:

Higher fees

Some payment processors may charge you higher fees for installment transactions or merchant services fees for needing to process multiple payments. In any case of overpayment, a credit memo can be issued to adjust the amount to keep your records accurate.

Integration issues

Your business may experience challenges integrating partial payment options across systems if still using QuickBooks Desktop or other platforms that might have difficulty syncing with online payments.

“Hidden” consumer costs

Depending on the payment agreement schedule, you or your customers may face hidden costs such as interest or fees. Maintain transparency by ensuring you provide a clear description of terms and payment processes so that your customers are aware of any extra costs.

How to manage partial payments

Understanding how to allow partial payment on invoices in QuickBooks is key to maintaining a healthy cash flow. This is especially important for accounts payable and accounts receivable, where partial payments are often a reality.

To effectively manage partial payments in your accounts receivable, it’s essential to have a clear system in place. This includes:

  • Setting clear payment terms: Define and communicate the payment terms for partial payments, including any interest or fees for late payments. You should also include the expected time frame for the complete payment.
  • Recording partial payments: Ensure each payment is accurately recorded against the outstanding invoice. This includes selecting the correct Payment Item to categorize each transaction, helping maintain clear financial records.
  • Regular follow-ups: Communicate with customers consistently about their balance payments and send regular reminders for the pending amount.

On the flip side, in your accounts payable, making partial payments helps you manage cash flow more effectively. By paying off portions of an outstanding balance, you maintain good relationships with your suppliers while you balance your business’ liquidity.

Here are some key steps to manage it effectively: 

  • Negotiating terms with suppliers: Communicate with your suppliers to agree on partial payment terms that work for both parties. This includes negotiating payment schedules or discounts for early payments.
  • Prioritizing payments: Determine which invoices should be paid first based on factors like due date, importance of the supplier, or potential discounts for early payment.
  • Accurate record-keeping: Maintain detailed records of each QuickBooks partial payment invoice made to ensure clarity in financial statements and aid in future financial planning, and prevent double entry errors by linking payments directly to invoices.

An initial partial payment also serves as a confirmation for the vendor to start working on your order, ensuring that your banner is ready on time for the event. Partial payments provide flexibility. You can allocate funds to different aspects of the event without compromising on quality or vendor relationships.

When you allow partial payment on QuickBooks, it builds trust among your vendors. This leads to better service and possibly favorable terms in the future.

Stop spending your day sending emails, estimates, and invoices.

How to pay vendors in QuickBooks Online

To pay vendors in QuickBooks Online, follow these steps:

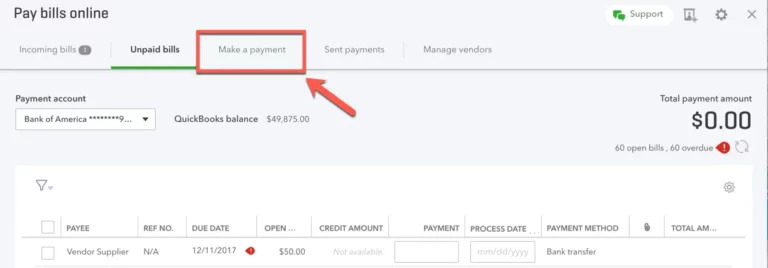
  1. Access the vendor’s invoice by navigating to your Bill pay online widget. 
  2. Select “Make a payment” and enter the partial payment amount or the amount you wish to pay initially. 
  3. Choose how you want to pay, whether it’s a bank transfer or credit. 
  4. Review and confirm your payment details by double-checking your amount and payment information. 
  5. Submit the payment. 
  6. Record the partial payment. QuickBooks Online automatically records this against the invoice.
  7. Keep an eye on the outstanding balance. 
  8. For any remaining payments, repeat these steps for the rest of the payments.
A screenshot showing how to make a payment in QuickBooks Online.

Best practices for precise invoice and payment management

To ensure accuracy in handling invoices in QuickBooks, consider implementing these best practices.

First, use QuickBooks’ customization options to:

As a result, you enhance brand awareness and client relationships. QuickBooks offers customization options for:

  • Adding logos.
  • Contact details. 
  • Personalized messages.
  • Sales forms.

Next, implementing efficient follow-up practices is crucial. Have clear channels for sending payment reminders — and consider automating this using QuickBooks’ features. 

Proactive measures also include tracking payment patterns and addressing concerns promptly. Establish escalation procedures for delinquent accounts, like sending collection letters or involving collection agencies.

You can also integrate QuickBooks with accounts receivable management tools to sync data automatically and reduce manual entry errors. 

Better yet, automate matching payments with related invoices to improve accuracy and minimize missed or duplicate payments.

How QuickBooks users can strengthen their sales process

Method is a powerful tool for QuickBooks users. It offers a suite of features to simplify and automate every stage of your sales and payment processes, including:

  • A powerful, two-way sync with QuickBooks to keep customer information and financials up to date.
  • The ability to automate invoicing and payment collection directly from your CRM to save time, reduce errors, and enjoy a consistent cash flow.
  • Efficient customer management that tracks all customer interactions and sales activities to provide a clear overview from lead generation to final payment.
  • Provides valuable key metrics to analyze sales performance and payment trends.

How to allow partial payments on QuickBooks Online invoice FAQs

What are payment plans or installment plans?

Payment plans, also known as installment plans, let customers pay for a product or service over time. They’re a form of customer financing that lets customers make purchases with partial payments over time, if they can’t afford the full amount upfront. 

Depending on the contract, these plans may allow for flexible payment amounts or require specific amounts on set due dates. This makes them a versatile payment option for customer payments.

Is a payment plan a loan?

No, a payment plan is not a loan. While it’s similar in that it provides financing options for a product or service, loans are typically issued by financial institutions like banks and credit unions. 

Payment plans allow customers more flexibility, including the option to stop customer payments if the product is defective. Companies may repossess the product if a customer cancels without a valid reason, similar to the payment terms of a loan.

Why should a business accept partial payments?

A business should accept partial payments through installment plans, as they offer these benefits:

  • Increased sales. 
  • Improved customer loyalty. 
  • Higher order values. 
  • Attracting new customers.
  • Stable cash flow. 

Extend your potential with QuickBooks.

Start your free trial with Method.

Image credit: Bnenin via Adobe Stock

Woman in yellow crew-neck t-shirt wearing eyeglasses using laptop

How to receive payments in QuickBooks Online

There’s no doubt that QuickBooks Online is great for managing payments. Read this blog to learn how to receive payments in QuickBooks Online.

How to receive payments in QuickBooks Online Read More »

It’s no secret that QuickBooks Online is an excellent tool for handling your business’ finances. Among its standout features is effective payment management. 

Whether you’re a seasoned QuickBooks user or just starting out, you may wonder how to receive payments in QuickBooks Online.

In this blog, discover how to receive payments in QuickBooks Online, including:

  • Payment options.
  • Common mistakes.
  • Best practices.

Let’s get started! 

Push QuickBooks Online further than ever with Method.

Is your business eligible to receive payments via QuickBooks?

Before you learn how to receive payments in QuickBooks Online, you need to address if your business if your business is viewed as eligible by Intuit QuickBooks.

The answer is yes! QuickBooks supports a wide range of businesses and offers payment solutions tailored to your needs. 

QuickBooks lets you receive: 

  • Cash. 
  • Checks.
  • Online invoices. 
  • Mobile payments. 
  • ACH bank transfers. 
  • Credit cards.

Steps: How to receive payments in QuickBooks Online

Screenshot of QuickBooks Online receive payment dashboard

Image credit: QuickBooks

Perhaps the most important part of running a business, receiving payments is an essential process that keeps your finances current and healthy. Here’s a guide to show you how to receive payments in QuickBooks Online: 

Set up payment options

Before receiving and processing any payments, sign up for QuickBooks Payments and set up your preferences:

  1. Navigate to “Settings” on the QuickBooks Online page and select “Account and Settings.”
  2. Once the section is selected, click on the “Payments” tab.
  3. Select “Learn more.”
  4. Click on “Set up Payments” to sign up.

Note: Only the primary administrator of your QuickBooks account can apply for Payments.

  1. Fill in the “About your business,” “About yourself,” and “Your deposit account” sections to ensure accurate entry of your bank account details.
  2. Once complete, select the “Review and finish” button, then “Get set up.”

Create invoices

Once your Payments account is confirmed and configured, your next step is to create personalized invoices. Unlike sales receipts, which offer quick sales snapshots, invoices serve as detailed transaction records.

Creating invoices with QuickBooks Online helps customers understand payment details and ensures smooth payment processing.

Here’s how to make them:

  1. Go to “+ New” and select “Invoices.”
  2. Select “Add customer” and choose from the customer dropdown. Select “Add new” if you need to add a new customer.
  3. Once your customer is navigated to, fill in the “Invoice date,” “Due date,” and “Terms” fields.
  4. Select “Add product or service” and choose from the drop-down menu. You can also select “Add new” to add new invoices for products and services.
  5. Enter the price you’re charging.
  6. After the price is adjusted, you’ll see “Ways to pay.” If you want to change these payment options, select “Payment options” in the right sidebar. Toggle any of these options on or off with the corresponding checkbox.
  7. Once it is updated, manage discounts, fees, and taxes in the “Discount and fees” section.
  8. After everything is checked for accuracy, click the “Save” button.

Accept online payments

Once the invoice is saved, it’s time to ensure your payment is received in QuickBooks: 

  1. Go to “Settings” and select “Account and Settings.”
  2. Once that is clicked, select the “Payments” tab and ensure the online payment option is enabled.
  3. After the online payment option is applied, select your preferred gateway. 
  4. Once the gateway is entered, follow the on-screen instructions to link your account.

Note: QuickBooks Online integrates with several payment gateways like PayPal, Stripe, and Square.

Knowing how to receive payments in QuickBooks Online helps you: 

  • Increase convenience. 
  • Decrease manual work. 
  • Improve customer experience. 
  • Get paid more reliably and on time.

How long does it take to receive payments in QuickBooks Online?

Now that you know how to receive payments in QuickBooks Online, you’re probably curious about processing times. Here’s the scoop:

Funds typically deposit within five days after your first payment, with potential delays during merchant account setup. Once established, your credit card payment is deposited within two business days. Electronic transfers, however, may take three to four days to process.

Familiarizing yourself with these timelines enhances your financial planning and improves cash flow.

Recording invoice payments

Getting familiar with how to receive payments in QuickBooks Online is just the first step. After receiving a customer’s payment, you need to record it in QuickBooks to mark the invoice as paid. Failing to do so leaves the invoice balance unpaid when you go to reports. 

Luckily, learning to record payments is straightforward:

  1. Go to “+ New” and select “Receive Payment.”
  2. Select the customer name from the “Customer” column. 
  3. Pick the payment method (e.g., cash, check, credit card, electronic transfer) from the Payment method dropdown.
  4. In the “Deposit to” drop-down list, choose the desired account deposited to. 

Tip: If you need to group the payment with others, select “Undeposited Funds” from the drop-down list. This simplifies the deposit process and lets you track your undeposited funds account usage.

  1. In the Outstanding Transactions section, check the Transaction ID of the invoice you’re recording the payment amount for.
  2. When your desired invoice is accessed, enter the “Reference no.” You can also enter any notes or memos here. 
  3. Once complete, hit “Save and close” at the bottom. 

And that’s it! Your invoice payment is recorded.

Payment options in QuickBooks Online

To fully grasp how to receive payment in QuickBooks Online, it’s important to understand the payment types it supports. With QuickBooks Payments, you can accept: 

  • Credit cards.
  • Debit cards.
  • ACH bank transfers.

Note that payment status and options vary based on your: 

  • Business type.
  • Customers.
  • Specific circumstances. 

Let’s break down some possibilities:

Delayed payments in QuickBooks Online

Sometimes, payments in QuickBooks Online take a bit longer than expected.

This could be due to a variety of reasons, such as:

  • Batch deposit delays.
  • Transactions involving refunds or returns.
  • Bank holds.
  • Account reviews.
  • Bank rejections. 

Understanding these factors helps you anticipate, prevent, and deal with delayed payments. 

Instant payments in QuickBooks Online

QuickBooks is designed to get you paid faster, especially with its Instant Deposit feature. Instant Deposit lets you transfer up to $25,000 per day. You can use this feature up to five times each day, and your limit resets every day. 

Funds typically appear in your bank account within a few minutes, although it could take up to half an hour. Keep in mind that all transactions are reviewed for risk, and there may be third-party delays.

Partial payments in QuickBooks Online

Sometimes, customers pay you in portion for a product or service. This is referred to as a partial payment. Customers may make partial payments for various reasons, like installment plans or contractual agreements.

QuickBooks Online records these payments efficiently, letting you: 

  • Track staggered payments.
  • View outstanding balances.
  • Predict income flows better. 

Partial payment tracking is ideal for business owners who deal with staggered deliveries or extensive project timelines. 

Payments through QuickBooks mobile app

Now, let’s talk mobility. Imagine you’re at a job site and need to accept a payment — that’s where the QuickBooks mobile app comes in. 

With this app, you can accept payments from customers using your mobile device. To do this, you’ll need to connect your card reader to the QuickBooks GoPayment app. 

Once connected, you can accept bank card payments via tap or insert, as well as digital wallet payments like Apple Pay and Google Pay.

Benefits of using QuickBooks for receiving customer payments

Learning how to receive payments in QuickBooks Online simplifies your financial management. Using QuickBooks for customer payments offers many benefits:

  • Convenient payment methods: QuickBooks simplifies accounts receivable management with convenient features like transaction entry and invoice automation.
  • All-in-one solution: The software provides a unified platform for invoicing, payment processing, and increased efficiency.
  • Time-saving: QuickBooks simplifies invoice creation with pre-filled customer information, customizable templates, and item lists.
  • Accuracy: The platform reduces errors by performing automatic calculations on predefined settings, which ensures matching transactions and invoices. 
  • Improved tracking and organization: QuickBooks automatically tracks and orders invoices for easy payment monitoring and account reconciliation.
  • Enhanced reporting: QuickBooks ensures all received payment information is reported for better financial oversight. Simply select run for the report you need and choose the reporting category.

Method CRM lets you run your business, your way.

Common issues when receiving payments in Quickbooks

As you navigate how to receive payments in QuickBooks Online, it’s important to be aware of common mistakes. Keep an eye out for these issues when receiving payments in QuickBooks:

  • Misapplied payments: Payments that aren’t linked to the correct invoice make it challenging to track outstanding invoices, which leads to inaccurate balances.
  • Overlooking undeposited funds: In QuickBooks Online, “Undeposited funds” temporarily stores payments until you combine them for a bank deposit. If moved incorrectly, you may have double entries.
  • Direct entry of payments as deposits: Entering payments into deposits instead of the “Receive payment” tool can cause paid invoices to appear as open, causing statement inaccuracies.

If you face challenges receiving payments, the QuickBooks community is an excellent starting point. You can use the platform to: 

  • Share experiences. 
  • Reply to fellow users. 
  • Access answers from QuickBooks experts.

Best practices to avoid invoice and payment errors

Now that you’re familiar with some issues when receiving payments in QuickBooks, let’s explore best practices to help you avoid them:

Accurate customer and vendor information

To ensure your information is processed correctly, review the:

  • Invoice number(s). 
  • Payment reference number. 
  • Payment receipt confirmation. 
  • Payment date and date of entry. 
  • Deposit slip number (if applicable). 
  • User ID (of person processing the payment). 

If incorrect, update and make the necessary adjustments (if any). 

Use invoice templates

Leverage custom invoice templates to ensure your invoice is reviewed for consistency and accuracy. 

Review invoices

Always check numbers before sending them to customers. Make sure your item is matched to the order quantity, price, and tax. 

Regular reconciliation

Regularly reconcile accounts and review your reconciliation status to identify discrepancies. When your account is reconciled, it helps keep your accounts in good shape.

Problems that may occur when payments are not recorded correctly in QuickBooks

When you don’t apply payments to the correct invoice, the invoice remains open. This triggers unnecessary collection efforts and damages customer relationships. 

To avoid such errors, consider hiring an accountant who can ensure accurate entries and prevent duplicates.

Overstated accounts receivable balances

If you don’t accurately apply payments, your accounts receivable balance will not reflect the true amount of money that your customers owe you. This leads to discrepancies in your financial statements and unforeseen losses.

Exceeded sales (income)

Recording payments incorrectly as deposits or sales receipts inflates your income figures. This is because the income was already accounted for when you issued the invoice. Such errors distort your financial performance analysis and can give you a false sense of financial stability.

Get paid sooner with Method + QuickBooks Online

Method is the #1 lead-to-cash automation tool for QuickBooks users. With its two-way sync with your accounting software, you can receive payments faster and keep your finances up to date.

Put an end to the constant battle of manual data entry — Method automates everything from invoicing to updating accounts, all in real time. Whether it’s recurring billing or one-time transactions, Method ensures stress-free payment processing. Start your 14-day free trial here.

QuickBooks Online receive payment: Frequently asked questions

Why is receiving payments in QuickBooks Online important?

Knowing how to receive payment in QuickBooks Online is vital as it:

  • Simplifies income tracking.
  • Lowers the chance of errors.
  • Saves you precious time.

By mastering how to receive payments in QuickBooks Online, you can secure:

  • Accurate financial records.
  • Consistently positive cash flow.
  • All the information you need to make informed decisions.

Can I record partial payments in QuickBooks?

Yes, you can record partial payments in QuickBooks. This is helpful for businesses that receive payments in installments or have clients with outstanding balances.

Recording partial payments ensures precise tracking of your income and balances, which keeps your financial records spot on.

What happens If a customer’s payment fails?

If a customer’s payment fails in QuickBooks Online, you need to address the failed transaction. This may involve: 

  • Reattempting the charge.
  • Contacting the customer for a different payment method.
  • Updating the invoice status to reflect the failed payment.

Is It possible to receive international payments through QuickBooks Online?

Yes, it is possible to receive international payments through QuickBooks Online. This lets businesses cater to a global customer base and accept payments in different currencies. 

Can I customize the payment receipts sent to customers?

Yes, you can customize payment receipts to include your: 

  • Branding. 
  • Business information. 
  • Other details.

See how Method simplifies your payment processing today. 

Photo credit: Andrea Piacquadio via Pexels
Crop unrecognizable woman taking credit card out of wallet

How to categorize credit card payments in QuickBooks

Tracking credit card payments is challenging. Discover how to categorize credit card payments in QuickBooks for better reporting.

How to categorize credit card payments in QuickBooks Read More »

Whether you’re paying vendors or receiving customer payments, a constant flow of credit card charges is unavoidable. What’s worse is keeping up with these payments on a daily basis.

The good news is that QuickBooks Online comes with a credit categorization feature. This tool:

  • Organizes credit card transactions.
  • Speeds up accounting processes.
  • Enhances financial reporting.
  • Keep accurate reports of your financial activities.

Keep reading to learn how to categorize credit card payments in QuickBooks, including some common errors and best practices.

Sick of missing invoices and other data in QuickBooks?

How do you categorize credit card payments in QuickBooks?

Credit card payments are recorded as transactions in QuickBooks. If you’ve linked your banking information with your QuickBooks Online account, credit card payments are automatically recorded.

However, sometimes there can be errors that cause a transaction not to show. Or, you may have made a credit card payment on a different account that you need manually add.

Follow the steps below to find out how to categorize credit card payments in QuickBooks.

How to categorize a credit card payment in QuickBooks Online manually

Here’s how you can manually categorize credit card payments in QuickBooks Online using the “Pay down credit card” function:

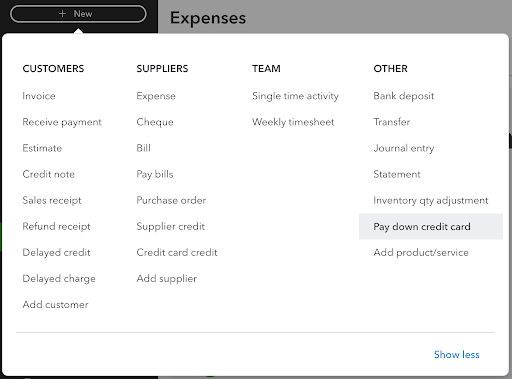
1. Navigate to “+ New” in the top left menu bar. Under the “Other” menu, select “Pay down credit card.”

A screenshot of QuickBooks Online + New menu with "Pay down credit card" highlighted.

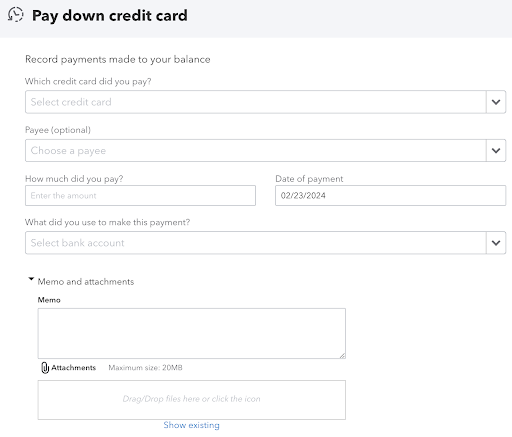
2. Choose the credit card you paid or add a new one if it’s not listed.

3. Write the name of your payee if you wish you keep it on record. However, this step is optional.

4. Enter your payment amount and the date the payment was made, then choose the bank account used to make the payment.

5. You have the option to add a memo and any attachments you want to keep on record.

6. When you’re finished, click “Save and Close” in the bottom right corner of the screen.

    Wish you could get more from QuickBooks? Method makes it possible.

    How to categorize credit card payments in QuickBooks: Top options

    Understanding how to categorize credit card payments in QuickBooks also means learning about its different categorization options.

    Categorize individual credit card transactions

    When it comes to receiving payments via credit card, PayPal, or other payment methods, categorizing individual transactions is the norm. To achieve this, just follow the usual steps outlining how to categorize credit card payments in QuickBooks Online.

    As you continue using QuickBooks, it learns to recognize and suggest categories for familiar credit card transactions. You can always adjust these if needed.

    Also, keep an eye out for “Match” instead of “Add” on certain transactions. This feature helps avoid duplicates for:

    • Pre-existing bills.
    • Invoice payments.
    • Bank deposits.

    All you need to do is verify that the balance matches, then click “Match.”

    Learning how to categorize credit card payments in QuickBooks boosts your efficiency and makes learning how to process credit card payments in QuickBooks Online easier.

    Split transactions among categories

    Sometimes, you may need to divide a credit card transaction across categories.

    Imagine you’ve got a receipt for $200, which includes $120 for office supplies and $80 for travel expenses. You can easily split this in QuickBooks Online. Simply allocate $120 to the “Office Supplies” category and $80 to “Travel Expenses.” This way, your financial reports are as accurate as possible to reflect each type of expense.

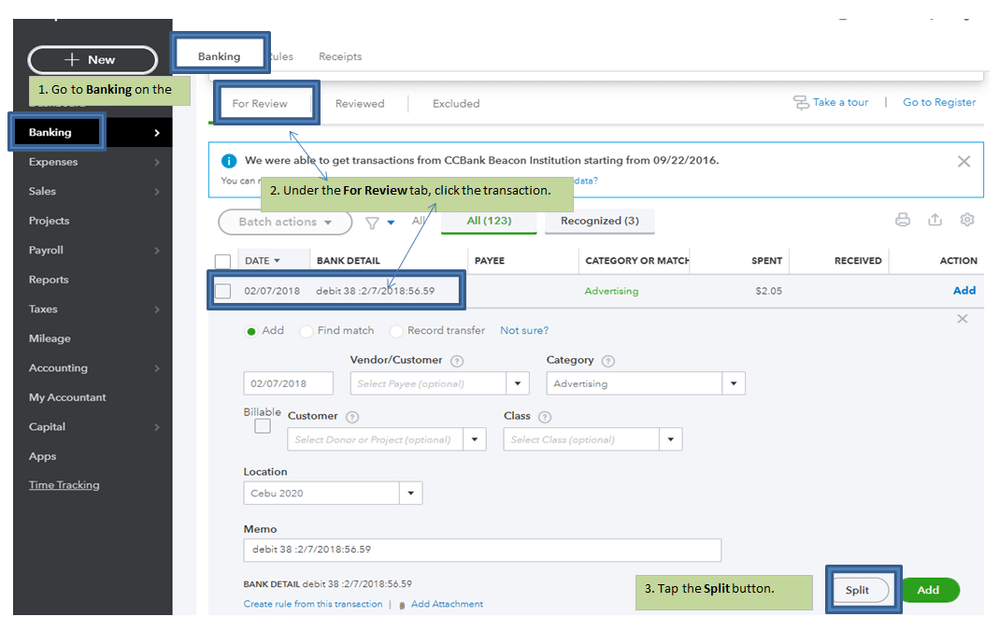
    Here’s how to split transactions among categories:

    1. Log into QuickBooks Online.
    2. Navigate to “Banking” in the left sidebar.
    3. Select the transaction you want to split under the “For Review” tab.
    4. Choose “Split” in the transaction details.
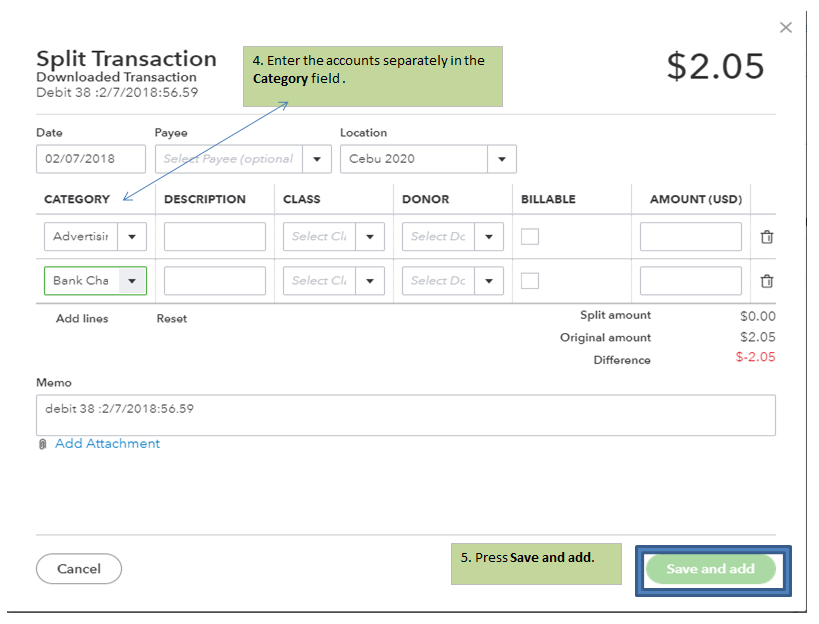
    5. Enter the accounts separately in the “Category” field.
    6. Press “Save and add.”
    A screenshot showing the first steps to split transactions in QuickBooks Online.
    A screenshot showing the second steps to split transactions in QuickBooks Online.

    Image credit: Intuit

    Common errors when categorizing payments into QuickBooks

    Now that you know how to categorize credit card payments in QuickBooks, let’s identify some common errors and how to avoid them.

    Not using the “Split” feature

    Failing to use the “Split” feature on credit card statements can result in inaccurate tracking when a transaction spans multiple respective categories.

    To fix this, get comfortable with the “Split” function and use it for multi-category transactions. Also, make sure you’ve assigned each transaction to the correct credit card account.

    Incorrect account selection

    When categorizing credit card payment details, selecting the wrong account leads to issues.

    For example, choosing an expense account instead of a credit card liability account results in incorrect transactions and financial statements.

    To avoid this, always double-check your account selections to make sure they match the transaction and credit card type, like payment vs. direct expense. Also, ensure that your bank and credit card details are correct to prevent inaccuracies.

    Failing to update categories

    Failing to regularly review and update your expense categories results in misclassifications.

    To ensure accuracy when recording payments, schedule routine checks of your expense categories. This lets you make necessary adjustments as your business shifts over time.

    Understanding these common errors is crucial in learning how to process a credit card payment in QuickBooks Online.

    Best practices when categorizing credit card payments

    As you learn how to categorize credit card payments in QuickBooks, adopting best practices eases your bookkeeping burdens.

    Here are some best practices to keep in mind:

    • Regularly reconcile: Regularly match your credit card transactions with bank statements for financial accuracy.
    • Set up banking rules: Use QuickBooks’ banking rules to automatically categorize bank transactions. This saves you valuable time and reduces manual errors.
    • Separate personal and business expenses: Carefully categorize transactions, especially if the same credit card is used for personal and business expenses. This maintains an accurate and comprehensive overview of your financial health for informed decision-making.
    • Train your team: Equip your team with the skills to handle transaction details in QuickBooks efficiently.
    • Review reports regularly: Use QuickBooks reports to check for any categorization errors.

    These best practices are also useful when learning how to process a credit card payment in QuickBooks Online.

    How to easily record and categorize credit card payments in QuickBooks Online

    To perform credit card payment categorization quick and easy in QuickBooks Online, follow these steps:

    1. Log into QuickBooks Online to access your account and manage your credit card purchases and payments.
    2. Go to the “Banking” tab in the left-hand menu and select “Banking” to open your linked accounts, including bank feeds.
    3. Select your credit card account from your list of accounts. Choose the account where your payment was made.
    4. Find the transaction you need to categorize by locating the “For Review” tab and then choosing the transaction you need.
    5. Open the transaction, then choose a category:
    • Category: Using the “Category” dropdown menu, select one that best describes the nature of the transaction. It could be a category such as Accounts Payable, Office Supplies, or Travel Expenses.
    • Memo: Optionally, you can add a memo or specific bank details to clarify the precise purpose of your payment.
    • Split Transactions: If the payment covers multiple categories, you can select “Split” to allocate amounts. For example, $100 for office supplies and $50 for travel expenses.
    1. Finally, click “Add” to review and confirm the transaction categorization. This will save it to your QuickBooks credit card payment records.

    Following these steps is a straightforward process for categorizing credit card payments in QuickBooks, making sure your financial records are accurate and up-to-date.

    Alternative methods to categorize a credit card payment in QuickBooks

    Create a check

    Did you make a credit card payment via check? You’ll need to record this transaction accurately in QuickBooks Online to maintain your financial records. Follow these steps to categorize checking:

    1. Log into your QuickBooks Online and access your account.
    2. Find the “+ New” button to initiate new banking transactions.
    3. In “Business View,” you need to select “Pay down credit card.” 
    4. Enter in and specify the amount and date of the payment.
    5. Select the bank account from which the payment was made.
    6. As the payment was made using a check, here you will now select “I made a payment with a check” and then enter the check number into the corresponding field.
    7. (Optional) You can also add a note or attachment to the transaction during this process.
    8. Once you have correctly entered all the details, click “Save and close” to record and categorize the check payment.

    Reconcile your credit card transactions and make a payment

    Keeping your accounts reconciled in QuickBooks online means you’ll have more accurate and up-to-date records across your credit cards and expense transactions. 

    To get a more visual step-by-step guide on reconciling accounts in QuickBooks Online and Desktop, take a look at our video tutorial:

    Here’s how to reconcile credit card transactions in QuickBooks Online:

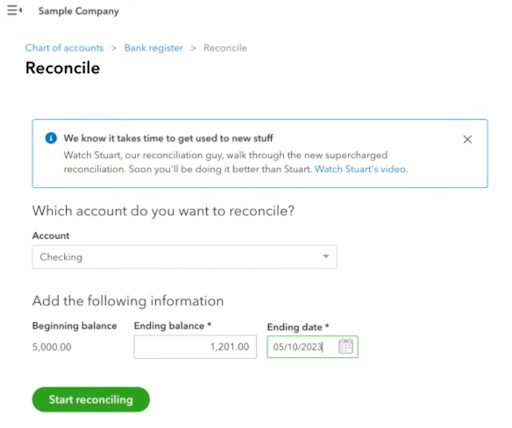
    1. At the top right corner of your screen, select the gear icon. Under the Tools menu, choose “Reconcile” from the dropdown.
    2. In the Account dropdown menu, select the bank account or credit card you want to reconcile.
    3. Using the ending balance and date from your credit card statement, fill in the Ending balance and Ending date fields. 
    4. Click “Start Reconciling”.
    A screenshot of QuickBooks Online reconcile accounts window with options showing account selection, balances, and date.
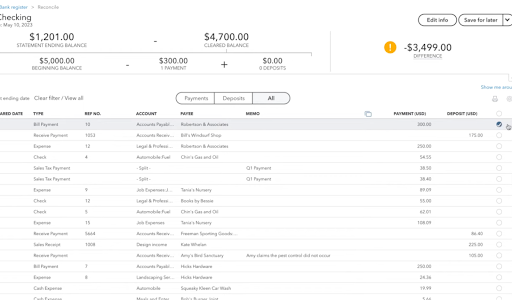
    1. QuickBooks will now show you a list of transactions for the selected account. You can compare each transaction in QuickBooks Online with those on your credit card statement.
    • If a transaction matches the statement, you can click the checkbox to the right to mark it.
    • If a transaction doesn’t match up, leave it unchecked.
    A screenshot of a bank register being reconciled in QuickBooks.

    1. Now, check for discrepancies. QuickBooks will indicate any differences between your records and the statement. If you find a difference, review the transactions to identify and resolve it.
    2. Once all the transactions are matched and discrepancies have been addressed, you can click “Finish now” to complete the reconciliation.

    To record a payment for your reconciled credit card:

    1. Click “+ New” and then select “Pay down credit card” under the “Vendors” section.
    2. Choose the credit card account you have just reconciled and enter the “Payment Amount” and “Date.”
    3. Now, you can select the Bank account used for the payment.
    4. If the payment was made by check, enter the check number in the field. Or, for electronic payments, you can enter the EFT number.
    5. Optionally, you can add a memo or attachment if you need to.
    6. Click “Save and Close,” and you will have recorded the payment.

    Use banking download

    If both your credit card and the bank account you use for payments are connected (through bank feeds), you can easily record the payment by simply transferring it:

    Step 1: Transfer the Payment

    1. Go to the “Expenses” tab from the menu.
    2. Choose the account from which you’ll transfer the payment.
    3. Find the transaction, and select the “Pay down credit card” option.
    4. Open the Transfer account dropdown, then choose the account to which you want to send the transaction.
    5. Click “Confirm” to complete the transfer.

    Alternatively, you can record the payment as a transfer:

    1. Go to Expenses in the menu.
    2. Select the account you’ll be transferring from.
    3. Find the transaction, and choose “Record as transfer.”
    4. In the “Transfer account” dropdown, pick the destination account.
    5. Finally, you can click “Confirm” to save the transfer.

    Step 2: Match the Transaction

    After transferring, you can match the transaction with the new account:

    1. Go to the “Recognized” tab and locate the transaction.
    2. In the “Action” column, you should select “Match” to confirm it with the new account.

    How QuickBooks users make more sales in less time with Method

    Method is the #1 CRM for QuickBooks users. It makes credit card payments in QuickBooks even easier, along with offering several additional benefits.

    Method’s two-way, real-time sync with your accounting software reduces manual data entry and keeps your business finances current and up to date. This leads to fewer errors, which frees up more time for activities that add value to your business. It also promotes accurate financial decisions through data-driven insights.

    What’s more is that Method’s automation capabilities speed up and simplify your payment process for a better bottom line.

    Conclusion: How to categorize credit card payments in QuickBooks

    Using QuickBooks’ reconciliation tool to balance your accounts is the best way to keep an accurate recording of your financial records.

    By reconciling your accounts, you’ll simplify your financial management and discover valuable insights into your business’ revenue.

    How to record credit card payments in QuickBooks FAQs

    Is a credit card payment an expense in QuickBooks?

    Yes, a credit card payment is typically recorded as a transfer rather than a direct expense when using QuickBooks online. While the charges made on the card are categorized as expenses, the payment itself does reduce the card balance.

    How do I enter credit card charges in QuickBooks Online?

    To enter credit card charges in QuickBooks Online, you can follow these steps:

    1. Select “+ New” then choose “Expense.”
    2. Under the “Payment account” select your credit card account.
    3. Enter the date, payee, and the amount for the charge.
    4. In the category field, choose an appropriate expense category from the dropdown menu.
    5. Add any notes, then click “Save and close.”

    What kind of expenditure is credit card payment?

    A credit card payment is treated as a liability payment in QuickBooks, as it reduces your credit card balance.

    Note that QuickBooks doesn’t count credit card balance payments as a direct business expense, but rather as the repayment of borrowed funds.

    Is it OK to exclude credit card payments in QuickBooks?

    No, excluding payments to credit cards, including partial payments, is not recommended in QuickBooks. Doing so leads to inaccuracies in your financial records and reports.

    Recording all transactions, including credit card statements, ensures a complete and accurate financial overview.

    See how Method simplifies your credit card payments.

    Image credit: Liza Summer via Pexels

    Man in black suit working

    How to record sales tax payments in QuickBooks Online

    Struggling to keep your taxes organized? Learn how to record sales tax payments in QuickBooks Online to improve efficiency.

    How to record sales tax payments in QuickBooks Online Read More »

    As a small business owner, you’ve worn many hats to get where you are today. But there’s one thing that still might have you scratching your head — sales tax.

    Paying sales tax gets tricky, especially because you need to be completely accurate in order to: 

    • Comply with tax laws.
    • Avoid fines.
    • Make sound financial decisions.

    Luckily, QuickBooks Online simplifies this process. Because the accounting software is designed with small business owners in mind, learning how to record sales tax payments in QuickBooks Online is straightforward.

    Keep reading to discover: 

    • How to record sales tax payment in QuickBooks Online.
    • Why you should set up automatic sales tax.
    • The power of sales tax reports in QuickBooks.

    Let’s get started!

    Need an easier way to keep your QuickBooks data up-to-date?

    Different types of sales tax payments in QuickBooks

    Sales tax is an additional cost added to the price of goods and services that’s passed on to a governing body.

    But not all sales taxes are created equal. Here are the key types of sales tax payments in QuickBooks:

    • State sales tax: This is the largest portion of your overall sales tax. It gets paid to the state where your business operates.
    • County sales tax: On top of state sales tax, some counties have their own add-on tax. This varies from county to county.
    • City sales tax: This is the tax charged by your city or local government. Like county taxes, city sales tax depends on the area. 
    • Liability sales tax: Think of this as the total sales tax you collect from customers, including state, county, and city taxes.
    • Special sales tax category: You can apply sales taxes unique to your business or industry with sales tax categories in QuickBooks.

    Along with tracking payment fees, QuickBooks handles your sales tax payments automatically to ensure: 

    • Legal compliance. 
    • Operational efficiency.
    • Financial accuracy.

    How to automatically set up sales tax in QuickBooks

    When learning how to record sales tax payments in QuickBooks Online, a great feature to explore is automatic sales tax.

    Imagine being free from the burden of manual tax calculations. QuickBooks makes this dream a reality by automatically calculating your sales tax based on: 

    • What you sell.
    • Where you sell.
    • Where your products ship. 

    That’s the beauty of knowing how to record sales tax payments in QuickBooks Online with automation!

    Here’s how to set up automatic sales tax:

    1. Go to “Taxes” in the left-side menu, then the “Sales Tax” setup screen.
    2. Choose “Use automatic sales tax” or “Get Started.”
    3. Verify your business address and click “Next.”
    4. Match your tax rates with the state tax agency by using either:
    • “Match one rate at a time.”
    • “Match multiple rates at once.”
    1. Click “Next.”
    2. Enter your filing frequency and click “Save” when finished.

    Automatic sales tax simplifies the process of collecting, reporting, and paying your sales tax in QuickBooks. 

    No more calculations and risk of errors. QuickBooks ensures you account for every cent of your sales tax.

    Setting up sales tax items in QuickBooks

    When learning how to record sales tax payment in QuickBooks Online, it’s important to remember that some of your items may have different tax rates.

    Let’s say you’re a manufacturer who produces goods and ships them to various regions. In this scenario, your products’ tax rates may differ based on the state or region where you’re selling them.

    Fortunately, QuickBooks lets you assign tax categories to specific items. This helps you calculate the correct sales tax rate to add to each product you’re selling.

    To apply sales tax to an item on an invoice or sales receipt:

    1. Create a new invoice or sales receipt. 
    2. Add an item using the “Add products or service” drop-down menu. 
    3. Click the checkbox under the “Tax” column for any taxable product or service.
    4. Make sure the correct sales tax rate is selected in the tax rate field. 

    How to record sales tax payments in QuickBooks Online

    With automated sales tax in place, you can dive into learning how to record sales tax payments in QuickBooks Online. Here are some detailed instructions: 

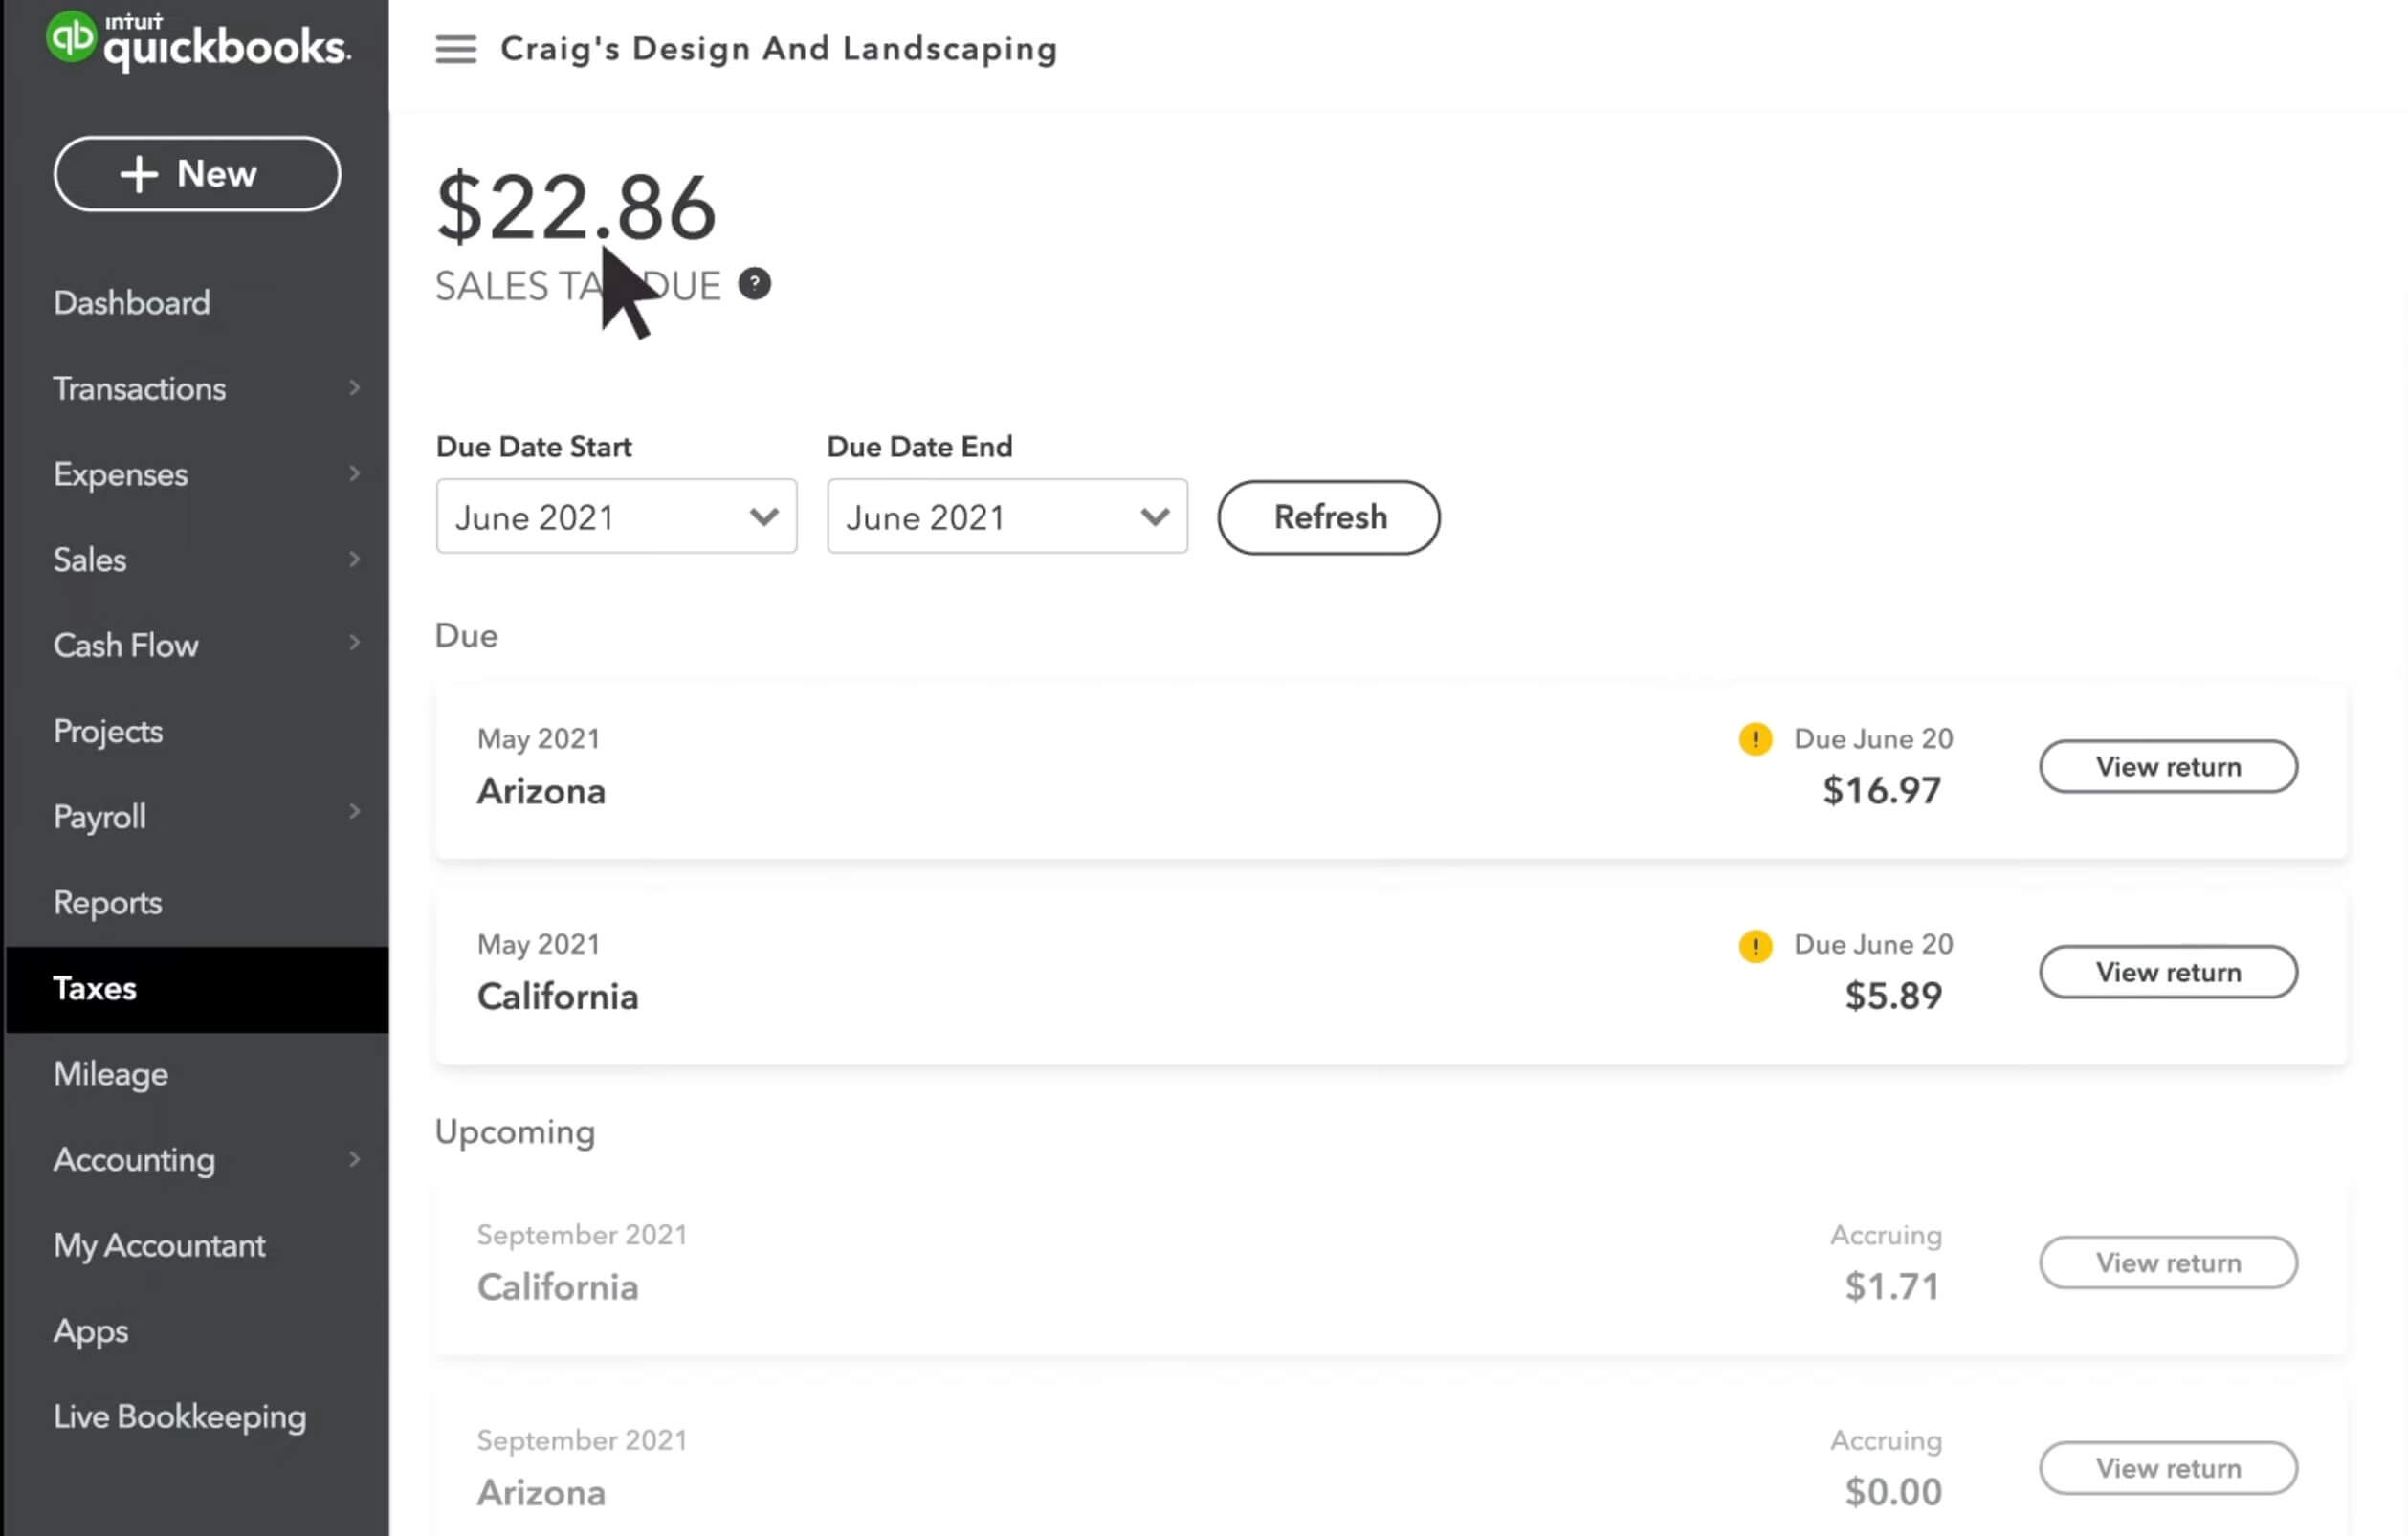
    Dashboard of QuickBooks Taxes

    Image credit: QuickBooks

    The first step in outlining how to record sales tax payment in QuickBooks Online is to review what you owe:

    1. Go to “Taxes,” then “Sales tax.”
    2. Check the amount due for the month, then click “View Tax Return.” For older returns, use the “Tax Period Date” dropdown menu.
    3. Review and adjust if necessary, using the “+ Add an adjustment” button. This is helpful if you have credits, discounts, penalties, or a correction. 
    4. Note down your:
      1. Gross sales.
      2. Non-taxable and taxable sales.
      3. Tax due.
      4. Adjustments. 

    Method CRM lets you run your business, your way.

    Once you’ve confirmed that all your information is accurate, you can proceed with filing your return with the right tax agency. You have two options:

    • E-file on your tax agency’s website.
    • File by mail.

    Here are some steps to guide you through the online process:

    1. Visit your tax agency’s website to file your return online. Sign up for your state’s e-filing service if you haven’t already.
    2. Complete the sales tax return form using the gross sales, non-taxable sales, and tax due amounts from the previous step for reference.
    3. Finish your sales tax return filing.

    Note: QuickBooks does not file returns, but you can update your sales tax information by manually entering your payment after filing.

    Now that you’ve finished filing, it’s time to record your sales tax payment in QuickBooks.

    Here’s how to do it manually and zero out your sales tax payable:

    1. Go to “Taxes,” then choose “Sales tax.”
    2. Find the recent return and click “View Tax Return.” For older returns, use the “Tax Period Date” dropdown menu to select a specific period.
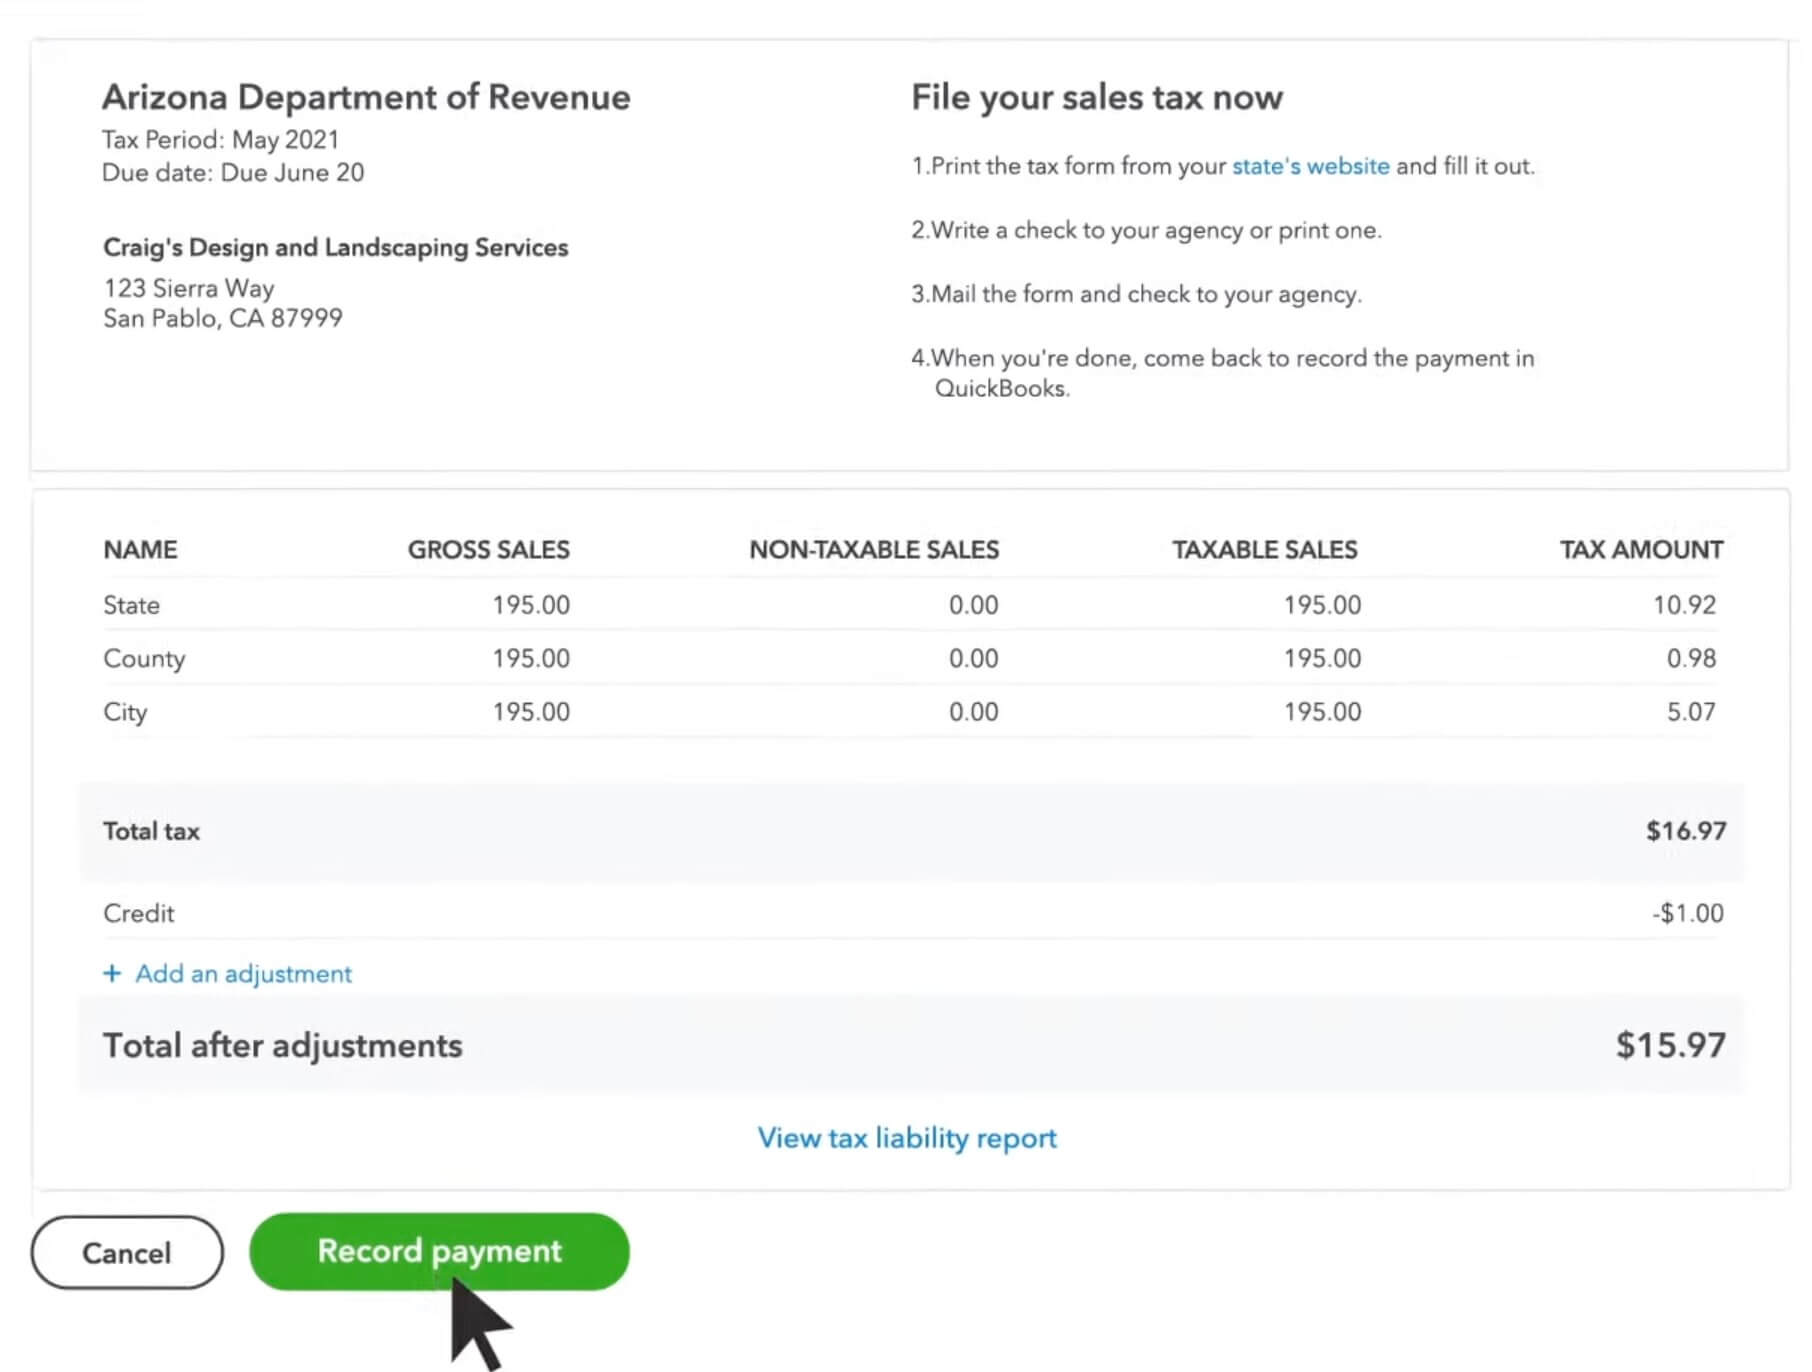
    3. Select a filing method, then click “Record payment.”
    4. Enter payment details like the tax amount, payment date, and your bank account.
    5. Click “Record payment.”
    6. Select “Back to sales tax center.”
    Record sales tax payment screen on QuickBooks

    Image credit: QuickBooks

    The final step in recording your sales tax payment is to check your filing status. If you filed online, go to your tax agency’s website to see if it’s been processed. If you mailed it, call your tax agency to get a return update.

    Editing and deleting tax payments in QuickBooks

    Even when you know how to record sales tax payment in QuickBooks Online, common errors are still possible. Rest assured, QuickBooks has your back.

    If you need to edit a sales tax payment, follow these simple steps:

    1. Go to Taxes and select the “Returns” tab.
    2. Choose “Tax Adjustment” to open the “Journal Entry” window.
    3. Enter the sales tax adjustment and provide a reason for it. You can use a positive or negative amount.
    4. Select an appropriate account to track the adjustment link. In case of rounding errors, use an income account for negative errors and an expense account for positive ones.
      1. For credits or discounts, choose an income account like “Other Income.”
      2. For fines, penalties, or interest, select an expense account.

    Apart from editing, you may need to delete a tax payment altogether. To do so:

    1. Go to “Taxes,” then select “Sales tax.”
    2. Choose the payment you want to delete from the “Recent Sales Tax Payments” list.
    3. Select “Delete Payment” and confirm by clicking “Yes.”

    Making these corrections ensures your financial records remain accurate, which is a non-negotiable for any business.

    How to generate a sales tax report in QuickBooks Online

    Learning how to record sales tax payment in QuickBooks Online is more than just a task. It’s a way to gain insights into your business’ financial well-being.

    One of the best ways to use your sales tax data in QuickBooks is to explore the reporting feature. To generate a sales tax report in QuickBooks Online:

    1. Visit the “Sales Tax” screen, where you’ll find sections for each sales tax agency, showing the amount owed and the period covered.
    2. Scroll down to view agencies listed at the bottom of the screen. You’ll see due dates, status, and the “Amount” you owe in the column.
    3. On the right side, click the “Reports” drop-down menu to access tax-related reports, like the sales tax liability report. This report provides details on your tax obligations, including tax types, amounts, and due dates to ensure you stay on top of your payments.

    Sales tax reporting is helpful for planning your next moves. Reports show you how your business is doing financially to simplify decision-making and drive business growth.

    Enhance QuickBooks with Method

    Method is the #1 lead-to-cash automation tool for QuickBooks and Xero users. 

    Thanks to its two-way, real-time sync with QuickBooks, Method ensures a smooth and hassle-free experience. From credit card processing to bill payments, Method simplifies your workflow by consolidating all your data into one place. 

    What’s more is that the software provides greater control over your sales tax management, resulting in precise financial planning and reporting. With Method, you can focus on growing your business, not your stress.

    See how Method makes your sales tax process less taxing.

    Image credit: RDNE Stock project via Pexels

    Person paying bills

    Setting up pay bills in QuickBooks

    Paying bills is a headache for any business owner. Read this blog to learn about setting up pay bills in QuickBooks Online.

    Setting up pay bills in QuickBooks Read More »

    Let’s face it — paying bills is a headache for any business owner. From vendor payments to utility bills, it’s a juggling act that requires skill and precision.

    The good news is that you don’t have to navigate it alone. With tools like QuickBooks Bill Pay, you’ll ease the burden of bill payments and reclaim valuable time to focus on what you do best. So, how do you use it?

    In this blog, you’ll learn all about setting up pay bills in QuickBooks Online, from entering vendor information to recording bill payments. 

    Let’s jump in! 

    Grow your business without leaving QuickBooks Online.

    What is QuickBooks Bill Pay?

    Dashboard of QuickBooks Bill Pay

    Image credit: QuickBooks

    Before setting up pay bills in QuickBooks Online, let’s explore QuickBooks Bill Pay.

    QuickBooks Bill Pay is a built-in payment solution for small business owners using QuickBooks. It integrates bill payments with your accounting software to ensure your financial data is always in sync.

    Imagine ditching the tedious, manual work involved in paying bills. That’s what QuickBooks Bill Pay offers with its powerful automation.

    You can even schedule payments ahead of time, and QuickBooks will automatically send the funds to help you avoid late fees and credit hiccups. As for vendors who prefer the old-school approach, QuickBooks can also mail a physical check on your behalf.

    QuickBooks works with any type of business bill, similarly to its flexibility in receiving payments. This includes bills for merchandising, rent, taxes, and utilities. 

    Additional benefits of QuickBooks Bill Pay include:

    • Data protection and time savings: Protect your financial data and reduce the time spent on manual payments. That means no more unnecessary bank visits or managing several accounts.
    • More control: Take control of your bill payments to help you stay financially organized and improve cash flow.
    • One-stop solution: Handle all your bill payments, from vendors to utilities, in one place.
    • Simplified compliance and delegation: Track and file 1099 forms easily. Plus, assign team members specific roles for bill payments to enhance security and efficiency. 
    • Efficient invoice management: Import invoices into QuickBooks and automate payment schedules. This reduces manual effort and frees up valuable time for you to focus on your business.

    Different payment methods with Quickbooks Bill Pay

    Now that you’re up to speed, let’s explore two payment methods you can use when setting up pay bills in QuickBooks:

    Pay bills with a credit card or cash

    QuickBooks Bill Pay gives you the freedom to pay bills using credit cards or cash. This flexibility lets you choose the best payment method for your needs and financial strategy.

    Using credit cards gives you extra time before funds leave your account, a plus for managing cash flow. On the other hand, cash payments are great for immediate business expense budgeting.

    Pay bills with a check

    For those who prefer traditional payment methods, QuickBooks also lets you easily pay bills by check. 

    This method is useful for transactions that require physical proof of payment or for vendors who do not accept electronic payments.

    Read on to learn how to record bill payments with credit card, cash, and check. By the end, you’ll know precisely how to pay a bill in QuickBooks Online.

    How to enter or edit payment information

    A great first step when learning how to pay bills in QuickBooks Online is to establish your payment terms and information. 

    QuickBooks Bill Pay makes it easy to enter, view, and edit a vendor’s payment details. This means you can confidently keep your payments on track and your vendor information up-to-date. 

    To enter or edit payment information in QuickBooks:

    1. Log in to your QuickBooks Online account. 
    2. In the “Banking” tab, select “Add Account” to connect your bank account. 
    3. Click on the “Expenses” tab in the left menu bar. 
    4. Under “Manage Vendors,” click on “New Vendor” and enter their information, such as contact details, name, and payment terms. 
    5. In “Settings,” select “Account and Settings.” 
    6. Go to “Expenses,” then “Bills and Expenses,” and activate “Make payments.”
    7. Select “Set up bank transfers” for your vendor, input their bank account info, and fill in the required fields.
    8. Click “Save.”

    Once you’ve entered your payment details, you’re ready to learn how to pay a bill in QuickBooks Online. 

    How to find and manage your unpaid bills

    While it’s not as exciting as watching revenue come in, setting up pay bills in QuickBooks also involves tracking and handling your unpaid bills.

    Luckily, managing all your bills in QuickBooks Online is a smooth process. In just a few steps, you can view, sort, and pay outstanding bills. This convenient payment processing cuts manual work and helps you avoid any late payment fees.

    To find and manage your unpaid bills:

    1. Log in to QuickBooks Online.
    2. Select “Bills” under the “Expenses” tab. 
    3. Use the tabs: “For review,” “Unpaid,” and “Paid” to organize bills. Let’s break them down:

    For review

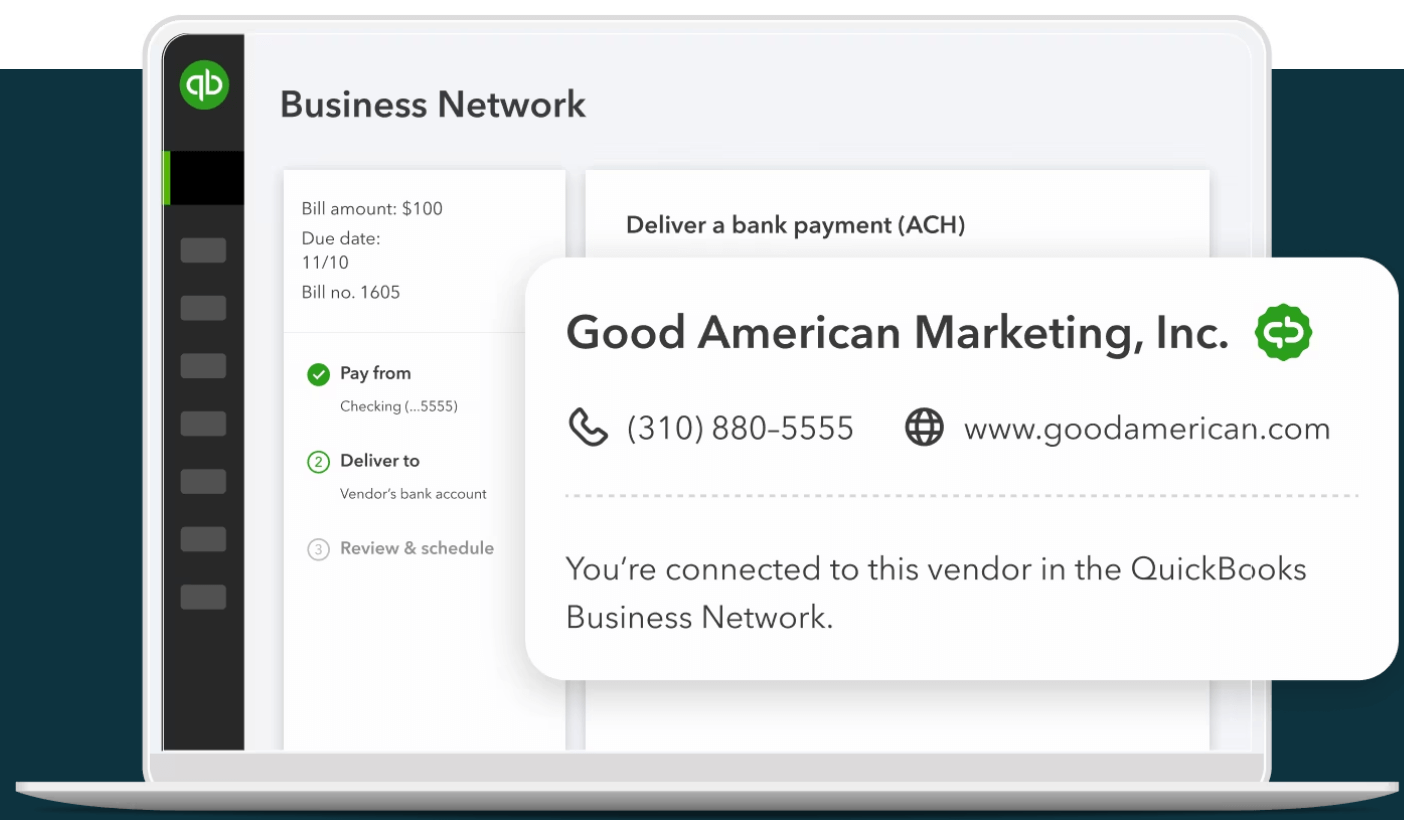
    “For review” displays bills awaiting your review, including those from the QuickBooks Business Network.

    Clicking “Review” lets you check bill details for accuracy. From there, you have the option to save them under “Unpaid” or schedule them for payment.

    Hitting “Save” automatically moves the bill to “Unpaid,” or “Paid” if the amount due is $0.00.

    Unpaid

    “Unpaid” shows all your bills you haven’t paid yet. You have a few options here.

    For one, you can “Schedule payment” using a QuickBooks-connected bank or credit card to easily transfer funds.

    If you’ve already made an online payment for a bill outside of QuickBooks, you can click “Mark as paid” to move it to the proper tab.

    Finally, the “View/Edit” option lets you see and adjust the bill’s details. Once you’re happy with your changes, you can select “Save” or “Save and schedule payment” depending on the action you want to take.

    Paid

    The “Paid” tab displays all your settled bills and their linked payments, with the option to view details. This is a great area to monitor and assess your payment history to inform cash flow management and operational performance.

    Wish you could get more from QuickBooks? Method makes it possible.

    How to schedule bill payments with Quickbooks Bill Pay

    A key aspect of setting up pay bills in QuickBooks Online is scheduling payments. This feature keeps your business’ financial commitments in line while removing the hassle of manual follow-ups.

    In a nutshell, scheduling bill payments lets you automate your payment process. You can schedule payments days in advance, which is especially useful for recurring payments.

    Here’s how you can accomplish this: 

    1. Sign in to QuickBooks Online.
    2. Go to “Expenses,” then “Bills.”
    3. Create a new bill or select an existing bill screen.
    4. Choose “Schedule Payment” or “Save and Schedule Payment.”
    • For new bills, you can schedule directly with the “Save and Schedule Payment” option.
    • To schedule payments for unpaid bills, access the “Expenses,” “Vendors,” or “Bills” tab. This allows you to locate unpaid bills in the system and establish their payment schedules. 
    1. Pick a bank account and “Edit” the payment amount if needed.
    • To add an account, connect to your bank online or enter its details manually. QuickBooks will send two small deposits to the account within three days for verification. 
    1. Select an account from the “Payment account in QuickBooks” dropdown list, or add a new one.
    2. Click “Next.”
    3. Choose your payee’s preferred payment method (i.e., a bank transfer or print check) and provide the necessary details.
    4. Set a “Withdrawal date,” up to 90 days in the future.
    5. Click “Next.”
    6. Review and confirm the details, then click “Schedule payment.” Use “Back” to edit more or “Cancel” if you’ve changed your mind.

    Note: QuickBooks Bill Pay currently only supports payments in USD.

    And that’s it! QuickBooks will send you a confirmation email once it completes the payment. 

    How to record bill payments in QuickBooks Online

    When learning how to pay bills in QuickBooks Online, scheduling and recording bills are two different processes. Scheduling plans for future expenses, while recording keeps track of what you’ve already spent. 

    Recording bill payments is crucial for reconciling your accounts. It ensures that your financial records always give a complete picture of your business’ spending. 

    Record partial or full payments towards bills

    QuickBooks Online lets you record full and partial payments.

    For those unfamiliar, a partial bill payment involves paying a portion of the bill now and the rest later. This is quite common in business scenarios, especially when customers are tight on funds.

    Making partial payments strengthens your relationships with vendors by fostering good faith. Even when you can’t pay the full bill immediately, regular installments show vendors you are committed to paying what you owe them. Plus, it’s a smart way to distribute your expenses, giving you more control over your cash flow.

    QuickBooks offers two easy ways to record payments, depending on if you use:

    • Credit cards or cash.
    • Check.

    Let’s explore each option. 

    Paying by cash or credit card

    To record cash and credit card payments towards a bill, follow these simple steps:

    1. Click “+ New.”
    2. Choose “Pay bills.”
    3. Select the “Payment account” from the drop-down menu.
    4. Optional: If you’re using a checking or savings account, input the “Starting check no.”
    5. Enter the “Payment date.”
    6. Check off the bills you’re paying.
    7. In the “Payment” column, enter the payment amount for each bill. You can apply credit here if available.
    8. Click “Save.”

    Paying by check

    To record check payments towards a bill, follow these steps:

    1. Click “+ New.”
    2. Select “Check.”
    3. Choose the vendor from the “Payee” drop-down menu.
    4. Select “Add” to add an open bill to the check. If not visible, click the small arrow near the amount. You can also add credit from the “Credits” section.
    5. Select the payment account from the “Bank/Credit account” dropdown list.
    6. In the “Amount” field, enter the check amount.
    7. In the “Outstanding Transactions” section, choose the bills covered by the payment. Tip: To split the payment among multiple bills, check the corresponding boxes and enter all amounts in the “Payments” column. 
    8. If you want, you can print the check here. Once you’re done, hit “Save and close.”

    To sum up, QuickBooks Online simplifies bill payments, offering full and partial payment options to manage cash flow and maintain vendor relationships.

    Enhance the power of QuickBooks with Method

    Method is the #1 lead-to-cash automation tool for QuickBooks and Xero users. It makes running your business with QuickBooks even easier thanks to its two-way, real-time sync. This means accurate and up-to-date financials, fewer mistakes, and more time for you to spend on value-adding activities.

    What’s more, is that Method’s automation capabilities speed up and simplify your payment process for a better bottom line.

    See how Method gets you paid sooner.

    Image credit: Karolina Grabowska via Pexels
    wooden cube blocks showing the numbers 2023

    2023 year in review: Method’s top product updates

    Discover the best of Method in 2023: from two-factor authentication to expanding Method:Field Services for Xero.

    2023 year in review: Method’s top product updates Read More »

    As the year winds down, it’s time to reflect on the incredible journey we’ve had at Method in 2023. It’s been a year of growth, innovation, and — most importantly — enhancing our product to better serve you.

    From introducing new, robust security measures to expanding our existing products, let’s dive into the top nine features that took Method to new heights this year.

    1. Stepping up security with 2FA

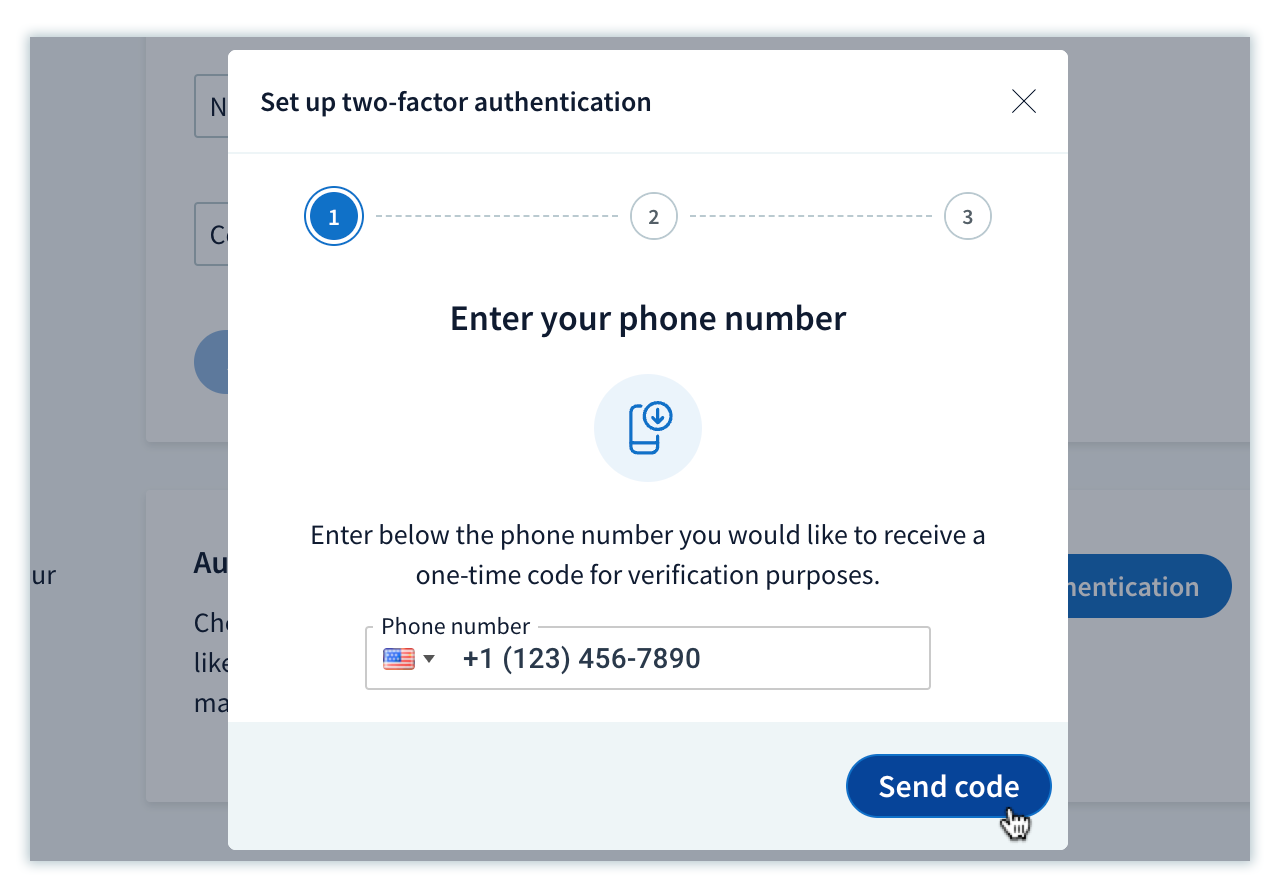
    Two-factor authentication setup showing a box to enter your phone number to send the code to.

    This year marked a significant leap in our security protocols. Here at Method, we understand the importance of safeguarding your data. And with 2FA, we’ve added an extra layer of security to your Method account. Learn more about setting up 2FA and rest easy knowing your information is safer than ever.

    2. Effortless repeat purchases with a single click

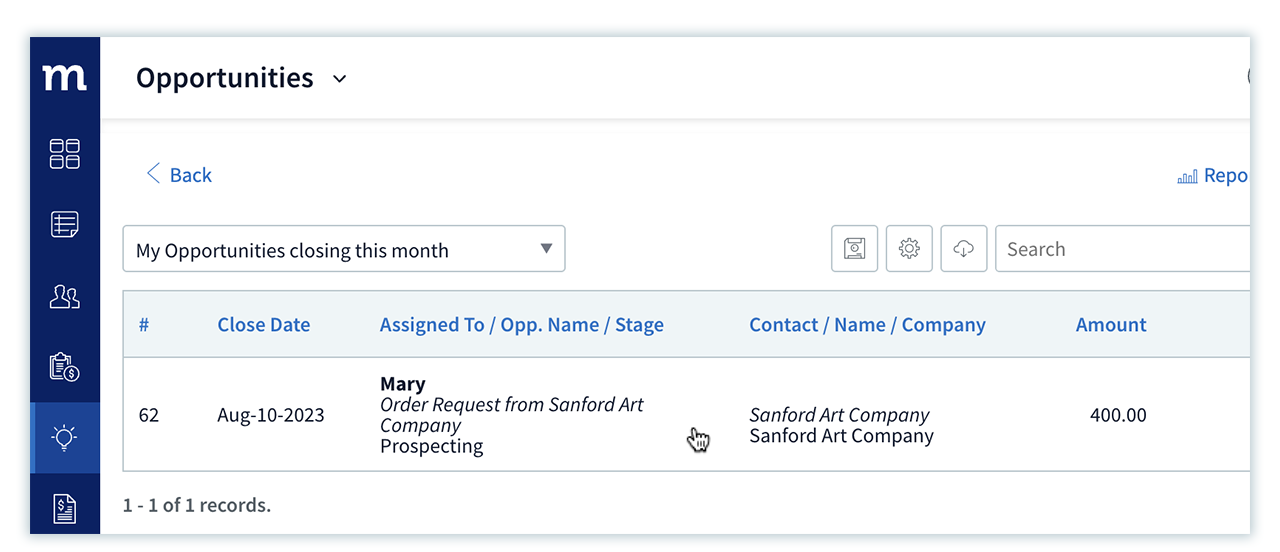
    Repeat purchase request shown in a table from a customer from Sanford Art Company

    We’re thrilled to announce our new repeat purchase functionality in the Method customer portal. This update makes repurchasing your products a breeze. As a result, you:

    • Simplify your workflow. 
    • Save valuable time.
    • Speed up cash flow.

    Say goodbye to the hassle of manually copying transactions. Your customers can simply hit the “Create order request” button on the bottom-right of their invoices, sales receipts, or lists of previously purchased items. 

    Once you approve the order requests, just sit back and watch as the repeat orders rain in!

    3. Get swift approvals and deposits from customer portals

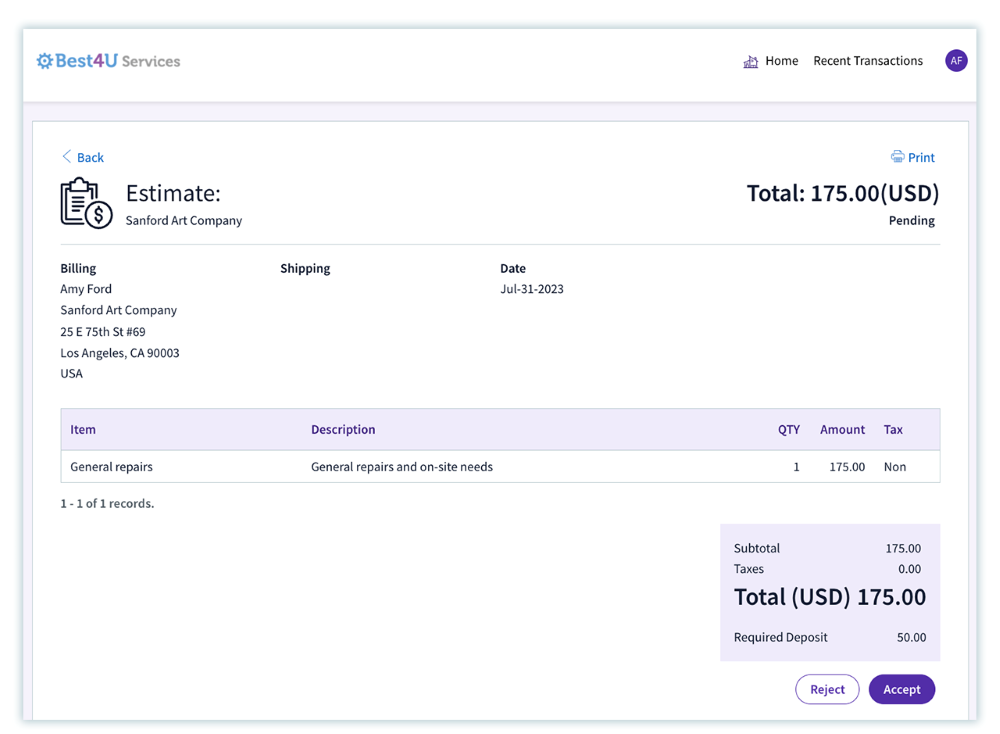
    An estimate from the Sanford Art Company showing an approval with a deposit to be sent to a customer for approval for the service of general repairs.

    Some more great news: our new swift approvals and deposits are a game-changer. Your clients can now easily approve estimates through your Method customer portal, simplifying the approval process and speeding up projects. 

    You also have the option to add an upfront deposit requirement to your estimates. Your customers can pay this conveniently through the customer portal, ensuring smooth transactions for a better bottom line.

    The best part? When an estimate moves to the next stages — whether it’s converted into a work order, then an invoice, or into an invoice directly — Method automatically factors in the upfront deposit to simplify your billing process.

    Now, you can manage client approvals and deposits for estimates with clarity and efficiency.

    4. Method:Field Services meets Xero

    A computer and a mobile showing screenshots of Method:Field Services

    Method:Field Services is now available for Xero users! Previously exclusive to QuickBooks, this updated platform now offers top-notch field service management for Xero loyalists, including:

    • A two-way sync with your Xero software to reduce manual data entry and paperwork.
    • Simplified scheduling and dispatching for efficiency and customer satisfaction.
    • Integrated invoicing and payments for quick billing and a healthier cash flow.
    • A field service mobile app for on-the-go access to schedules and customer info.  

    Really, Method:Field Services’ integration with Xero is more than an update — it’s a transformation for your field service workflow.

    5. Get the story behind your numbers with Chart Builder

    Animated image of a chart in Method

    Our new Chart Builder turns your data into visual, easy-to-understand insights. With charts that are as intuitive as they are functional, you can now start creating visuals that speak volumes. Here are some of the Chart Builder’s fresh, new functions:

    • Real-time preview: Watch your chart take shape instantly with every tweak. 
    • Expand charts: Magnify individual charts, which is especially beneficial if your dashboards are brimming with multiple data visualizations.
    • Stories behind the stats: Click on any data point and explore the underlying records to understand your data better. 
    • Revamped user interface: A sleek, user-friendly interface for you to build charts in no time. 

    6. Discover Hub to navigate workflows with ease

    Discover Hub showing the 'create invoice' and 'payment collection' missions.

    Introducing the Discover Hub — your new ally in mastering Method! This latest feature provides interactive demos, including tips and tricks to guide you through your new processes. 

    With intuitive modules, every step is clear and manageable. Whether you’re tackling invoice-creation or simplifying payment collection, this hands-on approach ensures that you stride through your Method journey with confidence. Stay tuned for more!

    7. Easier, smoother, better proposal payments

    A payment pre-authorization box which requests payment card details.

    This year, we’ve also made significant updates to proposal payments. Now, you can easily add and change payment methods on recurring proposals. 

    Plus, your customers can now update their payment methods via the guest portal. Here, they also have access to service agreements and proposal details. And with automated email alerts for payment issues, staying on top of your finances has never been easier.

    With these key updates, get ready for seamless transactions and a hassle-free 2024.

    8. Internal notes to keep your team in sync

    Internal notes box showing a dropdown to select a recipient along with notes and attachments to be added.

    Earlier in 2023, Method was thrilled to introduce a feature that makes internal communication among your field crew more efficient than ever. You now have the ability to add and view notes to your work orders. 

    You also get full control over who you send these notes to, and they’ll get an email with a link to see it and respond. It’s that simple! 

    This addition for your team keeps everyone in the loop and on the same page. It’s all about making teamwork as seamless as possible.

    9. SMS reminders for smarter dispatching

    Method dialogue box that asks to notify customer regarding a work order.

    And there’s more to come! We’re rolling out SMS dispatch reminders to transform how you communicate with your customers. This update focuses on efficiency to take your customer service to the next level.

    This means no more disruptive phone calls or slow emails. SMS hits that sweet spot of being both quick and convenient. Ideal for technicians who deal with time-sensitive matters and are always on the move, SMS communications provide the flexibility necessary to keep up. 

    With this addition, you can expect: 

    • Fewer missed appointments. 
    • Faster approval processes.
    • Happier customers.

    As we close off the year, we’re filled with gratitude for the opportunity we’ve had to improve Method in ways that resonate with your needs. Looking forward, we’re even more excited to continue this journey of evolution. Growing alongside your success is at the heart of everything we do. 

    Image credit: Thapana Onphalai via Vecteezy

    Man working on computer at construction site

    What are the best construction CRM software 2024?

    Do you want to speed up your lead-to-cash process? Find out which construction CRM software is the best fit for you.

    What are the best construction CRM software 2024? Read More »

    Staying ahead of the curve in the construction industry requires more than just bricks and mortar. You need a robust system to effectively manage your projects and relationships. 

    Enter construction CRM software, a business system designed to streamline operations and set construction professionals on the path to success. 

    But with so many options, how do you decide which software provider to go with? In this blog, you’ll delve into the world of construction software, tackling:

    • Why you need construction CRM software.
    • The key features to look out for.
    • Your top 5 options.
    • How to make the right choice for your business.

    Let’s get started!

    What is construction CRM software?

    Construction CRM (customer relationship management) software is a specialized platform tailored for the construction industry. It centralizes and simplifies key processes, letting construction companies efficiently organize, manage, and track everything from leads to projects. 

    As a comprehensive solution, it helps with: 

    • Customer service and support.
    • Project management. 
    • Estimating and invoicing.

    The best construction CRM also offers customization options for specialty contractors that you can tailor to your needs.

    Use a CRM that works the way you do.

    Benefits of using construction CRM software

    Streamline processes

    One of the primary advantages of construction CRM software is its ability to streamline processes for efficiency.

    It features personalized dashboards that organize your processes in one place, whether its:

    • Managing sales pipelines.
    • Coordinating teams.
    • Scheduling projects.

    This simplifies tasks and makes it easier for you to plan, control, and monitor your projects. 

    Automation

    Construction CRM software automates repetitive tasks, freeing up valuable time for your team to focus on more pressing issues. 

    You can automate all sorts of tasks, such as:

    • Bidding on jobs.
    • Sending estimates and invoices.
    • Handling customer support requests.

    With workflow automation, you optimize your operations so that projects progress smoothly — from bids to completion.

    Enhanced organization

    Construction projects involve tons of information, from details about contracts and subcontractors to estimates and proposals. 

    Luckily, construction software enhances the organization of tasks and resources, ensuring that you’re securely storing your data in a way that’s easy to navigate, update, and visualize. 

    Meet deadlines

    Meeting deadlines is crucial in the construction industry, as delays lead to increased costs and strained customer relationships. 

    CRM software enhances communication and collaboration, helping you effectively:

    • Track time.
    • Schedule your team.
    • Monitor progress.
    • Allocate resources.

    As a result, this improves the process of meeting deadlines for your construction company. 

    Selling opportunities

    Construction CRM software lets you manage and track leads so you can analyze them better and act on selling opportunities. With capabilities to forecast, estimate, and report, you can: 

    • Prioritize leads. 
    • Collaborate on proposals. 
    • Enhance your sales process. 

    This increases your chances of securing new prospects and helps you build lasting relationships with clients.

    Sick of endless paperwork and missed payments?

    Key features of construction CRM software

    As a construction professional, you need to know how to manage your customers, jobs, and workflows efficiently. 

    Fortunately, construction software is tailored to the unique needs of home builders, remodelers, and other industry professionals. Let’s explore the key features you need.

    Automation of repetitive tasks

    One of the standout features of construction CRM software is its ability to automate repetitive tasks. This streamlines processes for efficiency, saving you valuable time and money. 

    Without you raising a finger, automation performs your regular business activities, including:

    • Sending out marketing emails.
    • Generating invoices.
    • Syncing contacts.

    Document management and time tracking

    Like it or not, every construction job involves managing documents, from contracts to site plans. CRM software gives you a centralized, online space to store and manage your project information. This ensures easy access and navigation as it organizes and tracks project documents automatically.

    Plus, with the software’s integrated time-tracking features, you’ll gain real-time, 360-degree visibility into your operations to ensure your team is carrying jobs within their specified timelines.

    Sales pipeline tracking and reporting

    Managing sales pipelines effectively is crucial for growth. CRM software excels in this domain, offering tools that help in analyzing your current processes and needs. 

    Intuitive reporting and analytics keep you ahead of the curve, letting you: 

    • Monitor your sales progress.
    • Strengthen customer interactions.
    • Gain actionable insights.

    Project management tools

    Construction management software provides tools for effective project management, letting you schedule, coordinate, and communicate with your teams easily. 

    Also, it sources the right vendors and streamlines project management to ensure that everything runs smoothly from start to finish.

    Customization options for specialty contractors

    Every construction job is unique, and so are specialty contractors’ needs. Whether you’re a remodeler looking to integrate specific apps or a contractor wanting to customize their workflow, you can tailor your construction software to fit your exact requirements. As a result, you optimize your operations and deliver personalized service.

    Advanced workflow automation features

    Software with automation functionality simplifies tedious work like administrative tasks, ensuring that all your team members are on the same page.

    Workflow automation seamlessly connects the different stages of a project and links your various business functions together.

    Get time back to focus on growth with Method.

    Selecting the top construction CRM software of 2024

    The market is flooded with CRM software options. To simplify your search, we’ve curated a list of the top construction CRM software that aids in understanding the range of available features in the market. 

    Here are your five top choices based on their reviews, development features, and ability to cater to the construction industry.

    Method CRM

    Up first on our list is Method, the #1 CRM for QuickBooks and Xero users. It offers advanced process automation that saves you money and time. For example, it manages sales pipelines and reporting to optimize your performance and maximize cash flow. 

    Also, Method’s two-way sync with your accounting software eliminates double data entry and keeps your information current and accurate. Plus, its mobile app makes it the perfect choice for construction teams on the go.

    Method offers three affordable pricing plans and a free trial, so you can test it out before committing. 

    HubSpot CRM

    HubSpot product shot
    Image credit: HubSpot

    Image credit: Hubspot

    As one of the most popular business systems out there, HubSpot CRM is renowned for its comprehensive approach to customer relationship management. 

    It offers a wide variety of features for you to pick from, creating “hubs” for an all-in-one business system.

    A plus for construction teams is that HubSpot is available on both mobile and web, ensuring easy access for users on the go. 

    Zoho CRM

    Image credit: Discover CRM

    Zoho CRM has carved a niche for itself through an emphasis on boosting sales and marketing operations. It helps in analyzing current processes and needs, letting you tailor your strategies for maximum impact. 

    Zoho stores and manages project information effectively and ensures easy integration with other systems. This makes it a versatile choice for construction companies looking to boost efficiency.

    TopBuilder

    Image credit: TopBuilder

    As its name suggests, TopBuilder is tailored for the construction industry. It simplifies the management process, letting you focus on what you do best: building. 

    With its user-friendly interface, managing and tracking time becomes a breeze. TopBuilder also facilitates advanced workflow automation, ensuring that tasks are coordinated efficiently from start to finish.

    Insightly

    Image credit: Capterra

    Last but not least, Insightly has received rave reviews for its unique approach to CRM. It’s known for its impressive set of tools that boost selling opportunities and increase efficiency. 

    For construction companies, its built-in project management functions and mobile app are big selling points.

    Guidelines to choose the right construction CRM software for your business

    It’s clear that construction software is an indispensable asset in this competitive landscape. But with so many options available, choosing the right one is tough. Here are some guidelines to help you make an informed decision.

    Analyze your current processes and needs

    Before diving into the vast ocean of CRM software, it’s crucial to take a step back and analyze your current processes and needs. Understand where your business stands and what gaps you need to fill.

    Do you need a system that boosts selling opportunities? Or one that manages and tracks time effectively? By identifying your specific requirements, you can narrow down your search and find a solution tailored to your unique needs.

    Understand the range of available features in the market today

    The CRM market is brimming with features to help construction businesses succeed. From advanced analytics to project management tools, the options are great—but overwhelming. 

    It’s essential to familiarize yourself with the range of available features in the market today. This gives you a clearer picture of what’s possible and helps you identify features that align with your business goals.

    Know your budget and research pricing models carefully

    Budgeting is a critical aspect of any business decision, and choosing a CRM software is no exception. It’s essential to set a clear budget and stick to it, even if that means making compromises. 

    Don’t just look at the upfront cost. Dive deep and research the various pricing models available to you. Some software offer a subscription-based model, while others have a one-time licensing fee. 

    Look for a user-friendly interface and easy integration with other system

    Time is money in the construction industry, and you don’t want to spend it navigating a complicated system. Look for software that provides a user-friendly interface, ensuring that your team can get up and running in no time. 

    Additionally, in today’s interconnected world, it’s crucial to choose a CRM that integrates with other systems, such as: 

    • Accounting software.
    • Project management tools.
    • Communication platforms.

    Key takeaways

    The right CRM system can be the difference between a project’s success and its downfall. Construction CRM software keeps your team happy and optimizes your operations. Platforms like Method simplify your workflows through:

    • Project management tools. 
    • Process automation.
    • Improved customer engagement.
    • Reporting and analytics.

    As you explore your options, consider your construction business’ unique needs and how each software caters to them. With the right choice, success is just around the corner.

    FAQs

    How does construction CRM software boost productivity?

    Construction CRM software boosts productivity as it is designed to: 

    • Simplify business processes. 
    • Centralize information.
    • Manage and track time.
    • Automate repetitive tasks. 

    Not to mention, the software assists in budgeting and careful research of pricing models, ensuring your projects stay within financial constraints. 

    What kind of support can users expect from construction CRM software providers?

    Most construction CRM software providers understand the complexities of the construction industry and offer robust support to ensure smooth operations. Users can expect: 

    • Regular software updates. 
    • 24/7 customer service. 
    • Training sessions and tutorials. 

    The aim is to make it as easy as possible to leverage the full potential of the software and address any issues promptly. 

    How does CRM software impact communication within a construction company?

    CRM software improves internal communication within a construction company by centralizing project-related information. This ensures that your team members, subcontractors, and stakeholders have access to the same data. 

    With features like real-time updates, messaging platforms, and notification systems, the software ensures that crucial information is relayed promptly. This transparency helps businesses to succeed in their endeavors by eliminating misunderstandings and ensuring everyone is on the same page.

    Find the perfect fit for your construction business. Start your free trial of Method.

    Image credit: Daenin via Adobe Stock

    Contractor standing behind a desk full of files

    Top 5 best construction resource management software systems 2024

    Construction resource management software manages your tasks so you finish projects on time and in budget. Find out what the top systems are!

    Top 5 best construction resource management software systems 2024 Read More »

    Staying on top of resource allocation, task management, and project planning is challenging for construction businesses. This is where construction resource management software comes into play. It supports your day-to-day operations to increase your business’ productivity and profitability.

    In this article, you’ll explore: 

    • What construction software is. 
    • How it impacts your business operations with scheduling, resource allocation, and tracking capabilities.
    • Key features to keep your eye out for. 
    • The top solutions for 2024, based on features and user reviews.

    You’ll also see the role it plays in the construction industry, its impact on project delivery, and future trends that are shaping the landscape.

    What is construction resource management software?

    Construction resource management software is a powerful tool for contractors that enhances project efficiency and facilitates team collaboration. It acts as a central hub for all project-related information, allowing teams to use time effectively and increase productivity. This software:

    • Optimizes resource allocation. 
    • Automates scheduling. 
    • Provides real-time tracking and reporting.
    • Boosts communication among teams.

    Benefits of using construction resource management software

    • Streamlines task management: Staying organized is crucial for a small construction business. This software simplifies task management by providing a centralized platform to assign, prioritize, and update tasks. This ensures everyone is on the same page and working towards common goals.
    • Optimizes resource allocation: An efficient use of resources is the cornerstone of successful construction projects. This software allows you to analyze your productivity to allocate equipment, materials, and labor based on availability, ensuring you use resources effectively and meet budgets.
    • Automates scheduling: We’re past the days of manual scheduling. This software automates the scheduling process and manages project timelines to help you meet deadlines.
    • Provides real-time tracking and reporting: With the ability to monitor and track project progress through mobile apps, you can make informed decisions on the spot. This software generates detailed reports with valuable real-time insights for construction project managers and stakeholders.
    • Boosts communication among teams: Effective communication is vital in the construction industry. This software enhances communication by providing tools for team members to collaborate, share information, and prioritize tasks.

    Types of construction resource management software

    There are two main types of software: cloud-based solutions and on-premise solutions.

    Cloud-based solutions

    This software allows for cloud-based storage and access and offers the advantage of accessibility from anywhere in the world. It allows teams to collaborate seamlessly, even if they are not in the same physical location. 

    On-premise solutions

    On-premise solutions, on the other hand, are installed on your company’s servers and accessible only from your physical office, so offline access is possible. While they provide more control over your data, they do not offer the same accessibility as cloud-based solutions.

    Exploring key features of construction resource management software

    To fully understand the capabilities of construction resource management software, let’s get into some key features.

    Project scheduling

    Setbacks are common in the construction industry, so the nature of construction requires efficient project scheduling to meet deadlines and stay on budget. This software allows you to keep stakeholders aligned and working toward the same goal by: 

    • Creating precise timelines for every task and identifying roadblocks.
    • Prioritizing tasks based on deadlines and available resources.
    • Efficiently communicating updates on the job site.

    Project documents and document management

    This software simplifies document management by providing a centralized location for all project-related documents. As a result:

    • Essential information is easily accessible to authorized team members.
    • Manual tasks like data entry are reduced. 
    • Version control improves so you don’t work on outdated documents or rely on incorrect information.
    • You can organize your information efficiently without needing a physical archive.

    Task management

    Construction projects often involve overlapping tasks and priorities. Software coordinates task assignment based on dependencies, resource availability, and timelines, so nothing falls through the cracks.

    Team collaboration and communication tools

    Collaboration among team members is streamlined with built-in communication tools. Share updates, assign tasks, and communicate instantly so everyone is on the same page.

    Real-time data tracking and reporting

    Monitor project progress in real-time and generate detailed reports to evaluate performance and make data-driven decisions.

    The pivotal role of construction resource management software in the construction industry

    Construction resource management software supports financial control, enhances project efficiency, facilitates collaboration between participants, and simplifies procurement processes. It also ensures that all project stakeholders, from project managers to contractors, work efficiently to drive project success.

    Successful construction companies need to avoid resource wastage, which often happens when task coordination and scheduling are not optimal. Construction software increases profitability by reducing labor costs and material wastage.

    How resource management streamlines management processes

    Resource management simplification

    Construction resource management software simplifies the complex task of resource allocation by keeping track of resource availability. In turn, project managers and contractors can ensure that equipment, materials, and labor are used optimally to minimize waste and cost overruns.

    Gantt chart timeline utilization

    Image credit: Motion

    Project managers can manage Gantt chart timelines with ease to kickstart dependent tasks and identify possible roadblocks in each process. The visual representation of project schedules helps in prioritizing tasks and resources effectively.

    Progress visualization techniques

    Visualizing project progress through graphs and dashboards makes it easier to identify bottlenecks and make necessary adjustments. It also supports improved collaboration among team members by enabling them to flag roadblocks and ask for help when needed.

    Tasks comments and attachments management

    Detailed task comments and attachments help teams work effectively, ensuring that everyone has access to essential project information and speeding up project updates.

    Online notifications for efficiency

    Notifications keep team members updated about task assignments, changes, and updates, promote efficiency, and reduce communication gaps.

    Enhanced financial control

    Effective financial control is essential for the success of any construction project. Construction resource management software lets you manage budgets, track costs, and forecast expenses accurately so that you can assign a realistic budget to each task

    Export and sharing capabilities

    This software facilitates export and sharing of data and reports, which is key for collaboration with clients, stakeholders, and team members.

    Strategic project planning

    You can plan future projects with an analysis of project data. This helps you avoid repeating inefficient processes and increases your productivity.

    Top construction resource management software of 2024

    In 2024, several construction resource management software solutions stand out for their effectiveness in enhancing construction project management. Users have given them great reviews, and a number of people rely on them to manage their businesses. Below are the top picks.

    Method:Field Services

    Method:Field Services is a highly-rated construction management software that is versatile and user-friendly. This tool is designed to streamline lead-to-cash workflows from estimate creation to deposit collection and job scheduling. It is particularly beneficial for small construction companies that need to improve their customer experience and operations. It also offers a free trial.

    Key features

    • Project management: Method:Field Services provides a centralized platform for managing construction projects. You can create, assign, and track work orders, ensuring that a job progresses smoothly.
    • Scheduling: Along with other notable features, Method:Field Services helps you create detailed project schedules and construction times. Its scheduling tools help you allocate resources effectively, ensuring that projects are completed on time and in budget.
    • Fieldwork management: With this cloud-based software, you can track the progress of your team and communicate with them in real-time.
    • Client Relationship Management (CRM): From nurturing potential clients to receiving payments and approvals for jobs Method:Field Services makes sure that you tend to your clients’ needs.
    • Customization: Tailor Method:Field Services to your specific needs, all without having to code! You can create custom fields, workflows, and reports to mold the software to your unique business processes.
    • Two-way real-time sync: Method:Field Services integrates with existing systems such as QuickBooks and Xero to simplify data transfer and ensure all your systems work together. This integration will help you with estimation, pricing, and profitability analytics. 

    GanttPro

    Image credit: GanttPro

    GanttPro is a robust construction project management software that excels in efficient scheduling and resource allocation. Its primary strength lies in its visual representation of project timelines through Gantt charts, which makes project planning and tracking intuitive.

    Key features

    • Gantt chart visualization: GanttPro’s standout feature is its user-friendly Gantt chart interface. It allows you to easily manage project timelines, making allocating resources, assigning tasks, and prioritizing work simple.
    • Collaboration: The software supports collaboration in larger teams by allowing them to view and update project timelines. This promotes transparency and ensures that everyone is on the same page.
    • Resource management: GanttPro provides tools for resource allocation, helping you assign team members, equipment, and materials to specific tasks.
    • Progress tracking: This tool enables progress visualization with features that let you identify delays or bottlenecks and make necessary adjustments to keep the project on track.

    RedTeam

    Image credit: RedTeam

    RedTeam is a comprehensive construction management solution that covers resource tracking, financial management, and document control. It caters to the specific needs of construction businesses, making it an excellent choice for contractors looking to simplify their operations.

    Key features

    • Project tracking: RedTeam allows you to monitor progress, costs, and schedules. This helps you make informed decisions and keep projects in budget.
    • Financial management: Managing finances in construction is critical, and RedTeam excels in this area. It supports invoicing, cost and budget tracking, and estimating so your projects remain financially viable.
    • Document control: Keeping track of construction documents is made easy with RedTeam. It offers document management tools that centralize all project-related documents, which improves data accuracy and accessibility.

    Autodesk Build

    Autodesk Build product shot

    Image credit: Autodesk Build

    Autodesk Build is a cloud-based construction management platform that offers end-to-end project management capabilities. It stands out for its design software, making it a valuable tool for construction companies looking for a seamless design-to-construction workflow.

    Key features

    • Project management: Autodesk Build provides comprehensive project management tools that cover everything from document control to subcontractor management. It assists in project planning, helps you create a construction resource management plan, and offers a centralized platform to track and manage all project-related information.
    • Design software: One of its unique strengths is its design software. This feature allows for a smooth transition from design to construction, ensuring that design plans are seamlessly implemented and updated on the go.
    • Collaboration: The software promotes collaboration among project stakeholders, allowing them to share information and updates in real time. This fosters efficient communication and guarantees that everyone is aligned with project objectives.
    • Quality management: Autodesk Build tracks issues and supports workflows to resolve them without delaying the project. This ensures that the final product is up to par with your client’s standards and expectations.
    • Safety control: This system allows you to communicate safety measures to your construction crews to avoid workplace accidents and support workers’ well-being.

    Jobber

    Image credit: Jobber

    Jobber is a field service management software tailored for small businesses in the trades industry. It offers features for scheduling, dispatching, and client management, making it an excellent choice for companies looking to simplify their operations and provide top-notch service.

    Key features

    • Scheduling: You can assign tasks to your construction teams, optimize routes, and schedule appointments.
    • Client management: It includes features for managing client information, such as contact details, construction agreements, and communication logs. This helps you provide personalized service, maintain strong client relationships, and create a good customer experience.
    • Invoicing and payments: You can create and send invoices, track payments, and provide multiple payment options to your clients.
    • Dispatching: For field service operations and job site activities, dispatching is crucial. Jobber’s dispatching tools help you assign jobs to your team members, ensuring that they have all the information and materials they need to complete tasks efficiently.
    • Mobile access: Construction crews can access Jobber through an app on their mobile devices, enabling them to view job details, navigate to job sites, and update progress in real time.

    These top construction resource management software offer a range of features to cater to the diverse needs of small construction businesses. Whether you need robust project management, efficient scheduling, financial control, or field service management, a software solution can help you simplify your operations and enhance project efficiency.

    As technology continues to evolve, the construction industry is also undergoing significant changes. Here are some future trends that will shape the landscape of construction resource management.

    Increased adoption of technology

    The construction industry is embracing technology at an unprecedented rate. From drones to advanced software solutions, technology is transforming how construction companies operate.

    Use of advanced building materials

    The use of advanced and sustainable building materials is on the rise. Construction resource management software is crucial in tracking and managing these materials efficiently, given that procuring and using them can entail the creation of new techniques and workflows that outperform manual methods.

    Growing prominence for modular construction

    The housing crisis in North America encourages modular construction approaches, which involve prefabricating building components in a factory. Construction resource management software supports the planning of modular construction approaches by supporting the creation of new kinds of workflows.

    Emphasis on sustainable practices

    The construction industry now promotes sustainable practices, given that non-renewable resources will become less available over time. This calls for an industry that accommodates advanced building materials. Construction software solutions will aid in monitoring and implementing sustainable practices, such as energy-efficient building designs and materials.

    Better workers’ safety measures

    Worker safety is paramount in construction. Software aids in workers’ safety measures by: 

    • Tracking safety protocols. 
    • Reducing accidents. 
    • Ensuring a safe working environment.

    Key takeaways

    Construction resource management software is a game-changer for construction businesses looking to enhance project efficiency, facilitate team collaboration, and streamline management processes. Planning your days around priorities and establishing workflows will help you build an excellent foundation for your growing business.

    A software solution can be a great ally in your journey to increase profitability, providing you with the tools to implement the changes you want for your business. Communicating better with your team and fulfilling tasks when needed can make a huge difference.

    By optimizing resource allocation, automating scheduling, providing real-time visibility and reporting, and boosting communication among project teams, this software empowers businesses to thrive in the competitive world of construction.

    Frequently asked questions (FAQs)

    How does construction resource management software impact project delivery?

    Construction resource management software improves project delivery by enhancing efficiency, streamlining communication, and providing real-time detailed tracking and reporting. 

    It ensures that resources are allocated optimally, reducing delays and cost overruns. It also empowers project managers and contractors to use all the available resources as best as possible.

    These improvements ultimately help you provide your clients with more realistic costs and delivery dates and create an accurate roadmap of what needs to happen to deliver on time.

    What is the difference between cloud-based and on-premise solutions?

    Cloud-based solutions are accessible from anywhere via the internet and promote collaboration among remote teams. On-premise solutions are installed on company servers and offer more control over data but may lack accessibility. As technology becomes more advanced, cloud-based solutions increase in popularity.

    Future trends in construction, such as increased technology adoption, modular construction, and sustainable materials, are shaping construction resource management by calling for workflows that include new construction techniques and material providers.

    Grow your business, not your stress. Watch free demo

    Image credit: Pexels
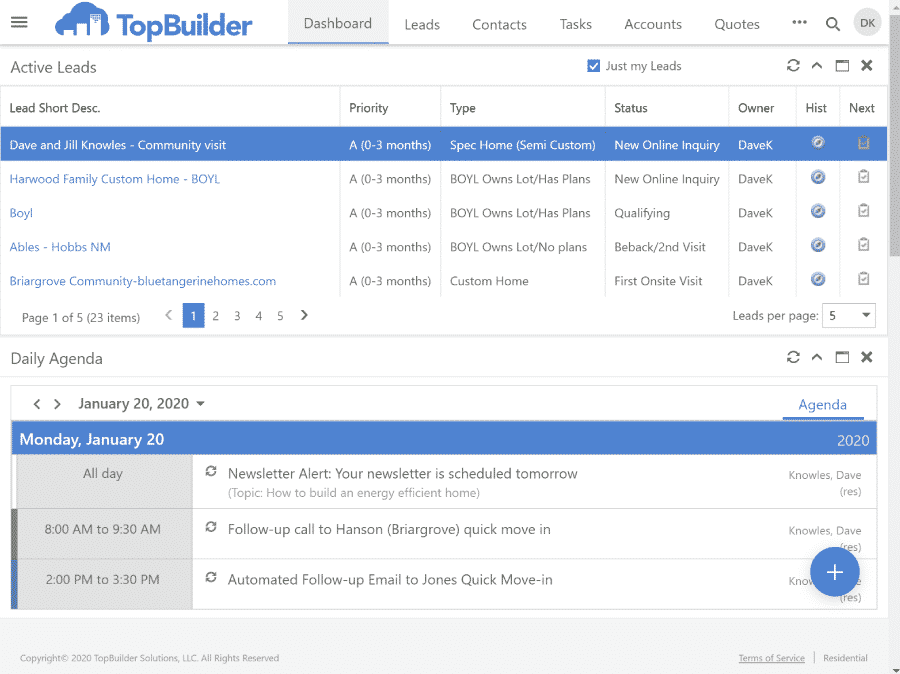
    Woman smiling while working on computer

    Top 5 best CRM apps and why your small business needs it

    As your customer base grows, take advantage of every sales opportunity with a CRM app and provide an unforgettable customer service.

    Top 5 best CRM apps and why your small business needs it Read More »

    Efficiently managing customer relationships is vital for the success of your small business. 

    CRM (customer relationship management) apps are important tools to simplify this process. But, choosing the right one for your business is daunting. 
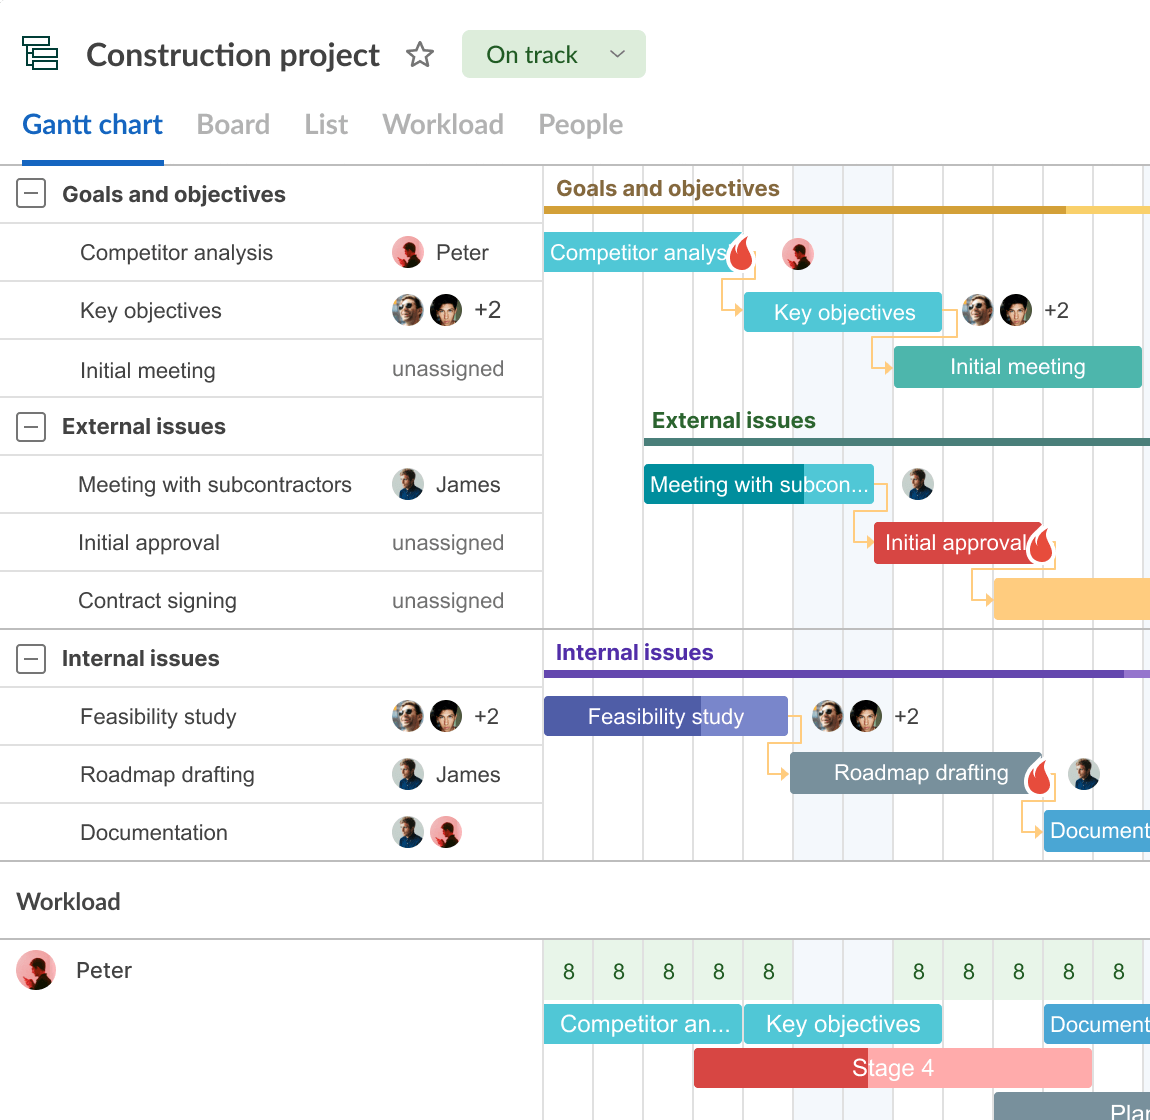
    Let’s explore your top five CRM picks to help you make the best choice.

    Keep reading to learn how a CRM app:

    • Saves you time and money.
    • Streamlines sales processes.
    • Enhances customer service.

    Let’s get started!

    What is a CRM app?

    A CRM app helps you organize, manage, and track interactions with your current customer base and potential new customers. 

    CRM apps automate processes to reduce the chance of human error. They also centralize your customer data, which provides better control over sales activities. 

    Best of all, a good CRM allows easy syncing with other apps like QuickBooks or Xero to fill the gaps in your operations.

    Importance of CRM apps for small businesses

    Why CRM matters for your small business

    Our research indicates that 85% of customers contacting your business for support expect you to know some details about them (like purchase history, preferences, etc.). So, having quickly accessible information about them is essential.

    Instead of hiring more staff to pick up the phone, CRM software automates your customer service with 24/7 online portals and chatbots to answer common questions. After all, you shouldn’t need a large team to pick up the slack. 

    That’s why you should let a CRM do the heavy lifting, so your people can focus where they’re needed most.

    Benefits of using a CRM app

    A CRM software automates repetitive tasks in a way that increases overall business efficiency. 

    It lets you analyze data from across your various platforms to give you reports that measure progress. By better understanding your customers, you can tailor marketing and sales strategies to leverage every opportunity.

    The best CRM software lets you:

    • Create self-service 24/7 customer portals.
    • Instantly send confirmation emails upon payment.
    • Centralize information in a way that simplifies contact management.
    • Automatically track commissions.
    • Instantly convert estimates to invoices.
    • Capture electronic signatures in QuickBooks.

    Understanding the sales process in a CRM app

    Setting up the sales process in a CRM app

    To set up your sales process, you’ll want to first list and plan for all its stages from lead generation to closing deals. Staying organized and prepared from the beginning provides a clear path for sales progression. 

    Then, assign specific tasks and reminders to each stage to ensure your sales teams can seamlessly collaborate on sales opportunities.

    Remember that some CRM offers customizable features if the stock software can’t do everything you require.

    Automating the sales process with a CRM app

    You can handle certain repetitive tasks like invoice reminders and online document approval with workflow automation tools. 

    By automating your entire sales pipeline, you can optimize the time your company spends on priority tasks. With hundreds of daily tasks on your plate, CRM software is something that will ease your burden.

    Utilizing the features of a CRM app to improve your sales process

    A CRM ensures consistency across your platforms so that information never slips through your fingers. It consolidates information for your sales reps, so they don’t need to spend extra time communicating with contacts. You can even set up notifications that update your clients in real time.

    Analyzing your sales data with a CRM app

    CRM software offers you powerful tools to better understand your sales data, such as customer preferences and buying patterns. It pulls insights from your other business software and compiles it for a bird’s eye view of all your data. 

    CRMs help companies identify trends with a sales forecast report for a targeted marketing campaign. Many options offer marketing automation features such as introductory emails. A clear understanding of sales metrics ensures informed decision-making for your business’ profits.

    Building and managing your sales team with a CRM app

    To make the best of your CRM software, you’ll also want to improve the efficiency of your sales team. You can track performance and promote communication between cross-functional teams for a faster lead-to-cash process.

    When managing a sales team, CRM software:

    • Increases sales team productivity.
    • Provides a unified view of customer interactions.
    • Improves data analysis and reporting.
    • Optimizes lead tracking.

    Assigning tasks to your team members with a CRM app

    A CRM app serves as a centralized place for you to effortlessly and automatically assign tasks to your team members. By defining specific roles, you can ensure that no leads fall through the cracks.

    Tracking performance of your team members with a CRM app

    As a manager, maintaining detailed oversight of your team’s work allows for better tracking of individual responsibilities and contributions. For example, some CRMs provide an automatic commission tracker to boost operational efficiency.

    Managing your sales pipeline with a CRM app

    CRM software offers a variety of automations and tools to help your team engage with customers.

    Creating and managing your sales pipeline with a CRM app

    A CRM app helps in pipeline management, from lead acquisition to conversion. Plus, it lets you organize this information visually to simplify your business processes and improve transparency. A team that knows where each customer is in the sales process knows how to move forward at all times.

    Automating the flow of leads through your pipeline with a CRM app

    Shorten your sales cycle by automating leads’ progression through the sales pipeline. By ensuring timely interactions, you foster a positive experience and drive customer loyalty. This also leaves more time for your company to spend on value-adding tasks.

    Analyzing the performance of different stages in your pipeline with a CRM app

    CRM software enhances customer relationship management to give you a better understanding of your sales pipeline and prevent potential bottlenecks. The results are smoother and more effective sales funnels, where you aren’t wasting time with unproductive tasks.

    Comparison of top CRM apps

    Method CRM

    Is your business already using QuickBooks or Xero? If so, Method is the best CRM for you. 

    It boasts a seamless integration with your accounting software so you can track leads in real time. 

    And, if your business requires a unique feature not included in the app, Method’s no-code platform lets you customize your experience without needing to hire a developer. 

    Method also scales to accommodate your small business as it grows, so you won’t need to rely on makeshift solutions or spend a lot of time migrating your data.

    Pros

    • Two-way, instant data sync with QuickBooks and Xero.
    • Drag-and-drop, no-code capabilities.
    • Online portals for 24/7 customer convenience.
    • Offers robust third-party integrations with Zapier, Outlook, Google, and more.
    • Totally customizable with one hour of free customization included.

    Cons

    • Only available in English.
    • Limited to QuickBooks and Xero users.

    FreshSales

    Overview of a "Leads" page on FreshSales CRM software interface. It shows a lead's account information and recent history of calls.

    Image credit: Mailshake

    FreshSales is a comprehensive platform with an intuitive interface that makes it easy for small teams to start with. 

    It supports multiple languages and currencies for businesses that function internationally and comes in at an attractive price point. 

    With advanced analytics features, it’s a great option for small businesses. However, companies that plan to grow will find its sales tools limiting.

    Pros

    • Intuitive user interface.
    • Advanced analytics reports.
    • Affordable plans.

    Cons

    • Weak customization options relative to competitors.
    • Hard limit of 1000 contacts for marketing actions.
    • You cannot create multiple pipelines.

    HubSpot CRM

    HubSpot product shot

    Image credit: HubSpot

    HubSpot is a popular CRM with unique key features that make for good collaboration between teams. With team inboxes, you can share notes and communicate with fewer meetings. 

    Plus, HubSpot has a large third-party marketplace to add CRM tools you might be missing. Courses are also available through their HubSpot Academy service for further education. 

    However, some businesses may find limitations in HubSpot’s analytics reporting and restrictions on custom fields.

    Pros

    • Easy-to-navigate dashboard with an intuitive design.
    • Selective pricing plan lets you choose features you will use and pay for.
    • HubSpot Academy offers courses and certificates.

    Cons

    • Strict limit of 1,000 custom fields.
    • Limited customization for different industries.
    • Analytics reports are not as detailed as competitors.

    Pipedrive

    Pipedrive screenshot

    Image credit: Pipedrive

    Pipedrive is an affordable CRM made for entrepreneurs and small businesses starting with their first CRM. Its interface is easy to navigate with minimal training. 

    However, it has a limited capacity to grow with your business, meaning you may need to transfer customer data to another CRM in the future.

    Pros

    • Easy to pick up and use daily.
    • Low-cost plans.
    • Customizable, drag-and-drop interface.

    Cons

    • Limited capacity to handle rapid business growth.
    • Customization options are not comparable to other CRMs at a similar price point.
    • Doesn’t separate leads from contacts, making it difficult to tell the difference between potential customers and paying ones.

    Zoho CRM

    Screenshot of Zoho CRM dashboard.

    Image credit: DiscoverCRM

    Zoho facilitates task assignment and follow-ups with a range of features for businesses of all shapes and sizes. It competes primarily with Salesforce and light enterprise solutions. 

    With advanced customization options, Zoho centralizes communications with its users for and leverages them with its reporting features. 

    While it has many strengths, some users find the app bloated with features they won’t need. Learning to use the app may take additional time as a result.

    Pros

    • Online portals for 24/7 customer convenience.
    • Detailed reports.
    • Personalized customer journeys.

    Cons

    • Customization has a steep learning curve without a strong customer support team.
    • Limited custom fields in the basic plan.
    • All-in-one solution requires purchase of additional tools.

    How to choose the best mobile CRM for you

    Evaluating CRM functionality and features

    Before deciding on a CRM, you need to evaluate your business needs and align your choice with the gaps in your operations.

    For example, are you planning on accessing your customer data on the go? Then you need a CRM with a mobile app

    Make a list of bottlenecks in your sales process — even those that you may not believe have a solution. You might be surprised while trialing a CRM at what you can simplify or automate.

    Considering CRM program integrations and add-ons

    CRM apps connect with other platforms to accomplish what they can’t on their own. Integrations let your business coordinate various processes from sales to customer service. 

    By using add-ons that let you monitor sales performance metrics or schedule tasks, for example, you can predict trends and make informed decisions.

    Assessing customer and tech support

    Excellent customer support makes a huge difference in your CRM experience. Many CRM companies offer web-based support platforms, making it easy to access resources or personalized assistance. 

    A web support page or help desk drastically reduces downtime by providing solutions to common problems. A CRM provider that can handle issues in a timely manner is important to getting the most out of your solution.

    Understanding app pricing

    Pricing varies between CRM products. Most operate using a paid subscription model, charging per user per month. The cost of your app typically reflects its ability to offer advanced features. 

    When selecting a business CRM, it’s best to find one that has features you know you’ll use so you aren’t paying extra.

    Key takeaways

    CRM apps are an important part of modern customer management, so finding the best one for your business is crucial. 

    In terms of essential features you need in a CRM app, look for software that:

    • Automatically syncs with your other platforms and devices.
    • Offers a free trial so you can test it before committing.
    • Lets you mobilize data from all of your platforms.
    • Enables real-time updates.
    • Facilitates on-the-go access.
    • Improves team collaboration.

    CRM app FAQs

    What makes a CRM app different from a CRM software?

    CRM software is an all-encompassing term that refers to the technology you use to organize contact data. On the other hand, a CRM app is a smaller aspect of your software system that performs a specific function.

    How to ensure the security of your data in a CRM app?

    CRM apps are generally more secure than other software, as they require password protection to access. Excel spreadsheets or other desktop-only programs are accessible to  anyone on your computer, as they store your data on the hard drive.

    A cloud-based CRM with a unique password facilitates secure data storage and management. You should also give each user their own seat within your app so users aren’t sharing account access. This also helps operational transparency and accountability.

    What are some common mistakes to avoid when using a CRM app?

    Your CRM will only work for you if you use its tools effectively. To make the most of your investment, make sure you:

    • Customize the app to fit your sales process.
    • Train your team so everyone knows how to use it.
    • Use the analytics features as part of your marketing plan.
    • Find a solution that supports mobile integration if you’re on the go.

    Following these guidelines will make your CRM app a vital part of your business strategy!

    Get your hands on a top CRM system with your free trial of Method CRM!

    Image credit: Patrick Tomasso via Unsplash.