
Last updated: April 28, 2026
In QuickBooks Desktop, you can edit an invoice template directly from the Manage Templates window, adjusting everything from your logo and colors to column layout and custom fields. The process takes just a few steps and any changes apply automatically to future invoices.
This guide covers how to edit, customize, and update templates, plus how to troubleshoot common issues like greyed-out options or permission errors.
Note for 2026: Intuit stopped selling new QuickBooks Desktop licenses in September 2024, and support for the 2023 version ends May 31, 2026. The steps here still apply to existing users.
Key takeaways
- To edit a template, go to Customers > Create Invoices > Formatting > Manage Templates, select your template, and open Basic Customization.
- For deeper changes — columns, fields, headers, footers — click Additional Customization inside the Basic Customization window.
- Always duplicate a template before editing it. Changes apply to future invoices only, not ones already sent.
- If editing options are greyed out, check your user permissions or switch to single-user mode under File > Switch to Single-User Mode.
- You can’t edit the email message on an existing template; you need to create a new one.
- QuickBooks Desktop 2023 loses support on May 31, 2026, which affects payroll and bank feeds, not just invoicing.
QuickBooks Desktop can handle basic invoice template edits. If you need more control over the workflow around invoicing, like customer follow up, approvals, or payments, tools like Method can extend what QuickBooks can do.
2026 update: Is QuickBooks Desktop discontinued?
The current status of QuickBooks Desktop in 2026
QuickBooks Desktop is still available, but Intuit stopped selling new licenses for Pro Plus, Premier Plus, and Mac Plus on September 30, 2024. Now, the platform runs on a subscription model, and Intuit is phasing out support on a version-by-version basis.
QuickBooks Desktop 2023 reaches end of support on May 31, 2026. Existing users can continue operating, but it’s worth knowing this before you invest time in customizing templates.
QuickBooks Desktop discontinuation timeline:
- 2023: support ended for 2020 versions
- 2024: stopped selling for new licenses
- 2025: support ended for 2022 versions
- 2026: support ends for 2023 versions
- 2027: support to end for 2024 versions
What is a QuickBooks invoice template?
A QuickBooks invoice template is a pre-designed format used to create consistent, professional invoices within QuickBooks. It automatically includes key details like your business information, products or services, payment terms, and due dates, so you don’t have to build each invoice from scratch.
These templates reduce your manual work and eliminate issues around human error, so you end up with easy, polished invoices that suit your business needs, including:
- Information regarding your products or services.
- Your terms of payment, including accepted methods of payment, currency, and the due date.
- Any additional necessary information.
Additionally, QuickBooks invoice templates keep everything neatly in one location.
These templates come prepped and ready to use, but you still have the flexibility to tailor them to your preferences through design or layout modifications.
With QuickBooks Desktop invoice templates, you can:
- Enhance client satisfaction.
- Foster strong customer bonds.
- Add credibility to your invoices.
Now, let’s find out how to edit an invoice template in QuickBooks Desktop!
How to edit an invoice template in QuickBooks Desktop
Figuring out how to edit QuickBooks invoice templates is quite straightforward when you follow five simple steps:
- Step 1: Launch QuickBooks and navigate to the “Customers” menu. Then, select “Create Invoices.”
- Step 2: Find the “Formatting” tab at the top of the window and click it. A drop-down menu will open; choose “Manage Templates.”
- Step 3: The “Manage Templates” window will display a list of all available invoice templates. Browse through your options, choose the one you want to change, and then click “OK.”
- Step 4: Once you’ve selected a template to edit in QuickBooks, the “Basic Customization” window appears. Add your business logo and make any visual adjustments that align your invoice’s look with your branding. For more advanced options, click “Additional Customization.”
- Step 5: After fine-tuning your template, click “OK” to save your changes. Any QuickBooks Desktop invoice templates you create will be available indefinitely for all future invoices.
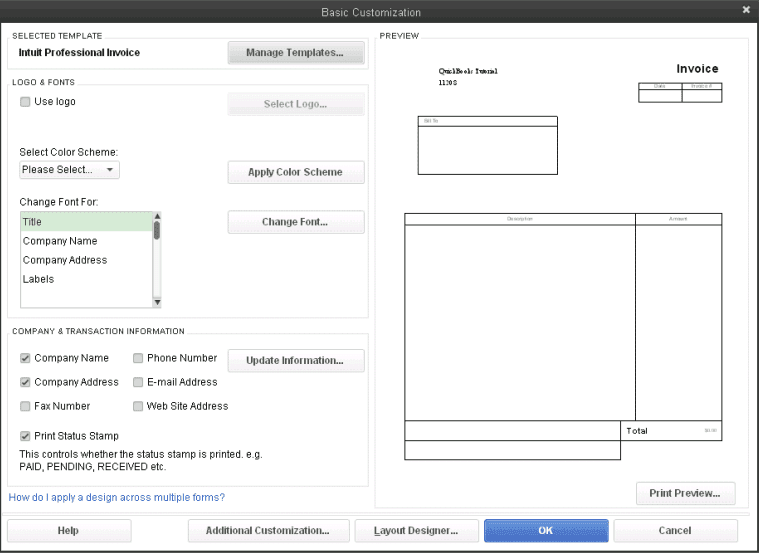
Image credit: QuickBooks Tutorial
If you’re looking to edit an invoice template in QuickBooks Online instead, check out this guide.
Are there pre-designed QuickBooks Desktop invoice templates that I can use?
Yes, QuickBooks Desktop comes with a variety of pre-designed invoice templates. These templates range from simple and professional layouts to more elaborate designs. So, you can choose one that best fits your business’s needs.
How to change an invoice template in QuickBooks Desktop
If you’re wondering how to change a Quickbooks Desktop invoice template, here’s how:
- Step 1: While creating or editing an invoice, click on the “Customize” button at the top of the invoice window.
- Step 2: Select “Manage templates” and choose a different template from the list.
- Step 3: Click “OK” to apply the new template to your invoice.
Pro Tip: If you use multiple invoice templates, set a default template for consistency. This avoids accidentally sending invoices with the wrong format or branding.
How to change an invoice email template in QuickBooks Desktop
Here are the steps to change an invoice email template in QuickBooks Desktop:
- Step 1: Under “Edit,” click “Preferences” and then “Send Forms.”
- Step 2: Choose the “Company Preferences” tab and select the “Email Templates” button.
- Step 3: Select “Invoice” from the template list and click “Edit.”
- Step 4: Customize the email template to your preferences, then click “OK” to save your changes.
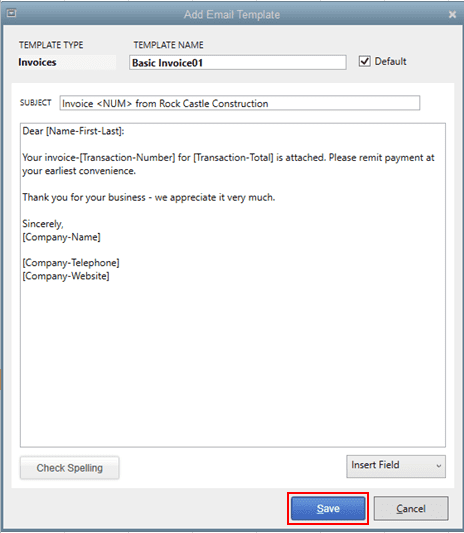
Image credit: QuickBooks
How to customize an invoice in QuickBooks Desktop
Here’s how you can customize your QuickBooks invoices:
- Step 1: Launch QuickBooks Desktop and open your company file.
- Step 2: From the top menu bar, go to the “Customers” menu and select “Create Invoices.”
- Step 3: At the top of the “Create Invoices” window, click on the “Formatting” tab. A drop-down menu will appear.
- Step 4: Select “Manage Templates.” Choose the template you want to modify and click “OK.”
- Step 5: The “Basic Customization” window opens after choosing a template.
- Step 6: If you want advanced options, click “Additional Customization.” Here, you can customize your invoice’s header, columns, footer, and more.
- Step 7: Preview your customizations to see how your invoice will look. When you’re satisfied, click “OK” to save your changes.
Pro Tip: Use Print Preview after making changes to catch spacing or alignment issues. Some layout changes don’t appear exactly the same until you preview or print the invoice.
Once you’ve created a Quickbooks customize invoice template, you can select it from the template drop-down menu at the top of the invoice screen.
Customizing your invoices not only helps you stay consistent with your branding. It also makes things clearer and more informative for your clients.
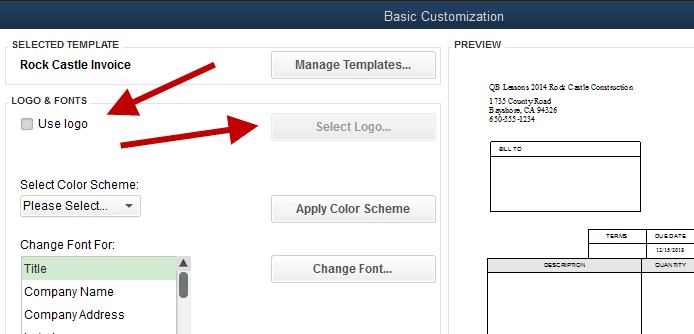
Image credit: QBK Accounting
How to update an existing invoice template in QuickBooks Desktop
Follow these steps to update an existing template:
- Step 1: Open QuickBooks Desktop and go to the Customers menu, then select Create Invoices.
- Step 2: In the invoice window, click Formatting, then choose Manage Templates.
- Step 3: From the list, select the template you want to update and click OK.
- Step 4: In the Basic Customization window, make visual updates such as logo, colours, or fonts.
- Step 5: For structural changes, click Additional Customization. Here, you can update fields, columns, headers, and footers.
- Step 6: Click OK to save your changes. The updated template will now apply to all new invoices that use it (but it won’t change existing invoices).
Pro tip: If you’re making substantial changes, duplicate your template first in the Manage Templates window. This gives you a backup in case you need to revert to the original.
How to change the company name in QuickBooks Desktop
If your company undergoes a name change, it’s essential that you update it in QuickBooks.
To do so, follow the five steps we’ve detailed below:
- Step 1: Open QuickBooks Desktop and go to the Company menu.
- Step 2: Select My Company.
- Step 3: Click the Edit (pencil icon) in the Company Information window.
- Step 4: Update your company name and any other relevant details.
- Step 5: Click OK to save your changes.
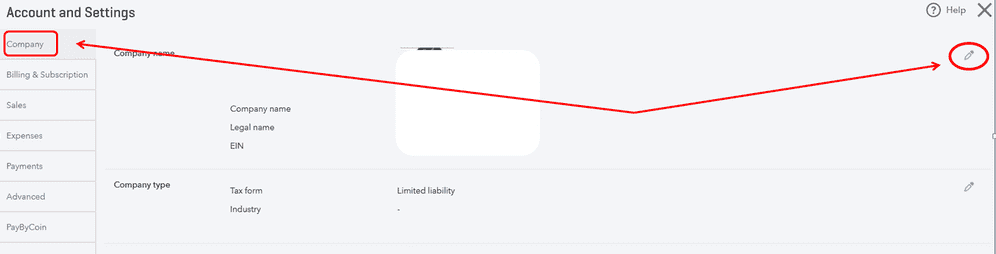
Image credit: Connectier
Consider alternatives for custom invoices in QuickBooks Pro and Premier
Because QuickBooks Desktop Pro Plus, Premier Plus, Mac Plus, and Enhanced Payroll are no longer available since September 30th, 2024, it’s crucial to explore alternatives that let you customize invoices.
That said, this change only affects new sales in the U.S. Existing QuickBooks Desktop users can continue their operations uninterrupted, with ongoing access to updates and support from Intuit.
Need more flexibility than QuickBooks Desktop offers?
QuickBooks Desktop covers basic invoice template edits, but it starts to feel limited when you need tighter control over approvals, customer communication, payment collection, or the steps around invoicing.
If you want to keep QuickBooks as your accounting system, Method adds more control around the work QuickBooks does not fully handle on its own, like managing estimates, invoices, payments, customer records, and sales workflows in one place with a two-way sync back to QuickBooks.
How to change the invoice message in QuickBooks Desktop
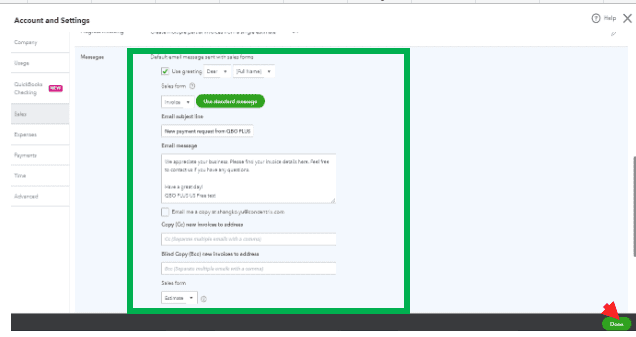
Image credit: QuickBooks
In QuickBooks Desktop, there are two different message areas you may want to change: the message that appears on the invoice itself and the email message used when sending the invoice.
To change the email message for invoices in QuickBooks Desktop:
Step 1: Open QuickBooks Desktop.
Step 2: Go to Edit, then select Preferences.
Step 3: Select Send Forms, then open the Company Preferences tab.
Step 4: From the Email Templates dropdown, choose Invoices.
Step 5: Select Add Template to create a new invoice email template, or choose an existing template to update if available in your version.
Step 6: Customize the subject line and message body. You can also insert dynamic fields, such as customer name or due date.
Step 7: Save your changes and set the template as the default if you want QuickBooks to use it automatically.
To change the message that appears directly on the invoice form:
Step 1: Go to the Customers menu, then select Create Invoices.
Step 2: Open or create the invoice you want to update.
Step 3: Find the Customer Message field near the bottom of the invoice.
Step 4: Choose an existing message from the dropdown, or select Add New to create a new one.
Step 5: Save the invoice.
So, changing invoice messaging in QuickBooks Desktop is possible, but it can be confusing because the invoice form message and invoice email message are managed in different places.
QuickBooks Desktop vs QuickBooks Online invoice templates
If you’re comparing your customization options across both platforms, here’s how they stack up:
| Feature | QuickBooks Desktop | QuickBooks Online |
| Customization depth | Advanced (header, columns, footer via Additional Customization) | Moderate (Design, Content, and Email tabs) |
| Template switching | Manual, via Manage Templates | Easier, via Custom Form Styles |
| Logo and branding | Supported | Supported |
| Font and colour control | Basic options | More presets and style options |
| Preview before sending | Print Preview only | Preview PDF before saving |
| Custom fields | Supported | Limited |
| Multiple templates | Supported | Supported |
| Email template editing | Available (with limitations) | More straightforward |
| Mobile access | Not available | Available |
Both platforms support invoice customization, but QuickBooks Desktop gives you more structural control (custom fields, granular column editing, and detailed header and footer options) making it the stronger choice if you need invoices that match a specific format or workflow.
QuickBooks Online is the better fit for most small businesses today: it’s easier to use, accessible on mobile, and offers a cleaner design experience even if the customization depth is shallower. Given that Intuit has stopped selling new Desktop licenses, Online is also the more future-proof option for anyone not already locked into Desktop.
QuickBooks Desktop limitations (2026)
Pro Tip: Is your version of QuickBooks Desktop approaching end of support? It’s worth auditing which features you rely on most. Payroll and bank feeds go offline when support ends, which affects more than just invoicing.
As we covered above, QuickBooks Desktop is still available in 2026, but it has moved to a subscription model, and Intuit is phasing out support on a version-by-version basis.
What’s currently happening:
- QuickBooks Desktop 2023 loses support on May 31, 2026.
- No new desktop licenses have been sold since September 30, 2024.
- Existing users can continue on their current version with updates and support from Intuit until their version’s end-of-support date.
When support ends for your version, you’ll lose access to:
- Payroll features
- Bank feeds
- Security patches
In the comparison table above, we mentioned that email template customization on Desktop has more limits than QuickBooks Online.
Here are a few examples:
- You can’t edit the email message on an existing template; you have to create a new one.
- Design options are more basic compared to QuickBooks Online.
- There’s no mobile access to edit or send invoices on the go.
Common mistakes to avoid
Pro Tip: When in doubt, create a copy of your template before making changes. You can do this in just a few seconds, and this small step can save you hours of backtracking.
- Editing the default template instead of duplicating it first: If you change the default template and something goes wrong, you lose your original. Always copy before editing.
- Not saving changes properly: After making customizations, you need to click OK in both the customization window and any sub-windows. Closing without saving discards your work.
- Confusing layout edits with content edits: Basic Customization controls the visual design: logo, colour, font. Additional Customization controls the structure: fields, columns, header, and footer. These are separate layers.
- Editing a template that’s actively in use without checking for in-progress invoices: Changing a template updates it going forward, but won’t alter invoices that have already been created or sent.
- Changing the company name on an invoice manually instead of updating it in Company Settings: Any manual change applies to that invoice only and won’t carry forward.
Troubleshooting if you can’t edit your invoice template
If the editing options are greyed out or unavailable, a few things could be causing this roadblock.
Here are the first troubleshooting steps to take to fix things:
- Permission issues: QuickBooks Desktop uses user roles to control access. If you’re not logged in as the Admin or a user with Full Access permissions, some customization options may be restricted. Log in as Admin and try again.
- Working in the wrong menu: Some users end up in the wrong customization window. Make sure you’re going through Formatting > Manage Templates from within an open invoice, not through Lists > Templates, as the two paths offer slightly different options.
- File restrictions: If your company file is in multi-user mode, certain editing functions may be restricted. Switch to single-user mode (File > Switch to Single-User Mode) and try again.
- Template is locked or read-only: If the template was originally imported or is tied to a version restriction, it may not be editable. In this case, create a new template from scratch and apply it.
How to change the invoice template in QuickBooks Desktop: FAQs
Where are templates stored in QuickBooks Desktop?
Templates are stored within your QuickBooks company file (.QBW), rather than being saved as separate files on your computer. This means they’re backed up whenever you back up your company file.
Why can’t I edit my invoice template?
The most common reasons QuickBooks users can’t edit their invoice templates are:
- Permission restrictions
- Being in multi-user mode
- Trying to edit a template that is locked or read-only
Check your user permissions, switch to single-user mode, and confirm you’re accessing templates through the correct menu path. We also cover more troubleshooting steps in the article above.
How do I edit terms in Quickbooks Desktop?
To edit terms in QuickBooks Desktop, go to Lists > Customer & Vendor Profile Lists > Terms List, then double-click the terms you want to update. Adjust the due date, discount, or payment period fields and click OK to save your changes.